Configuring DHCP policies
Configuring DHCP Policies
DHCP policies in Microsoft DHCP enable to create conditions that dictate how IP addresses and configuration settings like Options, Custom options and dynamic DNS settings are assigned to clients based on specific criteria. The DHCP server delivers these specific settings to clients that match these conditions. This feature enhances flexibility and control over the DHCP service, allowing for more granular management of network resources.
Key Concepts:
- Policy-Based Assignment:
- DHCP policies allow for the assignment of IP addresses and options based on predefined conditions.
- Policies can be applied at the scope level or server level, enabling broad or targeted configurations.
- Conditions:
- Conditions specify the criteria that a DHCP client must meet for the policy to apply.
- Common conditions include MAC address, vendor class, user class, relay agent information, and more.
- Settings:
- Once a condition is met, specific settings or options can be assigned to the client.
- Settings can include IP address ranges, lease duration, DNS server addresses, gateway addresses, and other DHCP options.
Defining DHCP policies for Microsoft DHCP servers via DDI Central enables you to apply specific configurations to DHCP clients based on various criteria. Here’s a detailed guide on how to configure these policies:
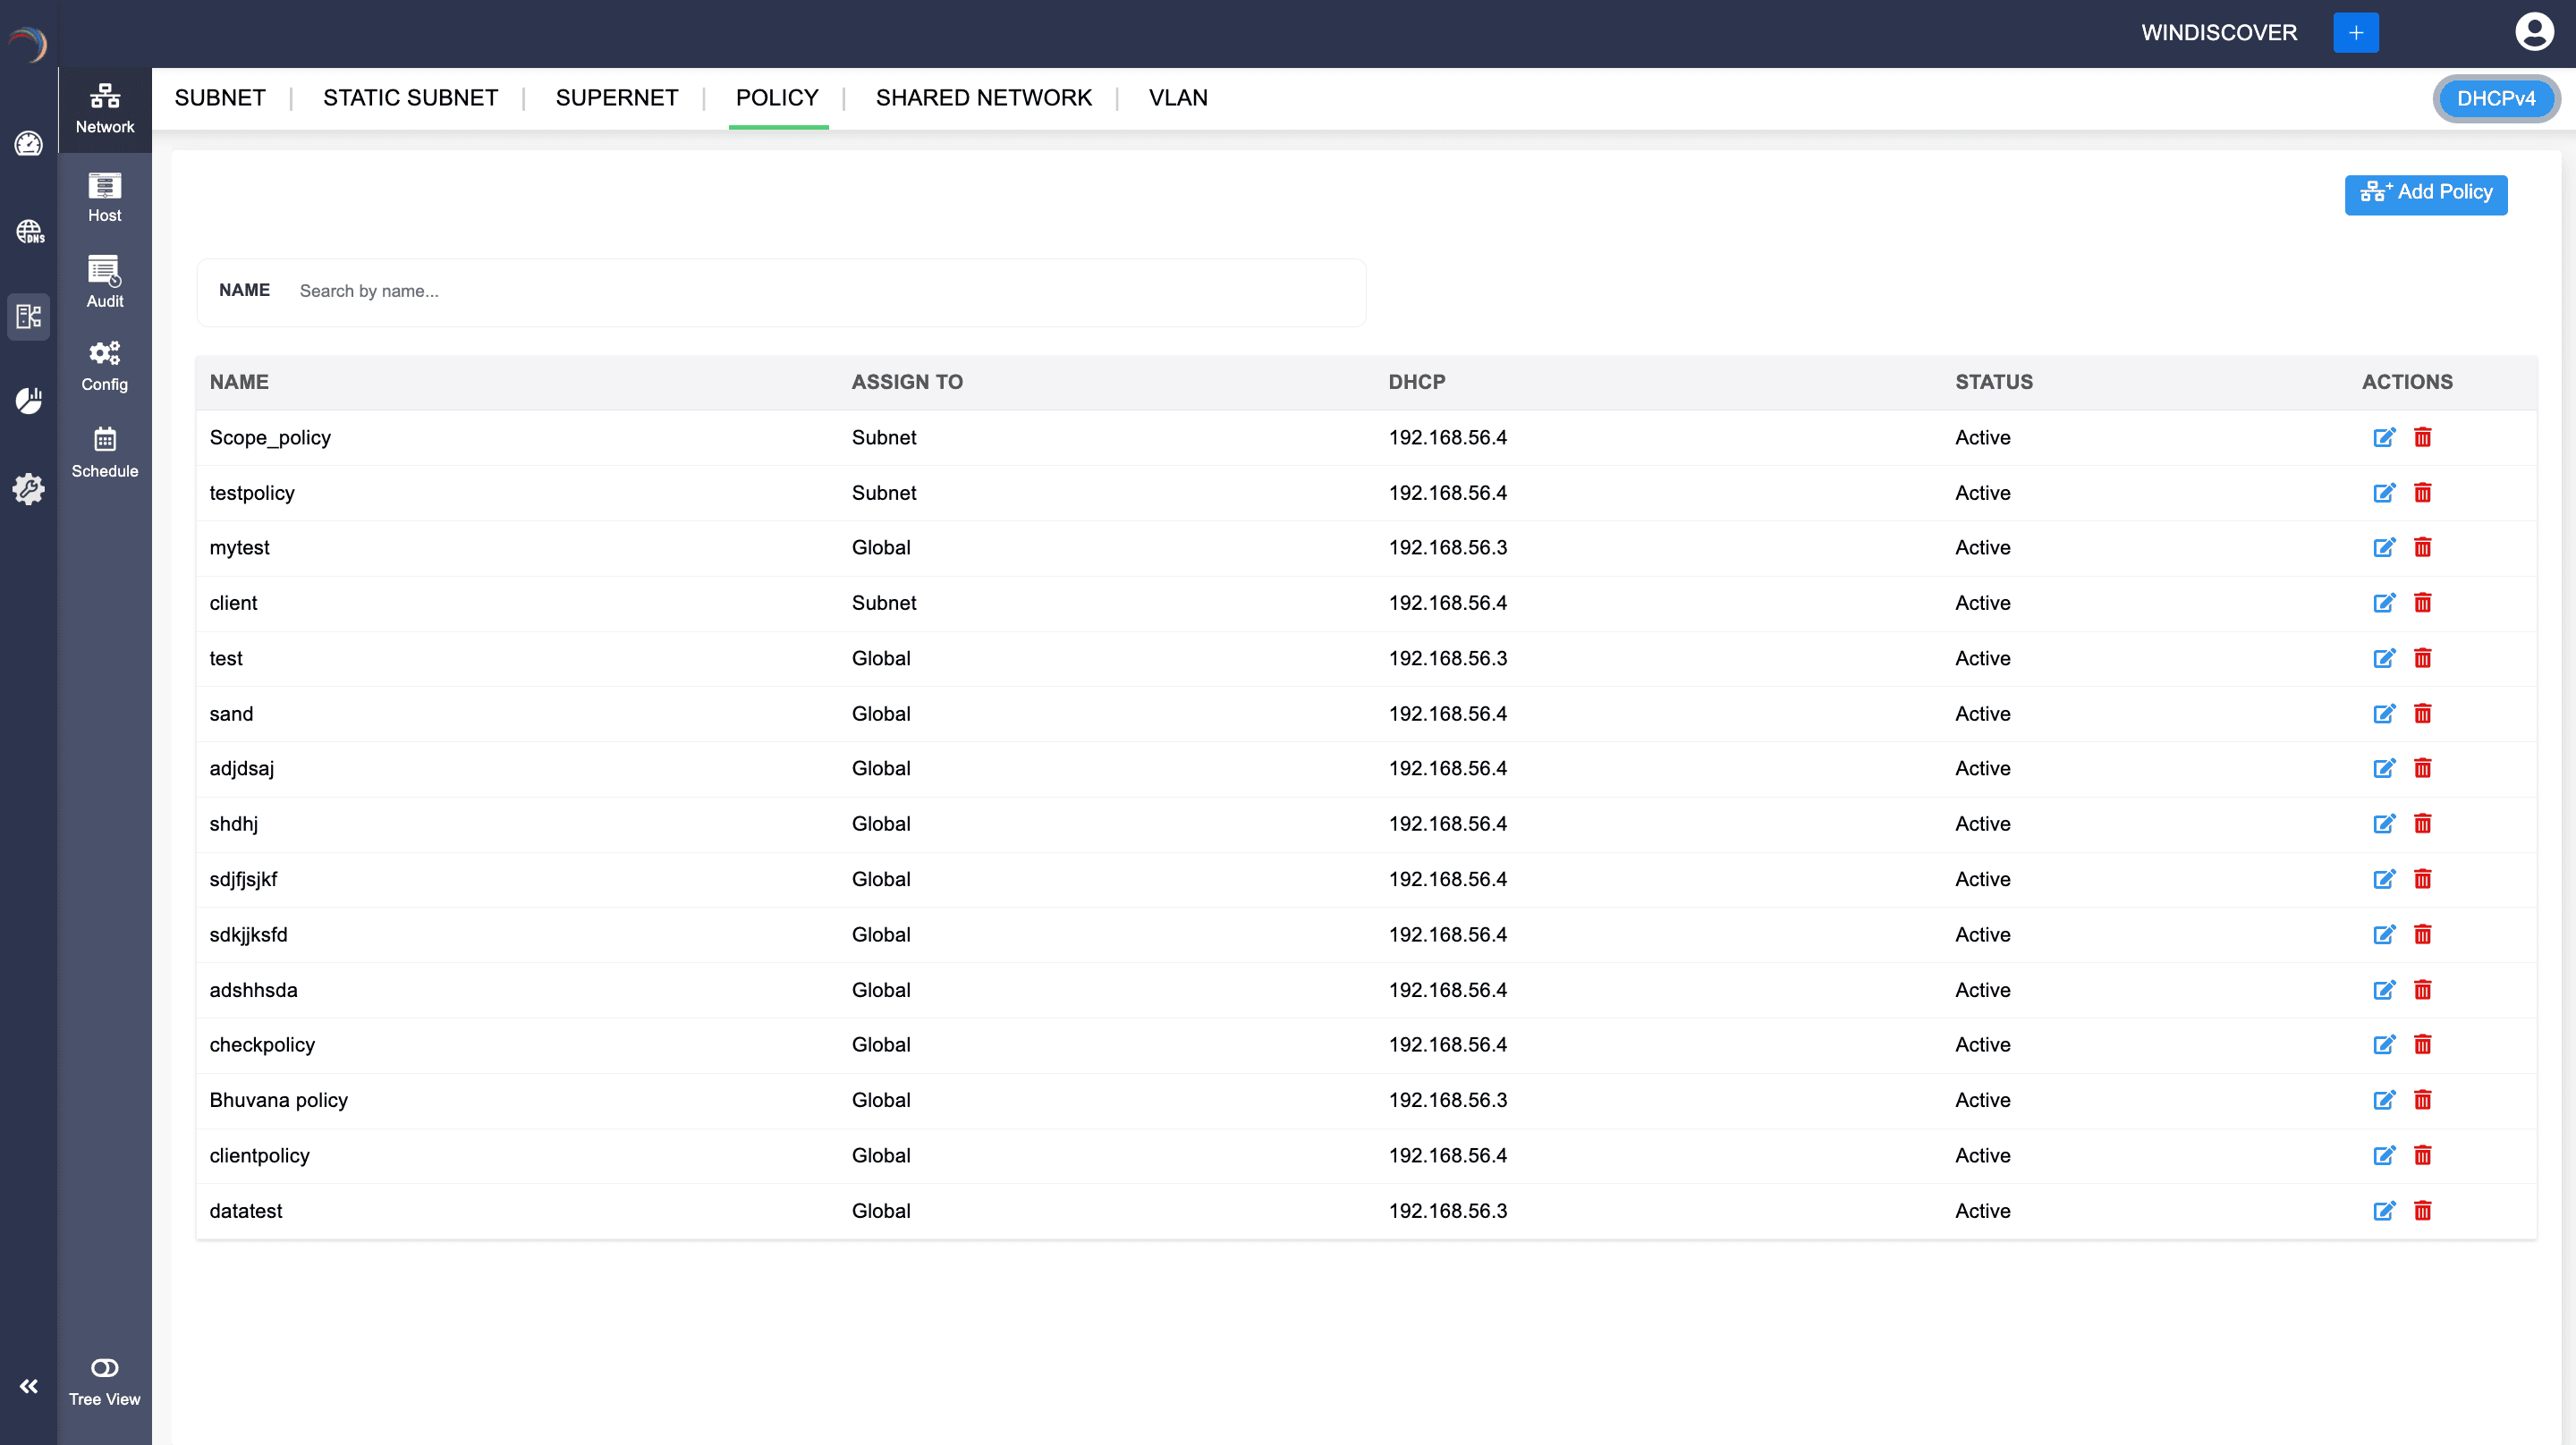
Creating a DHCP Policy
- Get into the DHCP module. Select the Network menu.
- On the Network page, navigate to the Policy tab.
- Click on the Add Policy button.
- On the Create Policy page that appears, provide a unique name for the policy and an optional description to clarify its purpose.
- Select and assign the DHCP server on which the policy should be applied.
- Select the scope of the policy. Policies can be applied at both the server level (affecting all scopes) and the scope level (affecting a specific scope).There are two options available. Select Global to assign the policy to the whole DHCP server level or, select Subnet to apply the policy to a particular scope
- When the Scope is chosen as a subnet, you'll be prompted to choose a Subnet and a particular IP address range within the chosen subnet upon which the policy should be activated.
- Status: Policies can be enabled or disabled as needed. A disabled policy is skipped during DHCP client request processing.The Status toggle enables or disables the policy. When enabled, the policy is active and applies to matching DHCP requests.
- Lease Duration: Set the duration for which an IP address will be leased to a client as per the policy.
-
Condition: This enables to combine and evaluate multiple conditions. Conditions can be combined using logical operators. Choose the conditional operation required for the policy you are creating:
Options:
- OR: The policy will apply if any of the specified conditions are met.
- AND: The policy will apply only if all specified conditions are met.
- Define Conditions:
- Navigate to the Condition tab to define the specific criteria that DHCP requests must meet for the policy to apply. Conditions can include factors like MAC addresses, vendor classes, user classes, etc .Click on the
- Add Condition button to set multiple criteria that determine which clients the policy will apply to.
- On Clicking Add Condition, the Add Condition page appears:
-
Select one of the criteria from the Criteria drop-down list box. Available criteria include:
-
MAC Address: Applies policy based on client MAC addresses.
Note: DDI Central supports the bulk import of MAC addresses as values into this criteria using a CSV file. The CSV file must not exceed 10,000 rows. Any entries beyond this limit will not be processed by DDI Central. In addition, the size of the file must not exceed 50 MB. Any file beyond this size limit will be rejected by DDI Central - FQDN: Applies policy based on clients requesting for a specific Fully Qualified Domain Name
- Vendor Class: Applies policies based on the vendor class or the vendor-specific information of the client device, enabling tailored network services for different device types.
- User Class: Applies policy based on custom user classes representing specific groups, providing customized settings for different groups of users or devices.
- Client Identifier: The Client Identifier is a unique identifier assigned to a DHCP client to distinguish it from other clients. It can be a MAC address, a unique string, GUID for PXE clients or another identifier specified by the client. The server checks the unique client identifier in the client's request. If this identifier matches the conditional defined in the policy, the settings from that policy are applied.
- Relay Agent Information: Use the information provided by the relay agent (such as location) to determine IP address assignment, enhancing management in complex network environments. The server examines the information provided by the relay agent, such as location or other identifiers. If this information matches a policy, the policy is applied.
- Subscriber ID: Denotes the unique identifier assigned to each subscriber or user. This ID is often used in environments where services are provided to subscribers, such as ISPs or large enterprise networks. The server checks for a matching Subscriber ID in the client's request. If a match is found, the corresponding policy is applied.
- Remote ID: Denotes the identifier of the remote device (typically a relay agent) to tailor IP address allocation, useful in networks with multiple relay agents. The server evaluates the Remote ID provided by the relay agent. If the Remote ID matches a configured policy, that policy is applied.
- Circuit ID: Denotes the unique identifier of the physical circuit, allowing precise IP address assignment for devices connected to specific circuits. The server looks for the Circuit ID in the relay agent's information. Policies matching the Circuit ID are then applied to the client's request.
-
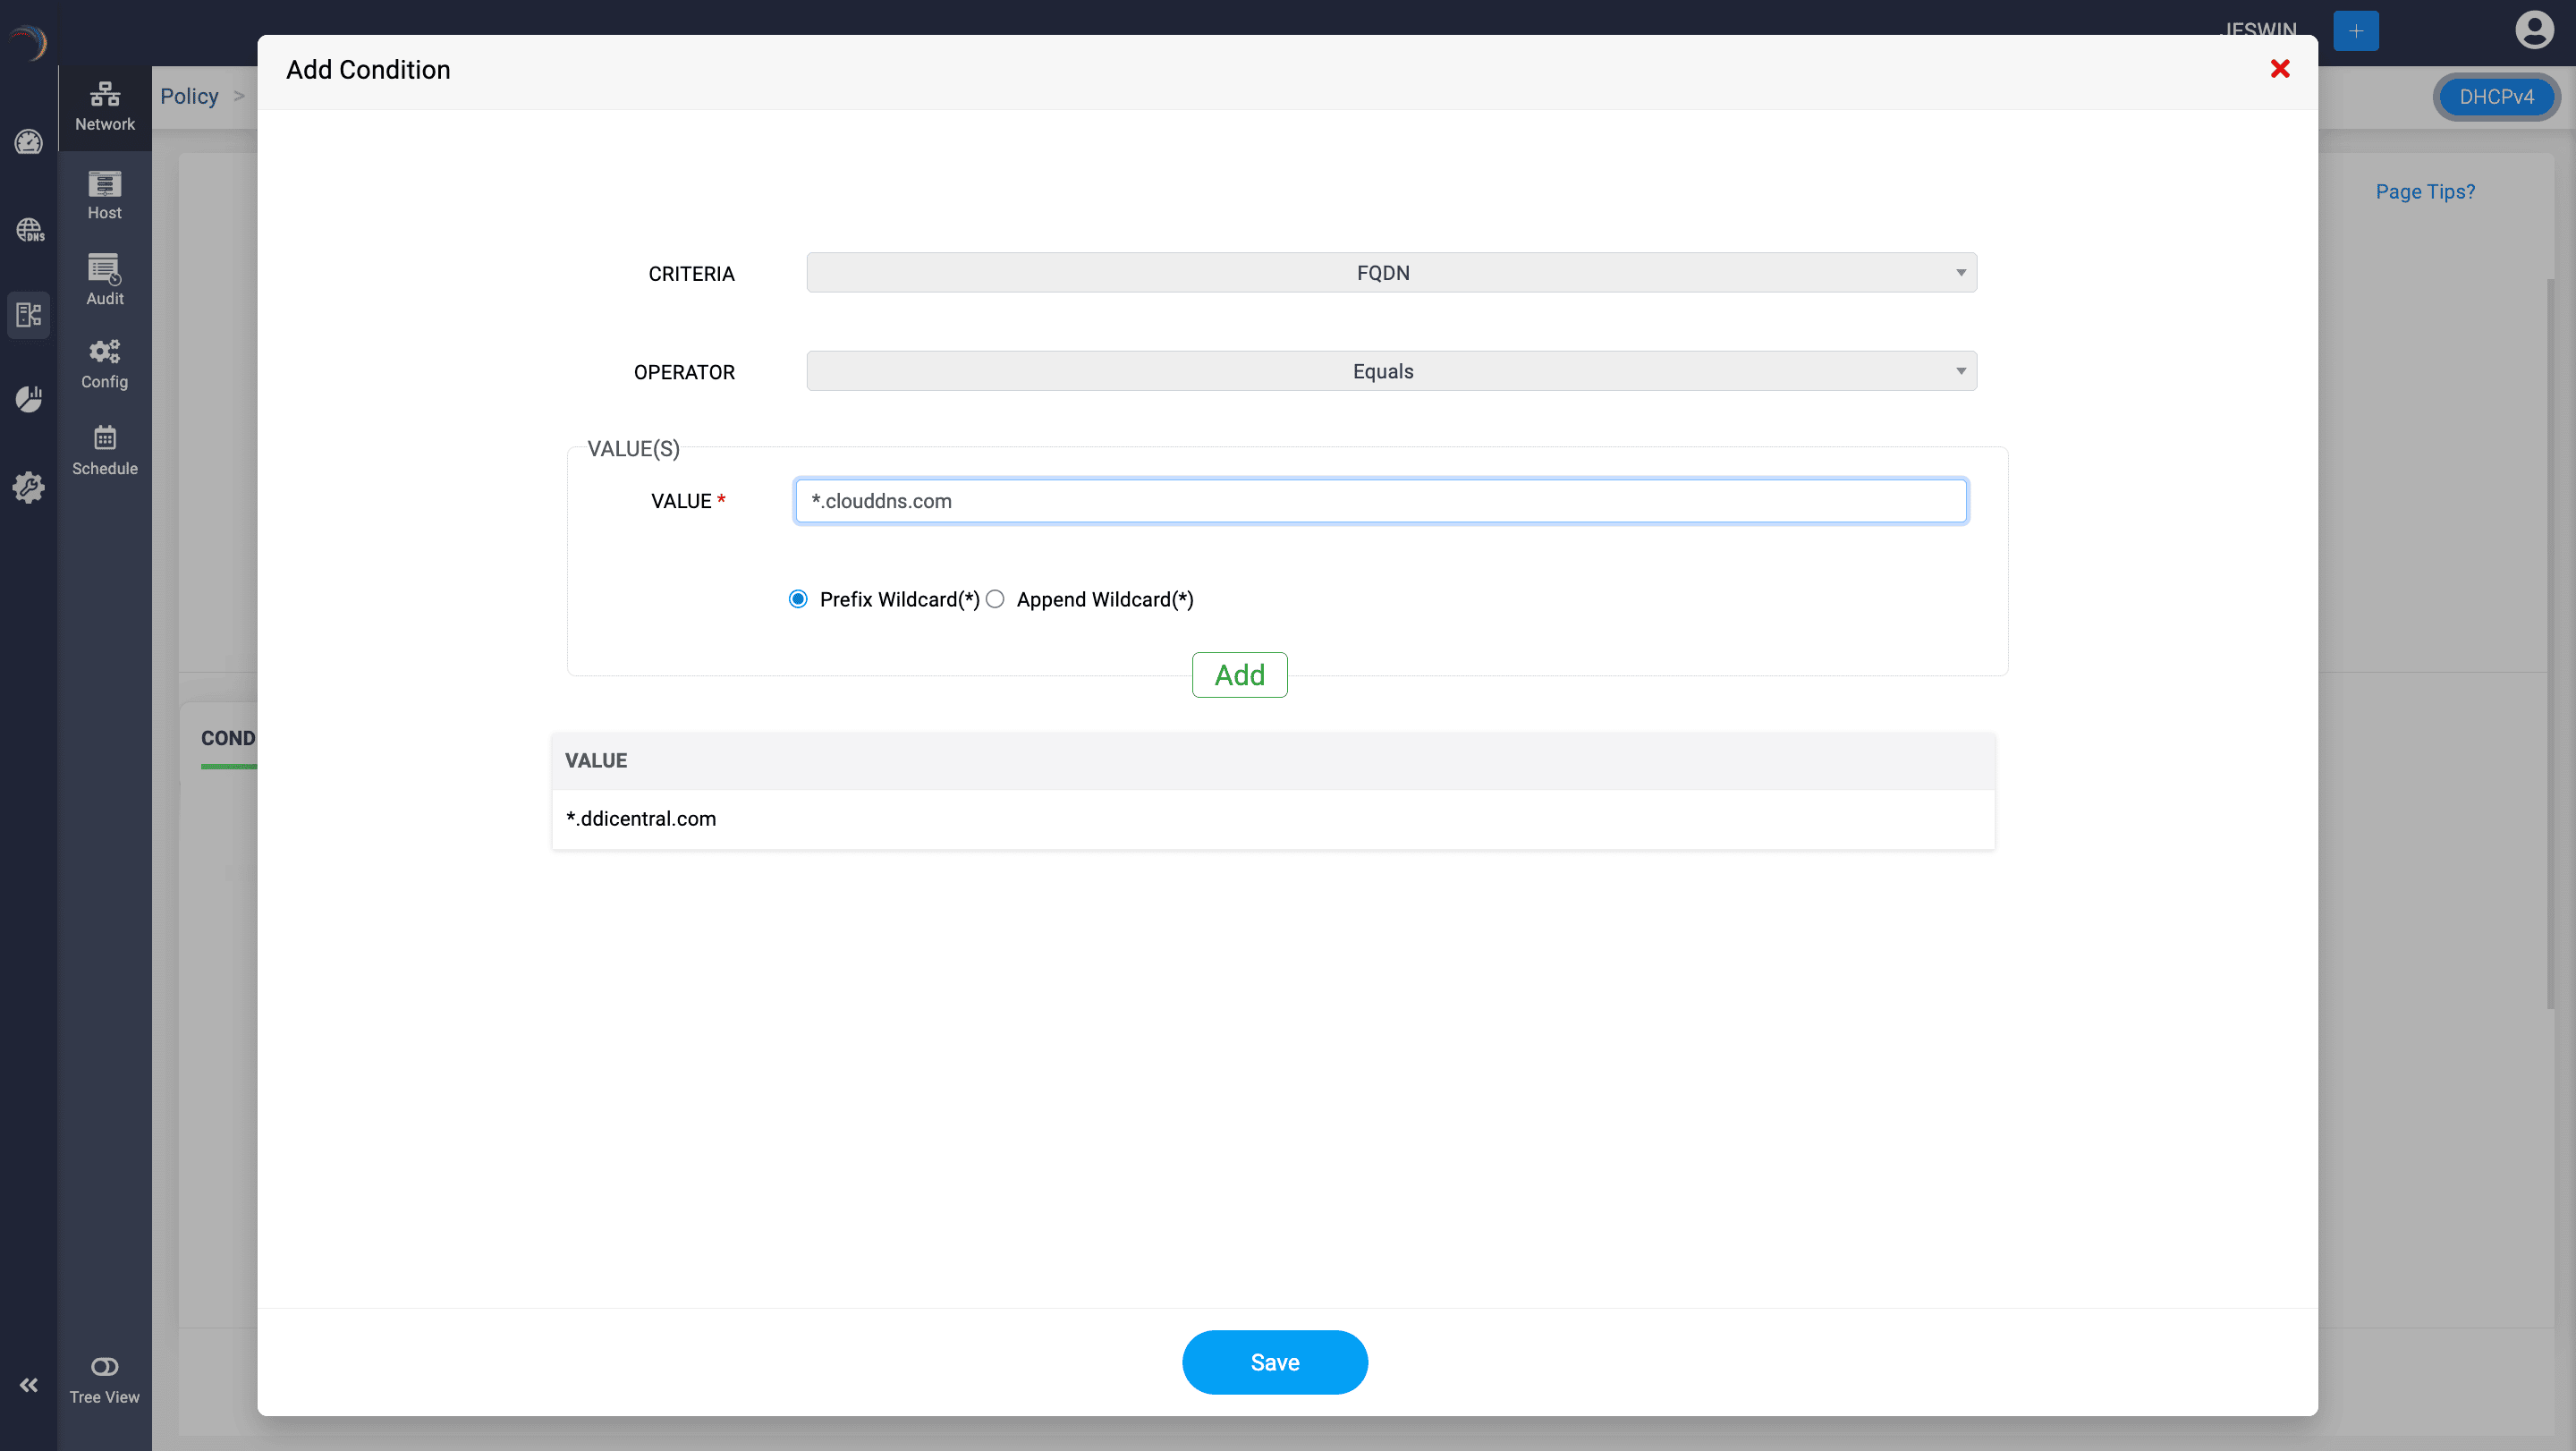
- Operator: Establishes the comparison logic for evaluating the condition. Defines how the condition will compare the criteria to the value(s) provided. Common operators include Equals and Does Not Equal.
-
Value(s): The specific value or set of values that the criteria will be compared against. Enter the appropriate value(s) based on the selected criteria. Provides the data that will be used to evaluate whether the condition is met.
Note: The input format for the value field for all the criteria is a hexadecimal string with or without hyphen separation. -
Wildcard Options:
Detects if the incoming client request does contain or does not contain certain specific patterns
- Prefix Wildcard (*): Allows you to append a wildcard character (*) at the beginning of the value-element. Treats the preceding characters as wildcard characters and the characters that follows as the pattern for comparison. Useful for matching any text that ends with the specified value.
- Append Wildcard (*): Allows you to append a wildcard character (*) at the end of the value. Treats the characters preceding the * as the pattern for comparison and the rest of characters as wildcard characters. Useful for matching any text that ends with the specified value.Useful for matching any text that begins with the specified value.
- Click Save within the Add Condition dialog box to add the defined condition to the policy. Confirms the entered criteria, operator, and value, and includes this condition in the policy being created or edited. This will take you back to the Create Policy page.
-
Set DHCP Options:
- IP Address Range: Specify a sub-range of IP addresses within the scope.
- Standard DHCP Options: Such as default gateway, DNS servers and more.
- Vendor Specific Options: Custom options provided categorized under various vendor profiles.
- Lease Duration: Optionally set a different lease duration from the default scope settings.
Configure the specific general DHCP options or Custom options that will be applied to clients meeting the policy conditions. Options can include:
- Review the policy settings and click Save to apply the policy.
- Modify existing policies by clicking the Edit button beside each policy. You can change conditions and settings as needed. You can also delete them if required using the Delete button.

Let's consider an example:
Example: To create a server-level policy for clients that are not members of the domain ddicentral.com enter the condition as follows.
- Choose the Condition as OR.
- Add and name the condition for unique identification.
- In the Add Condition dialog box, select FQDN as the Criteria.
- Select the Operator as Not Equals.
- Under the Values section, enter the value as ".ddicentral.com"
- Select the option Prefix Wildcard(*).
- Click Save.
Note: A policy with conditions based on fully qualified domain name criteria can have configuration settings for DNS but not for options or IP address ranges.
By using DHCP policies, administrators can efficiently manage how IP addresses and other network configurations are assigned, ensuring optimal performance and security tailored to different client needs. The interface shown in the image provides a user-friendly way to create and manage these policies, streamlining the administration of DHCP settings.

New to ADSelfService Plus?
Related Articles
Configuring standard microsoft DHCP options
Configuring Microsoft standard DHCP options in DDI Central DHCP (Dynamic Host Configuration Protocol) options are additional settings that a DHCP server can provide to clients along with their IP address assignment. These options help configure ...Configuring custom DHCP options
Custom options under Microsoft DHCP In Microsoft DHCP, custom options provide network administrators with the flexibility to tailor DHCP services to meet specific needs beyond the predefined options. These custom options allow for more granular ...Guidelines for managing Microsoft Windows DHCP servers
Guidelines for managing Microsoft Windows DHCP servers Follow the guidelines below to setup your Microsoft Windows DHCP infrastructure using DDI Central. Creating and managing DHCP scopes in DDI Central Managing Dynamic domains Creating DHCP policies ...DHCP fingerprinting with Client Classes
Client Classes and Sub Classes Client classes and Sub Classes are powerful features used to group clients (DHCP clients) and apply specific DHCP options or behaviors to those groups. These classes and subclasses enable more granular control over how ...Configuring ACL
Configuring ACL (Access Control List) An ACL in the context of network administration is a set of rules that control network traffic and limit access to networks and network resources based on predefined criteria. In DNS servers like ISC BIND, ACLs ...