Bulk enrolling Duo Security-enabled users for password self-service
Enrollment is the only task that has to be completed before users can start enjoying the benefits of ADSelfService Plus password self-service. But many a time, administrators might have to constantly shoot out reminders urging users to enroll. Or much worse, they could be pushed to the extent of taking it head-on by enrolling all their users themselves, one at a time!
The glad news is that we’ve got just what is needed to wade through all this trouble. ADSelfService Plus allows administrators the convenience of performing bulk enrollment of their hitherto unenrolled users so that they can avail password self-service.
Today, we will look at the ways to bulk enroll Duo Security-enabled users for password self-service. Duo Security is a trusted access platform that organizations employ to verify user identities, ensuring secure access.
Administrators can choose between two options to perform bulk enrollment. They are:
- Import enrollment data from CSV file
- Import enrollment data from external database
Method 1: Bulk enrollment by importing Duo Security users from CSV file
Step 1: Create a unique 16-digit alphanumeric key for each user who is to be enrolled. This will be their secret key in the CSV file.
Step 2: Import the CSV by following these steps to enroll the users into ADSelfService Plus.
Step 3: The admin can send users their respective secret keys via email or other secure ways. Keys will be used while configuring the TOTP authenticator app on users' phones.
Import data formats
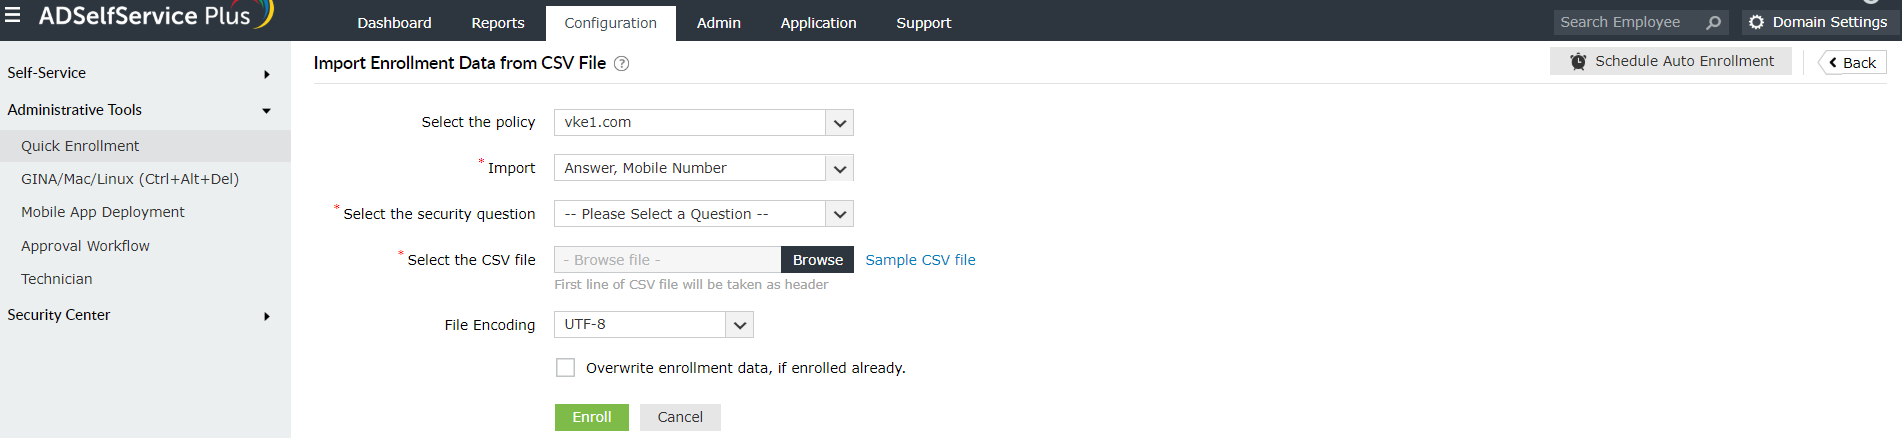
Steps for configuring auto-enrollment via a CSV file
- Log in to the ADSelfService Plus web console as an admin.
- Navigate to Configuration > Administrative Tools > Quick Enrollment, and click Import Enrollment Data from CSV File.
- Select a policy from the Select Policy drop-down.
- Select the enrollment data you want to import from the Import drop-down. Please note that each authentication method requires different kinds of enrollment data.
- Select the security question if question is not selected as Import type.
- Click Choose File, and select the CSV file containing the enrollment data.
- Select the encoding standard supported by the CSV file from the File Encoding drop-down.
- Check the Overwrite enrollment data if enrolled already box if you want to overwrite users’ enrollment data.
- Click Enroll.
Note: You can configure OU and group-based policies by going to Configuration > Self-Service > Policy Configuration. Using policies, you can enable forced enrollment for a specific group of users.

New to ADSelfService Plus?
Related Articles
Configuring Duo Security for Active Directory password reset
Duo Security is an access security focused application that is primarily used for multi-factor authentication. One of the ways Duo Security can be used to verify users identities is using passcodes. Here, once the user has provided their username and ...Self-service password reset for Windows 7, 8, and 10
We've all had to reset a forgotten password at some point in our lives. But have you ever wondered what goes on behind the scenes when you initiate a password reset? Have you considered the security risks that can arise due to poor password ...Configuring the ADSelfService Plus login agent for machine MFA and password self-service in Linux
Securing data and resources on the corporate network is of paramount importance to organizations. In a world where most corporate attacks originate at an endpoint, ADSelfService Plus offers 20 MFA factors to protect endpoints by allowing access only ...How to automatically enroll new users for self-password reset with CSV files?
With a multitude of users, ensuring them to enroll for password expiry notifications can be a cumbersome process. Despite the reminders, when the user fails to enroll, the administrator’s intervention becomes mandatory. With ADSelfService Plus' Auto ...Whitelisting the DUO credential provider for proper functioning of the ADSelfService Plus' self-service password reset feature
If you are using Duo Security's credential provider for MFA during machine logins, and want to use ADSelfService Plus' self-service password reset and account unlock feature from login screens, merely configuring the self-service password feature and ...