How to automatically enroll new users for self-password reset with CSV files?
With a multitude of users, ensuring them to enroll for password expiry notifications can be a cumbersome process. Despite the reminders, when the user fails to enroll, the administrator’s intervention becomes mandatory.
With ADSelfService Plus' Auto Enrollment feature, you can import enrollment data from a CSV file periodically. Wondering how to enroll new users? All you need to do is update the CSV file with new user data and auto-enrollment is taken care of, thanks to the scheduler.
Administrators can enroll users automatically without any user involvement for these authenticators:
- Security Questions and Answers
- Email IDs
- Mobile Numbers
- Custom TOTP - Hardware token
Bulk enrollment into ADSelfService Plus can be done by the admin with minimal user input for the following authenticators:
- Duo Security
- Google Authenticator
- Microsoft Authenticator
- Zoho OneAuth TOTP
- Custom TOTP - Software token
To enroll for Duo Security, please ensure that the users first download the Duo Security authenticator app and enroll with Duo. Admins can then bulk-enroll the users into ADSelfService Plus.
To use TOTP-based software authenticators (Google Authenticator, Microsoft Authenticator, Zoho OneAuth TOTP, and Custom TOTP - Software token), users will need to finish the process by installing the TOTP authenticator apps on their phones and configuring the enrollment settings using the Secret Key. Please find the configuration steps below:
Step 1: Create a unique 16-digit alphanumeric key for each user who is to be enrolled. This will be their secret key in the CSV file.
Step 2: Import the CSV by following these steps to enroll the users into ADSelfService Plus.
Step 3: The admin can send users their respective secret keys via email or other secure ways. Keys will be used while configuring the TOTP authenticator app on users' phones.
Import data formats
The data imported in the CSV file should follow the specified formats for each authenticator as mentioned in the table below.
| Import type | CSV header names | Allowed formats |
|---|---|---|
| Mobile Numbers | mobile | Must contain numbers 0 through 9 |
| Email IDs | Must be a valid email address | |
| Security Questions and Answers | question | Must be a security question, e.g., What is your favorite color? |
| answer | Must be the corresponding answer to the security question, e.g., Yellow | |
| Google Authenticator | googleauth secret key | Must contain letters A-Z or a-z and numbers 2-7 |
| Microsoft Authenticator | microsoftauth secret key | Must contain letters A-Z or a-z and numbers 0-9 |
| Zoho OneAuth TOTP | zohooneauth secret key | Must contain letters A-Z or a-z and numbers 0-9 |
| Duo Security | sAMAccountName | Must be a valid user in AD |
| Custom TOTP - Software Token | customtotp secret key | Must contain letters A-Z or a-z and numbers 0-9 |
| Custom TOTP - Hardware token | customtotp hardware serial number | Must contain letters A-Z or a-z and numbers 0-9 |
| customtotp secret key | Must contain letters A-Z or a-z and numbers 0-9 |
- The length of secret keys must be greater than or equal to 16 and less than or equal to 350.
- The length of serial numbers must be greater than or equal to 4 and less than or equal to 250.
Steps for configuring auto-enrollment via a CSV file
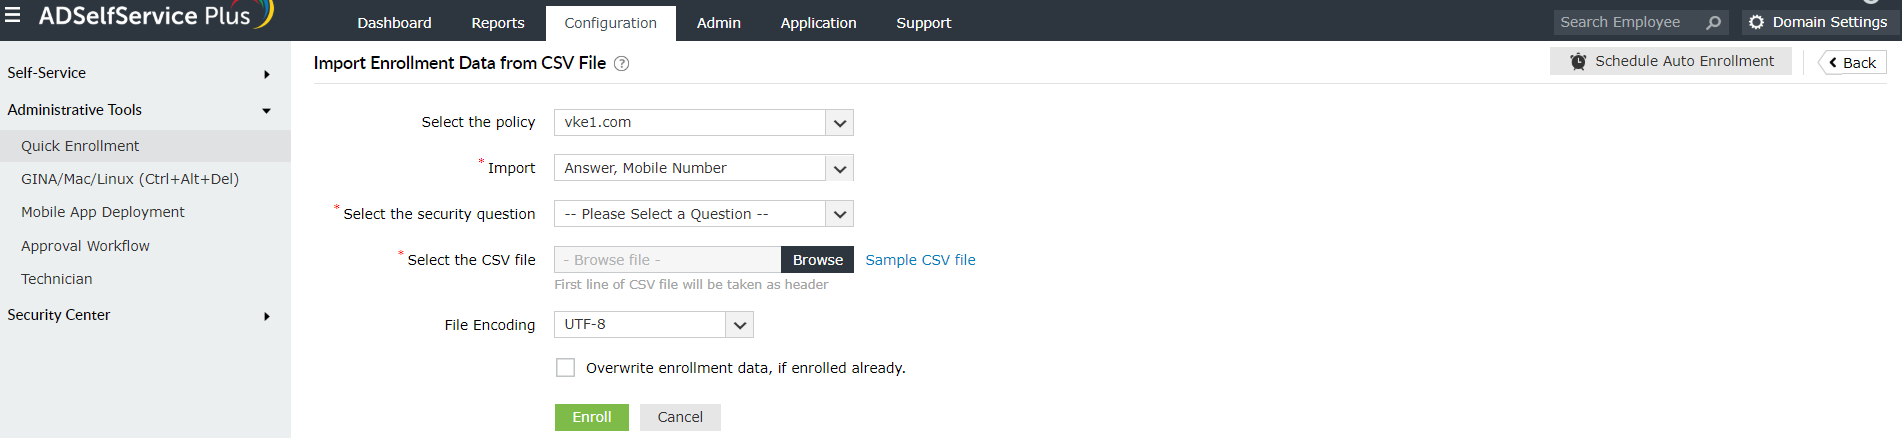
- Log in to the ADSelfService Plus web console as an admin.
- Navigate to Configuration > Administrative Tools > Quick Enrollment, and click Import Enrollment Data from CSV File.
- Select a policy from the Select Policy drop-down.
- Select the enrollment data you want to import from the Import drop-down. Please note that each authentication method requires different kinds of enrollment data.
- Select the security question if question is not selected as Import type.
- Click Choose File, and select the CSV file containing the enrollment data.
- Select the encoding standard supported by the CSV file from the File Encoding drop-down.
- Check the Overwrite enrollment data if enrolled already box if you want to overwrite users’ enrollment data.
- Click Enroll.
Note: You can configure OU and group-based policies by going to Configuration > Self-Service > Policy Configuration. Using policies, you can enable forced enrollment for a specific group of users.

New to ADSelfService Plus?
Related Articles
How to enable Partial Enrollment for Active Directory users in ADSelfService Plus
Active Directory domain users need to complete enrollment with ADSelfService Plus before they can use the below listed features: Self-service password reset Self-service account unlock Endpoint multi-factor authentication ADSelfService Plus' logon ...How to reset passwords in Linux OS with ADSelfService Plus
IT admins are equipped to deal with much more than simple password reset calls from frustrated employees. However, when there's a huge spike in calls to unlock user accounts or reset passwords, the admin productivity is hindered and they're forced to ...Self-service password reset for Windows 7, 8, and 10
We've all had to reset a forgotten password at some point in our lives. But have you ever wondered what goes on behind the scenes when you initiate a password reset? Have you considered the security risks that can arise due to poor password ...Forgot your Mac password? Reset it from the login screen with ADSelfService Plus
f users can't remember their macOS login password, they won't be able to log in to their Active Directory (AD) account either, which negatively affects their productivity. To reset Mac passwords, users can use any of the methods supported by ...Configuring the ADSelfService Plus login agent for machine MFA and password self-service in Linux
Securing data and resources on the corporate network is of paramount importance to organizations. In a world where most corporate attacks originate at an endpoint, ADSelfService Plus offers 20 MFA factors to protect endpoints by allowing access only ...