Adding Windows DNS-DHCP servers
Step 1. WinRM Setup
Step 2. Microsoft Server Setup
Step 3. Server Settings
Step-by-step guide to enable WinRM HTTP on DNS-DHCP server
-
Enabling WinRM
Run the following command below:
winrm quickconfig -
Modifying Ideal Timeout and Connection Parameters
Run the following command below:
winrm set winrm/config/service '@{MaxConnections="2000"}'winrm set winrm/config/service '@{MaxConcurrentOperationsPerUser="2000"}'winrm set winrm/config/winrs '@{IdleTimeout="900000"}' -
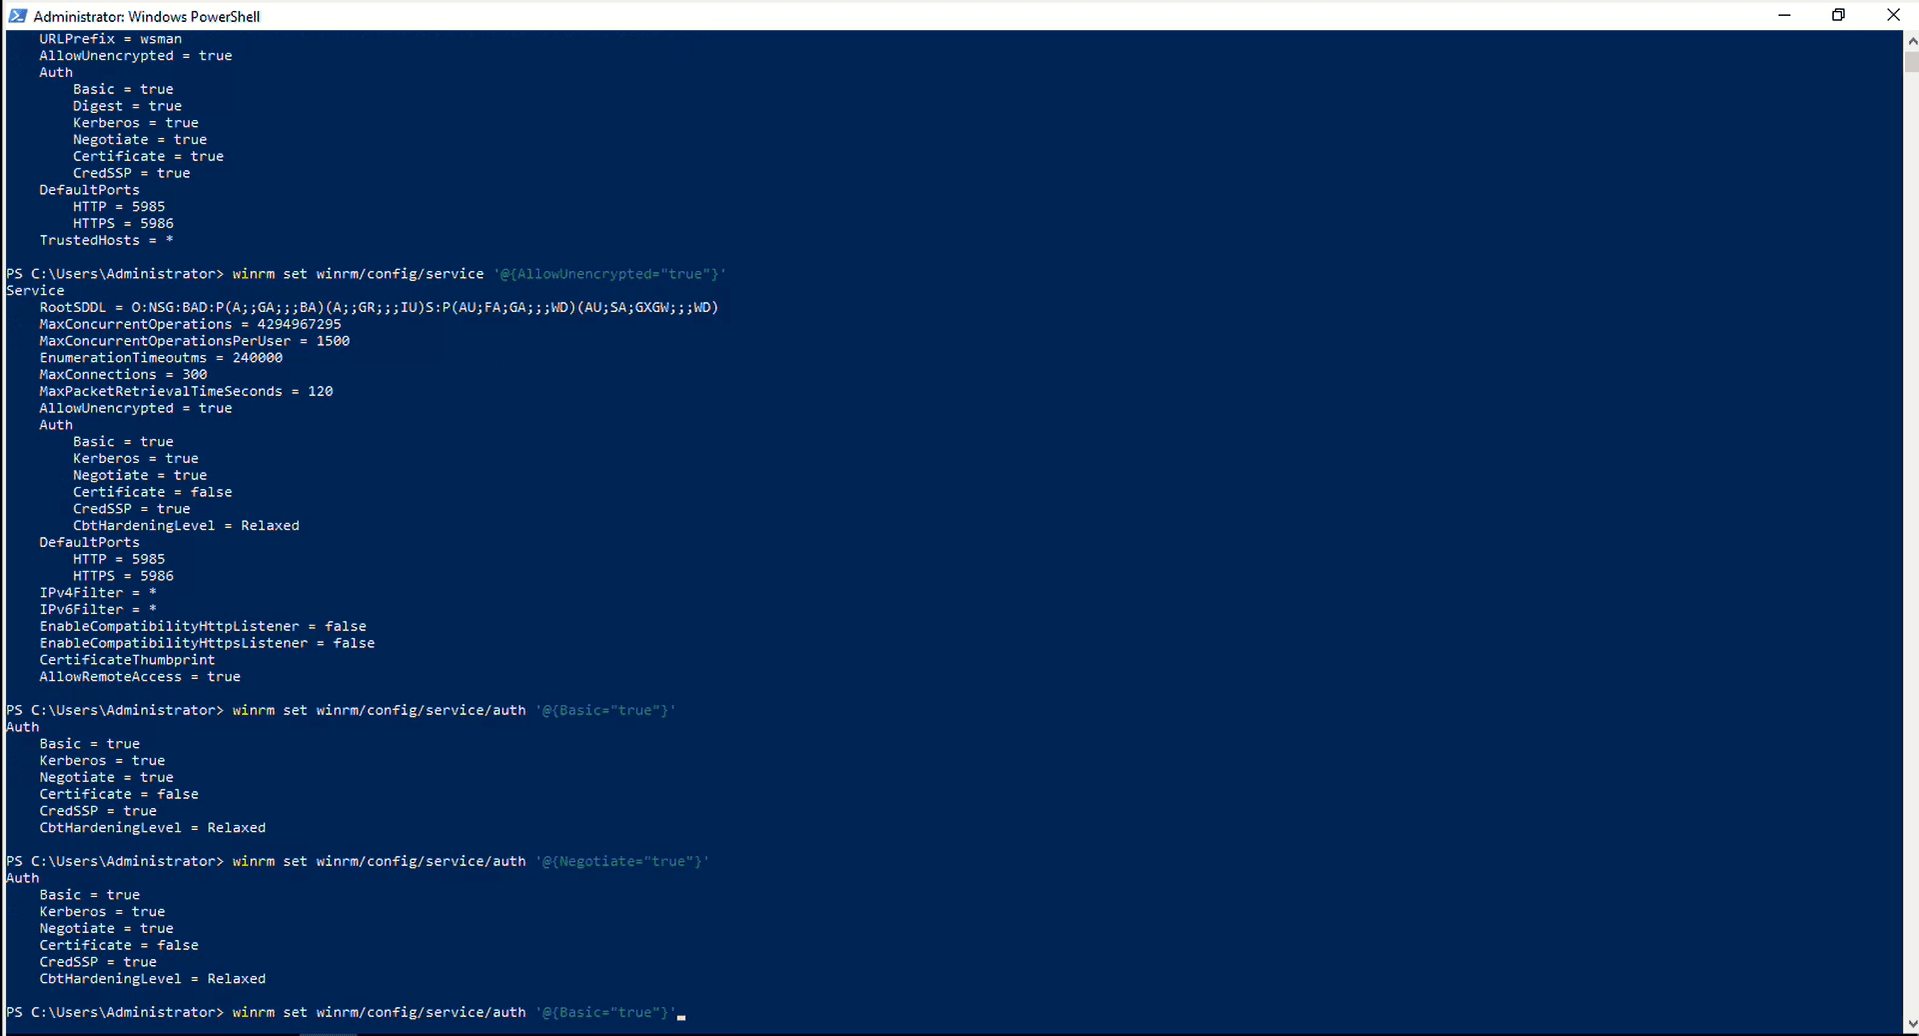
Enabling Authentication
1. Basic Authentication:
Description: Sends the username and password in plain text (Base64 encoded). Requires a secure channel (e.g., HTTPS) to protect the credentials during transmission.
Setup:
winrm set winrm/config/service/auth '@{Basic="true"}'2. CredSSP (Credential Security Support Provider):
Description: Enables delegation of user credentials from the client to the target server, allowing the server to access network resources on behalf of the user.
Setup:
Enable-WSManCredSSP -Role "Server"3. Negotiate:
Description: Uses either Kerberos or NTLM for authentication, automatically selecting the most secure protocol supported by both the client and server.
Setup:
winrm set winrm/config/service/auth '@{Negotiate="true"}' -
Setting up the Windows Remote Machine:
1. Enable unencrypted Communication:
winrm set winrm/config/service '@{AllowUnencrypted="True"}'2. Configure Trusted Hosts:
winrm set winrm/config /client '@{TrustedHosts="ip_address"}'
Note: Enter the IP address of the host running the DDI Central Console for WinRM to treat it as a trusted host.
3. Restarting the WinRM Service
Restart-Service WinRM -
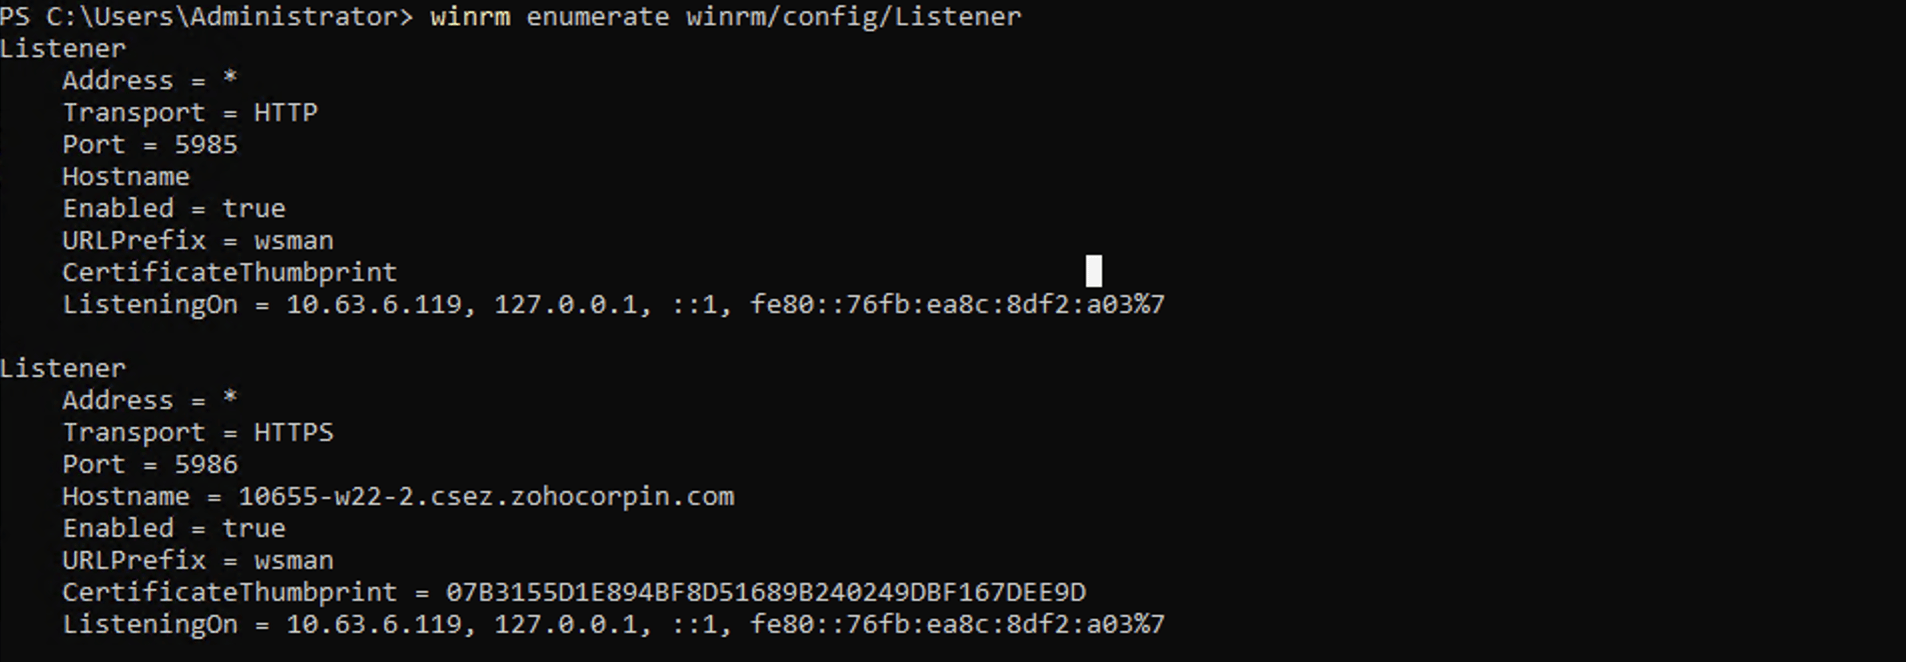
Inspecting WinRM listener configuration for remote management readiness
By reviewing the listener details, administrators can ensure that the correct addresses and ports are being used and check for any misconfigurations that may block remote access or cause connectivity issues.
Execute the command as shown below to ensure that the WinRM service is properly configured and enabled, which is necessary for remote management, especially while using PowerShell remoting.
winrm enumerate winrm/config/listener

Step-by-step guide to enable WinRM HTTPS on DNS-DHCP server
-
Modifying Ideal Timeout and Connection Parameters
Run the following command below:
winrm set winrm/config/service '@{MaxConnections="2000"}'winrm set winrm/config/service '@{MaxConcurrentOperationsPerUser="2000"}'winrm set winrm/config/winrs '@{IdleTimeout="900000"}' -
Enabling Authentication
1. Basic Authentication:
Description: Sends the username and password in plain text (Base64 encoded). Requires a secure channel (e.g., HTTPS) to protect the credentials during transmission.
Setup:
winrm set winrm/config/service/auth '@{Basic="true"}'2. CredSSP (Credential Security Support Provider):
Description: Enables delegation of user credentials from the client to the target server, allowing the server to access network resources on behalf of the user.
Setup:
Enable -WSManCredSSP -Role "Server"3. Negotiate:
Description: Uses either Kerberos or NTLM for authentication, automatically selecting the most secure protocol supported by both the client and server.
Setup:
winrm set winrm/config/service/auth '@{Negotiate="true"}' -
Setting up the Windows Remote Machine:
1. Enable encrypted Communication:
winrm set winrm/config/service '@{AllowUnencrypted="False"}'2. Configure Trusted Hosts:
winrm set winrm/config /client '@{TrustedHosts="ip_address"}'
Note: Enter the IP address of the host running the DDI Central Console for WinRM to treat it as a trusted host.
3. Restarting the WinRM Service:
Restart-Service WinRM -
Verifying the valid server certificate
Ensure that the Windows DNS/DHCP server has a valid server certificate installed. If you already have a valid certificate, follow the steps below.
If not, generate a valid certificate and get it installed. To verify the installation of a valid certificate, refer to the screenshot below:
Execute the command below, as demonstrated in the screenshot below.
Get-ChildItem -Path Cert:\LocalMachine\My

Note: Copy the Thumb print value generated by the above command and store it securely. -
Execute the following commands to enable HTTPS
New-Item -Path WSMan:\LocalHost\Listener -Transport HTTPS -Address $ipAddress -CertificateThumbprint $certThumbprint -Force
Note: In the above command, for $ipaddress, enter the IP address of the target Windows DNS/DHCP server in double quotes (" "), and for $certThumbprint, enter the hexadecimal value of the thumbprint from the previous step in double quotes (" "). -
Enabling WinRM
Run the following command below:
winrm quickconfig -transport:https -
Inspecting WinRM listener configuration for remote management readiness
By reviewing the listener details, administrators can ensure that the correct addresses and ports are being used and check for any misconfigurations that may block remote access or cause connectivity issues.
Execute the command as shown below to ensure that the WinRM service is properly configured and enabled, which is necessary for remote management, especially while using PowerShell remoting.
winrm enumerate winrm/config/listener
Creating Microsoft Clusters in DDI Central
Upon successful signup, the first glimpse within the DDI console reveals an empty dashboard. To get started, create clusters and add your DNS and DHCP servers to your clusters for effective management of your network infrastructure.
To create new clusters
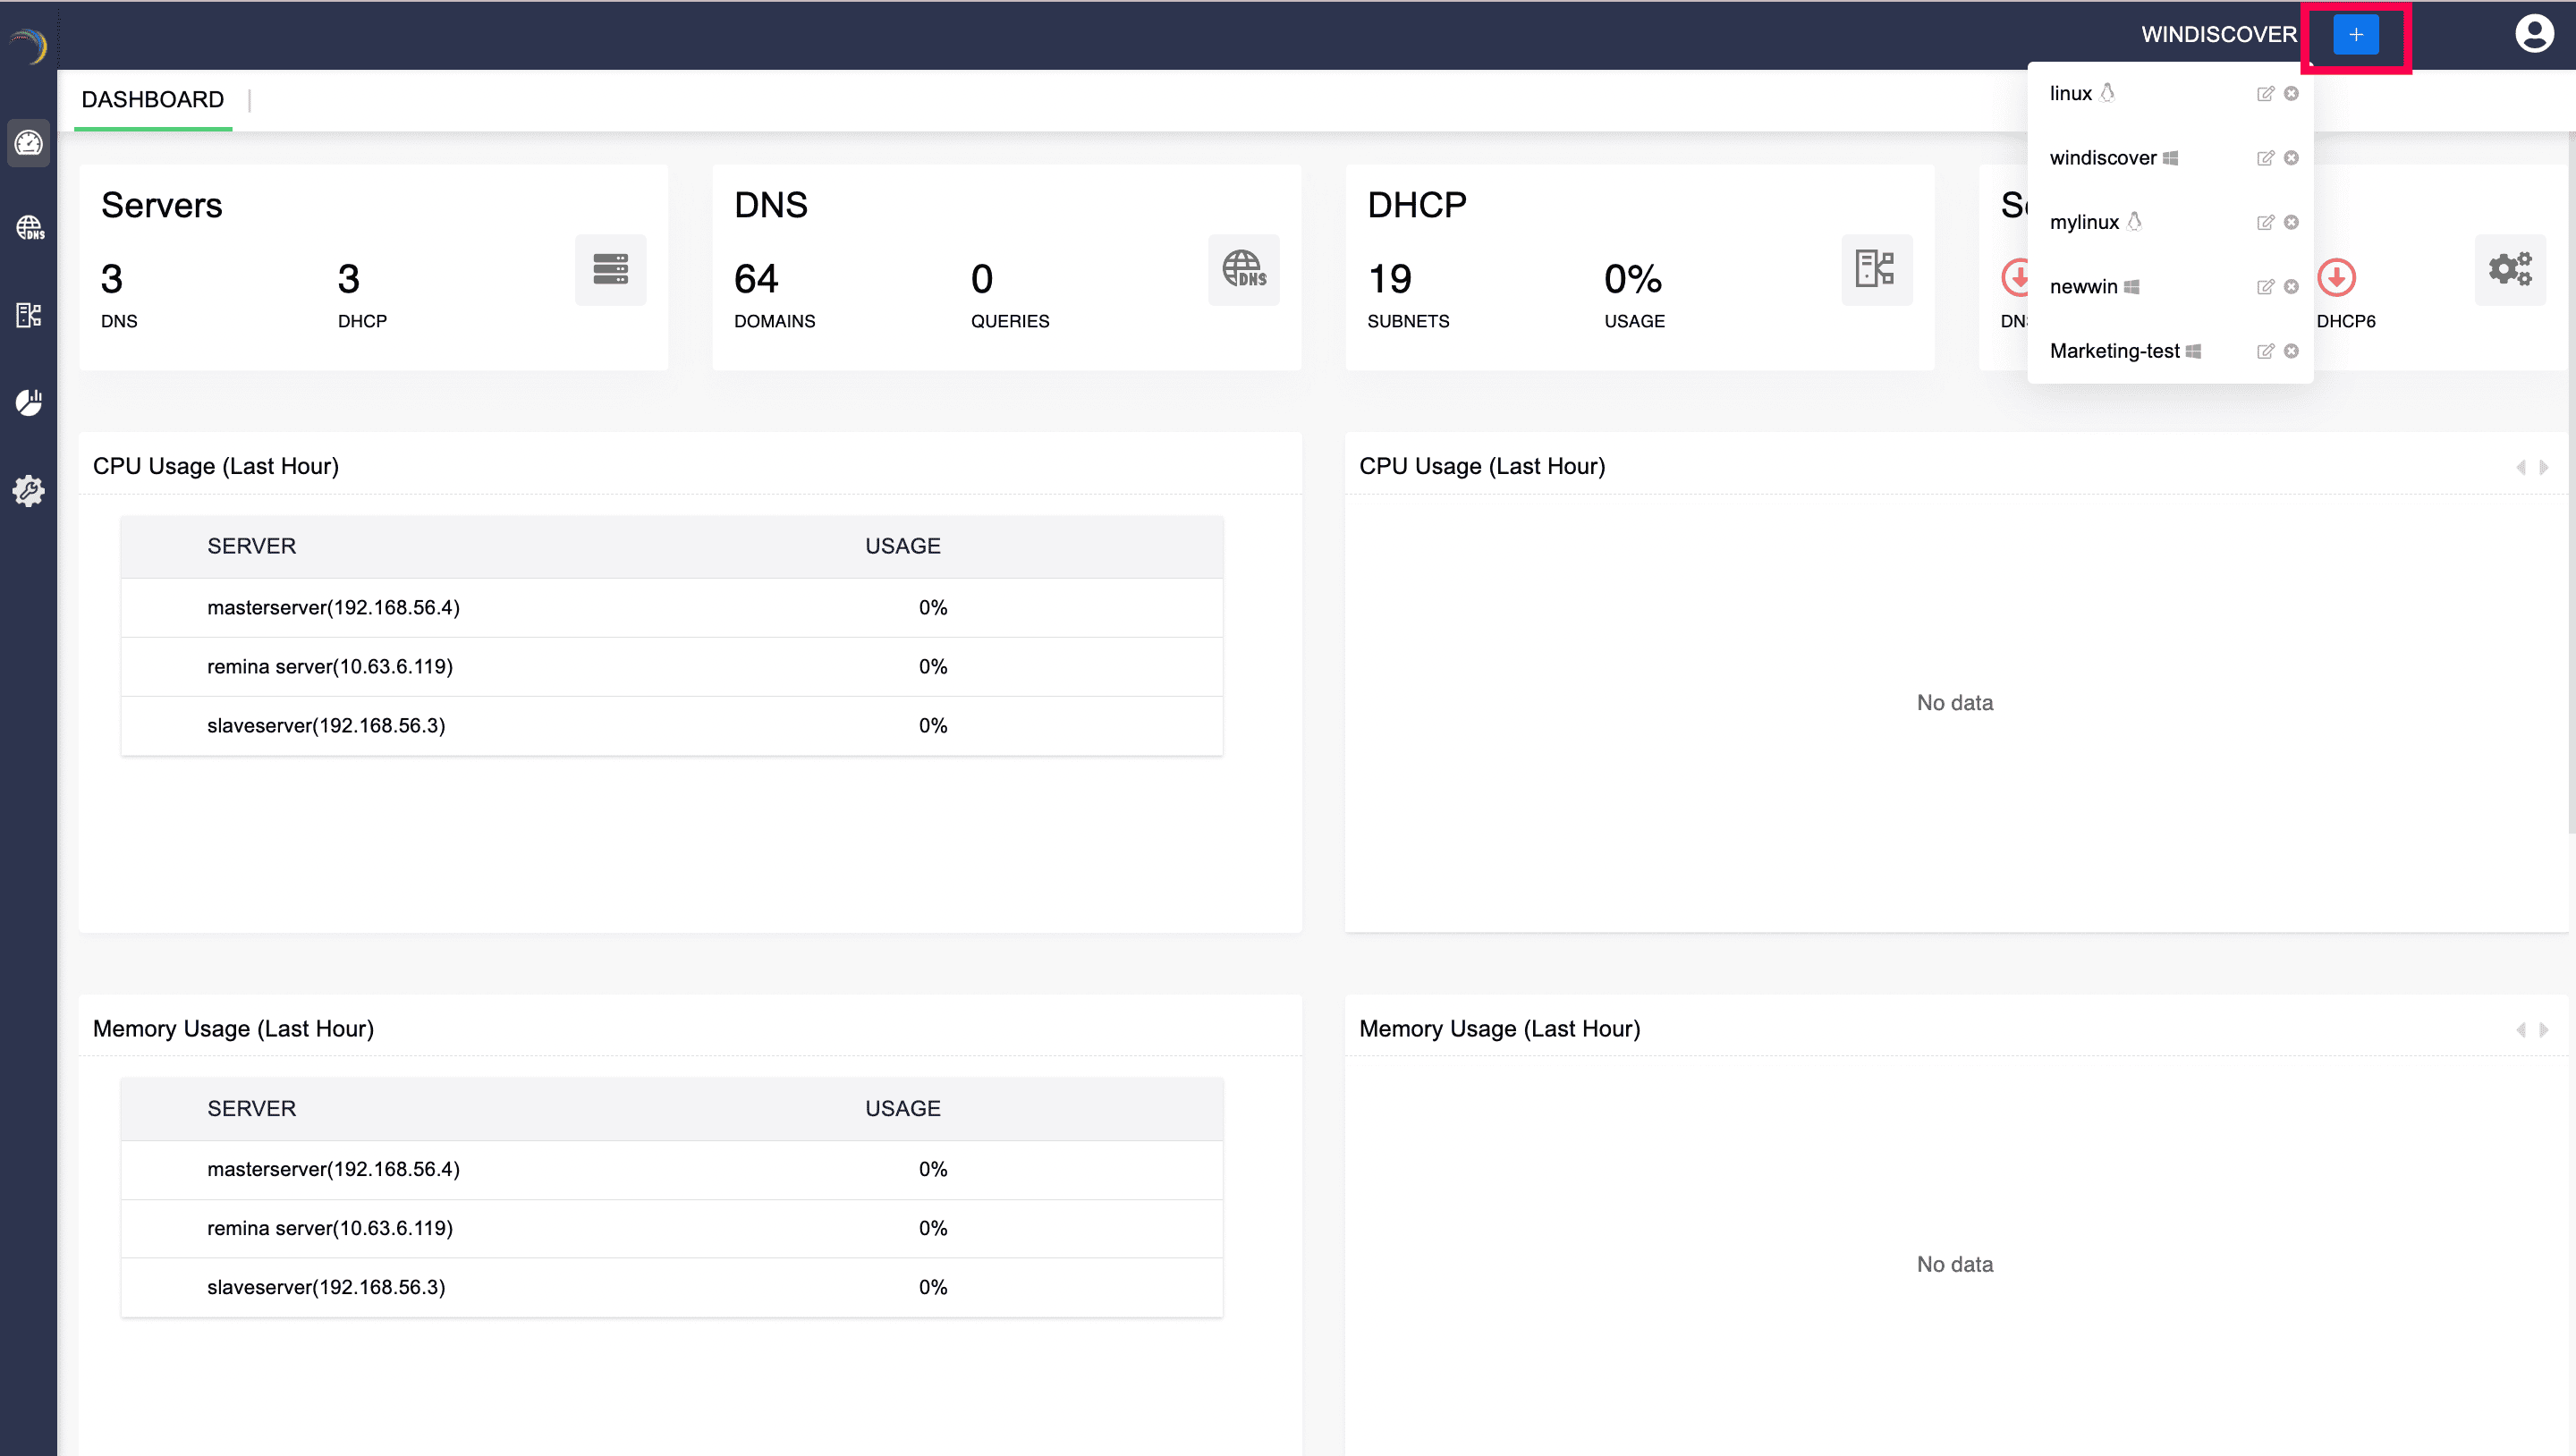
- Click on the blue plus ( + ) sign at the top right corner.
-
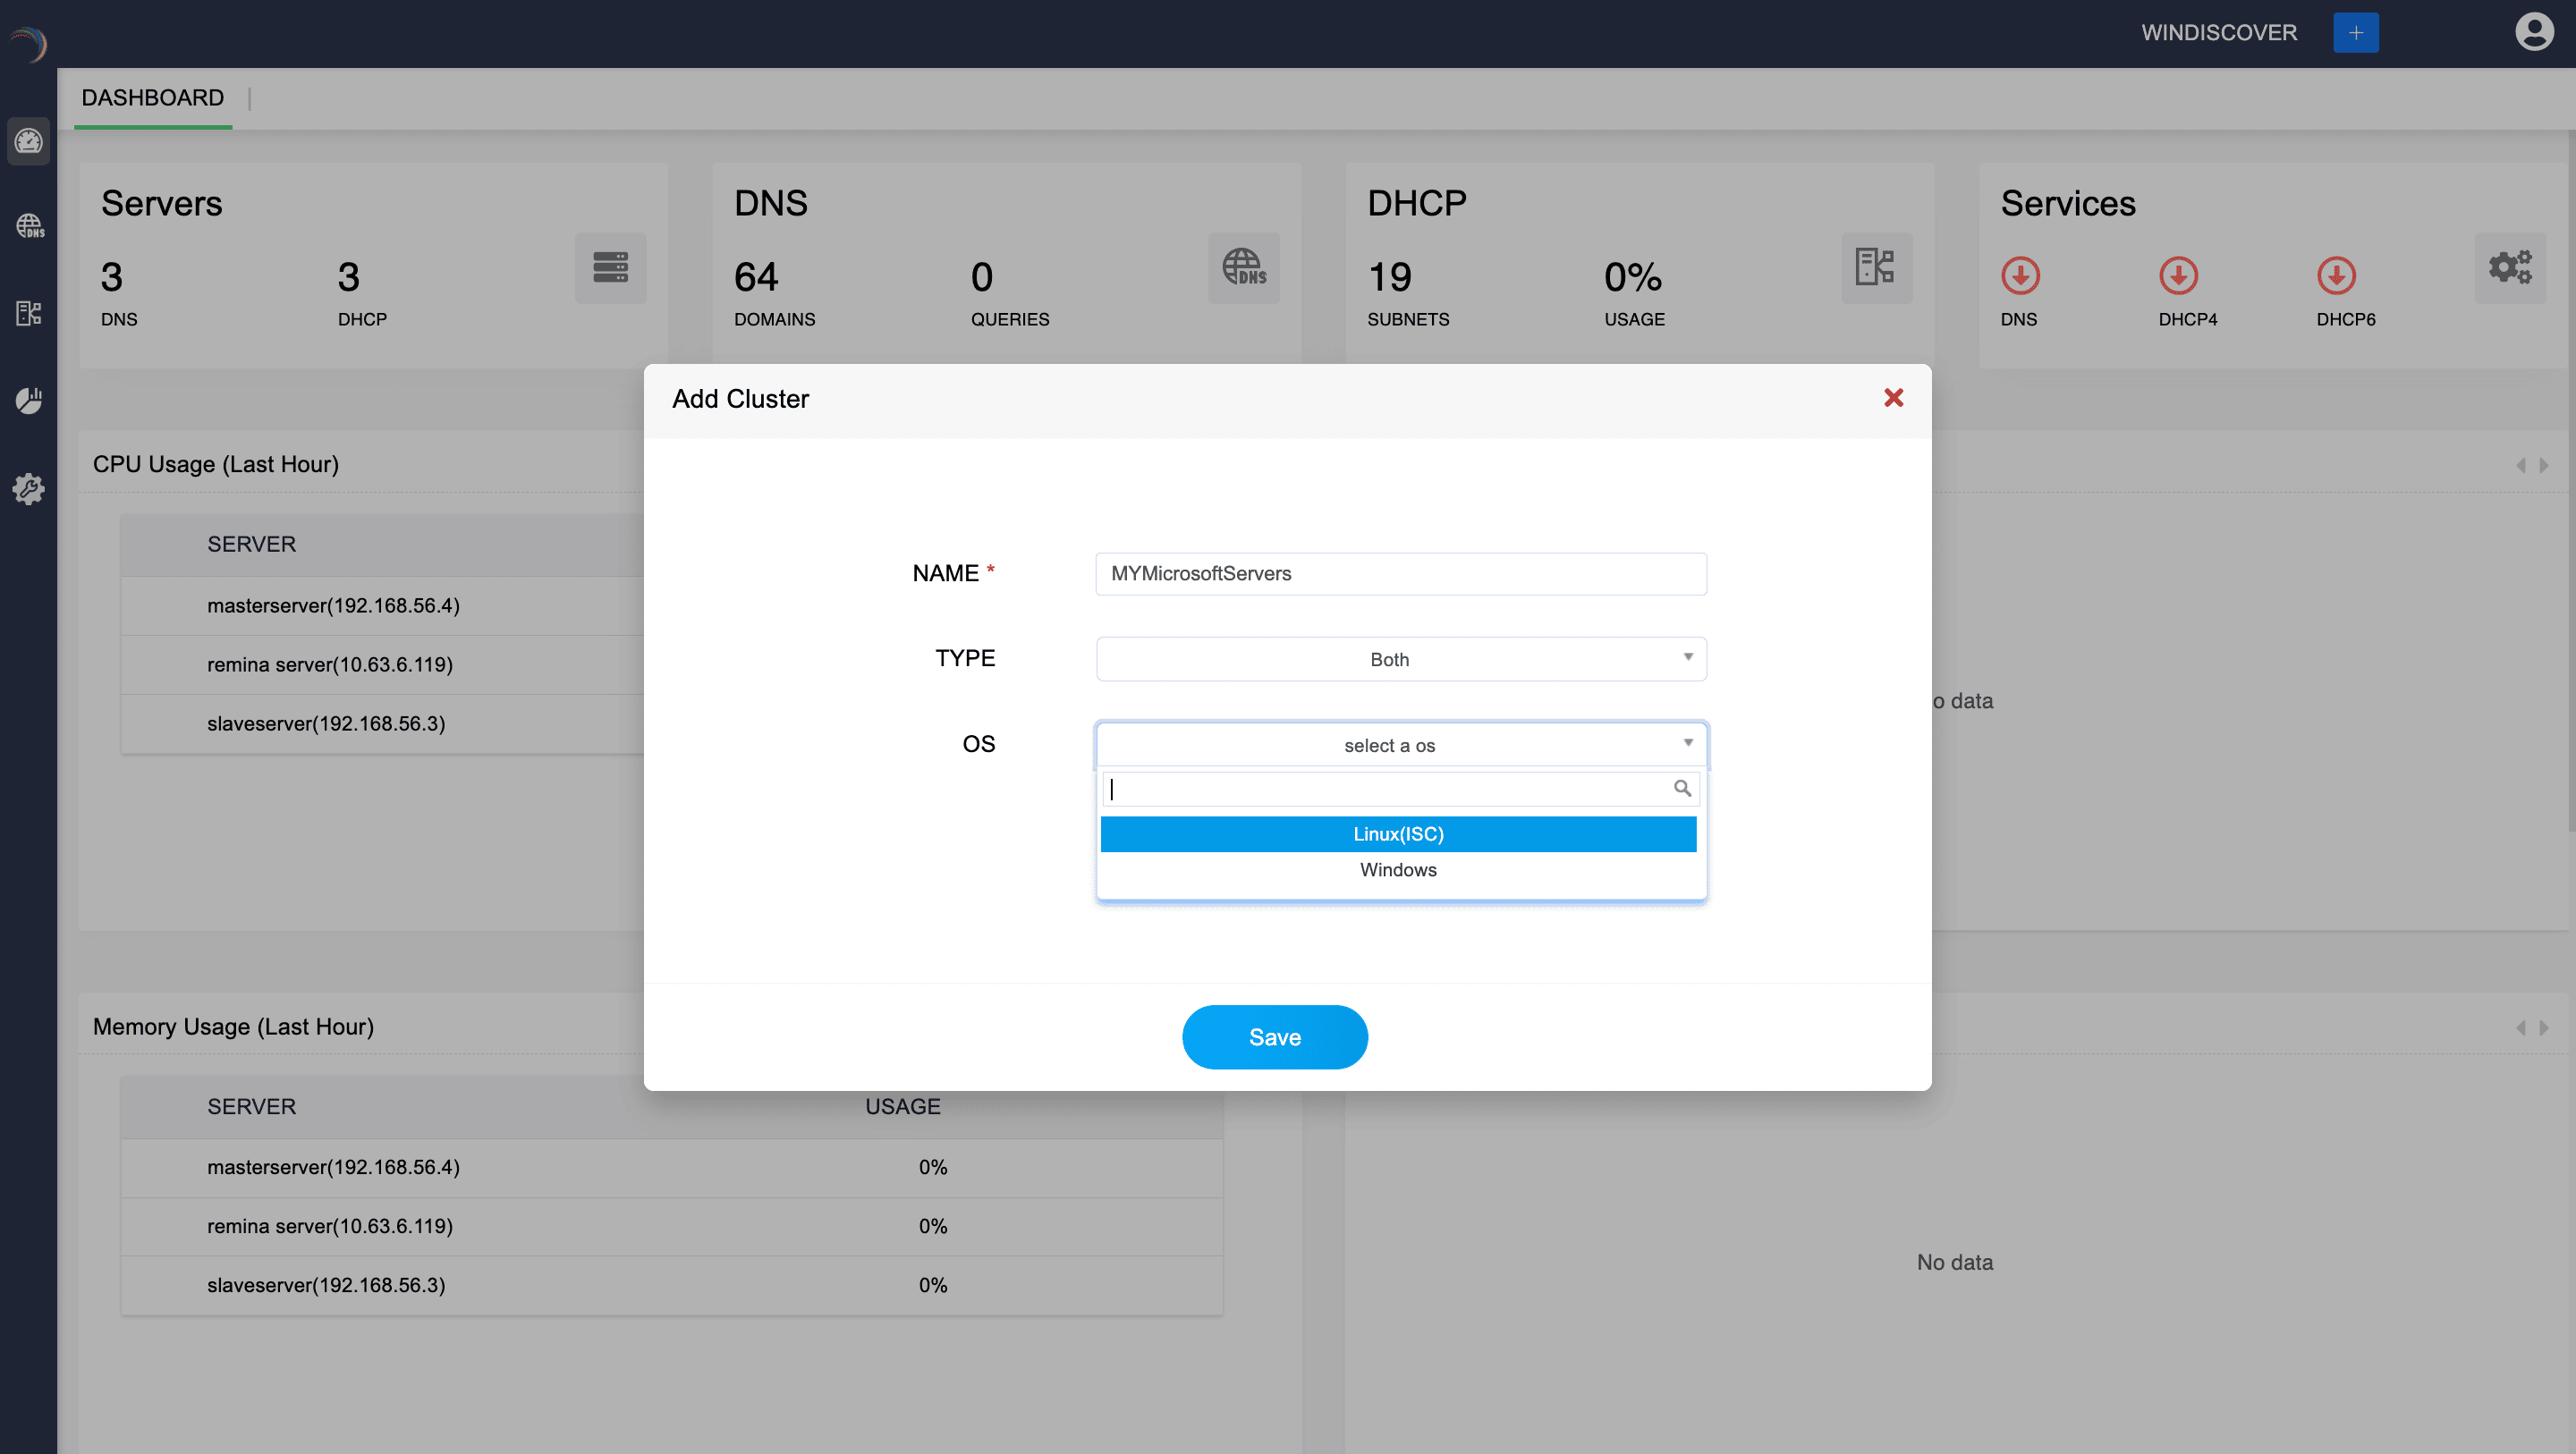
The Add Cluster window appears prompting you to enter the name and type of the cluster: DNS, DHCP or Both. Selecting either DNS or DHCP will create a cluster dedicated only for DNS servers or DHCP servers, respectively. Selecting both enables you to add both DNS and DHCP servers into the cluster.
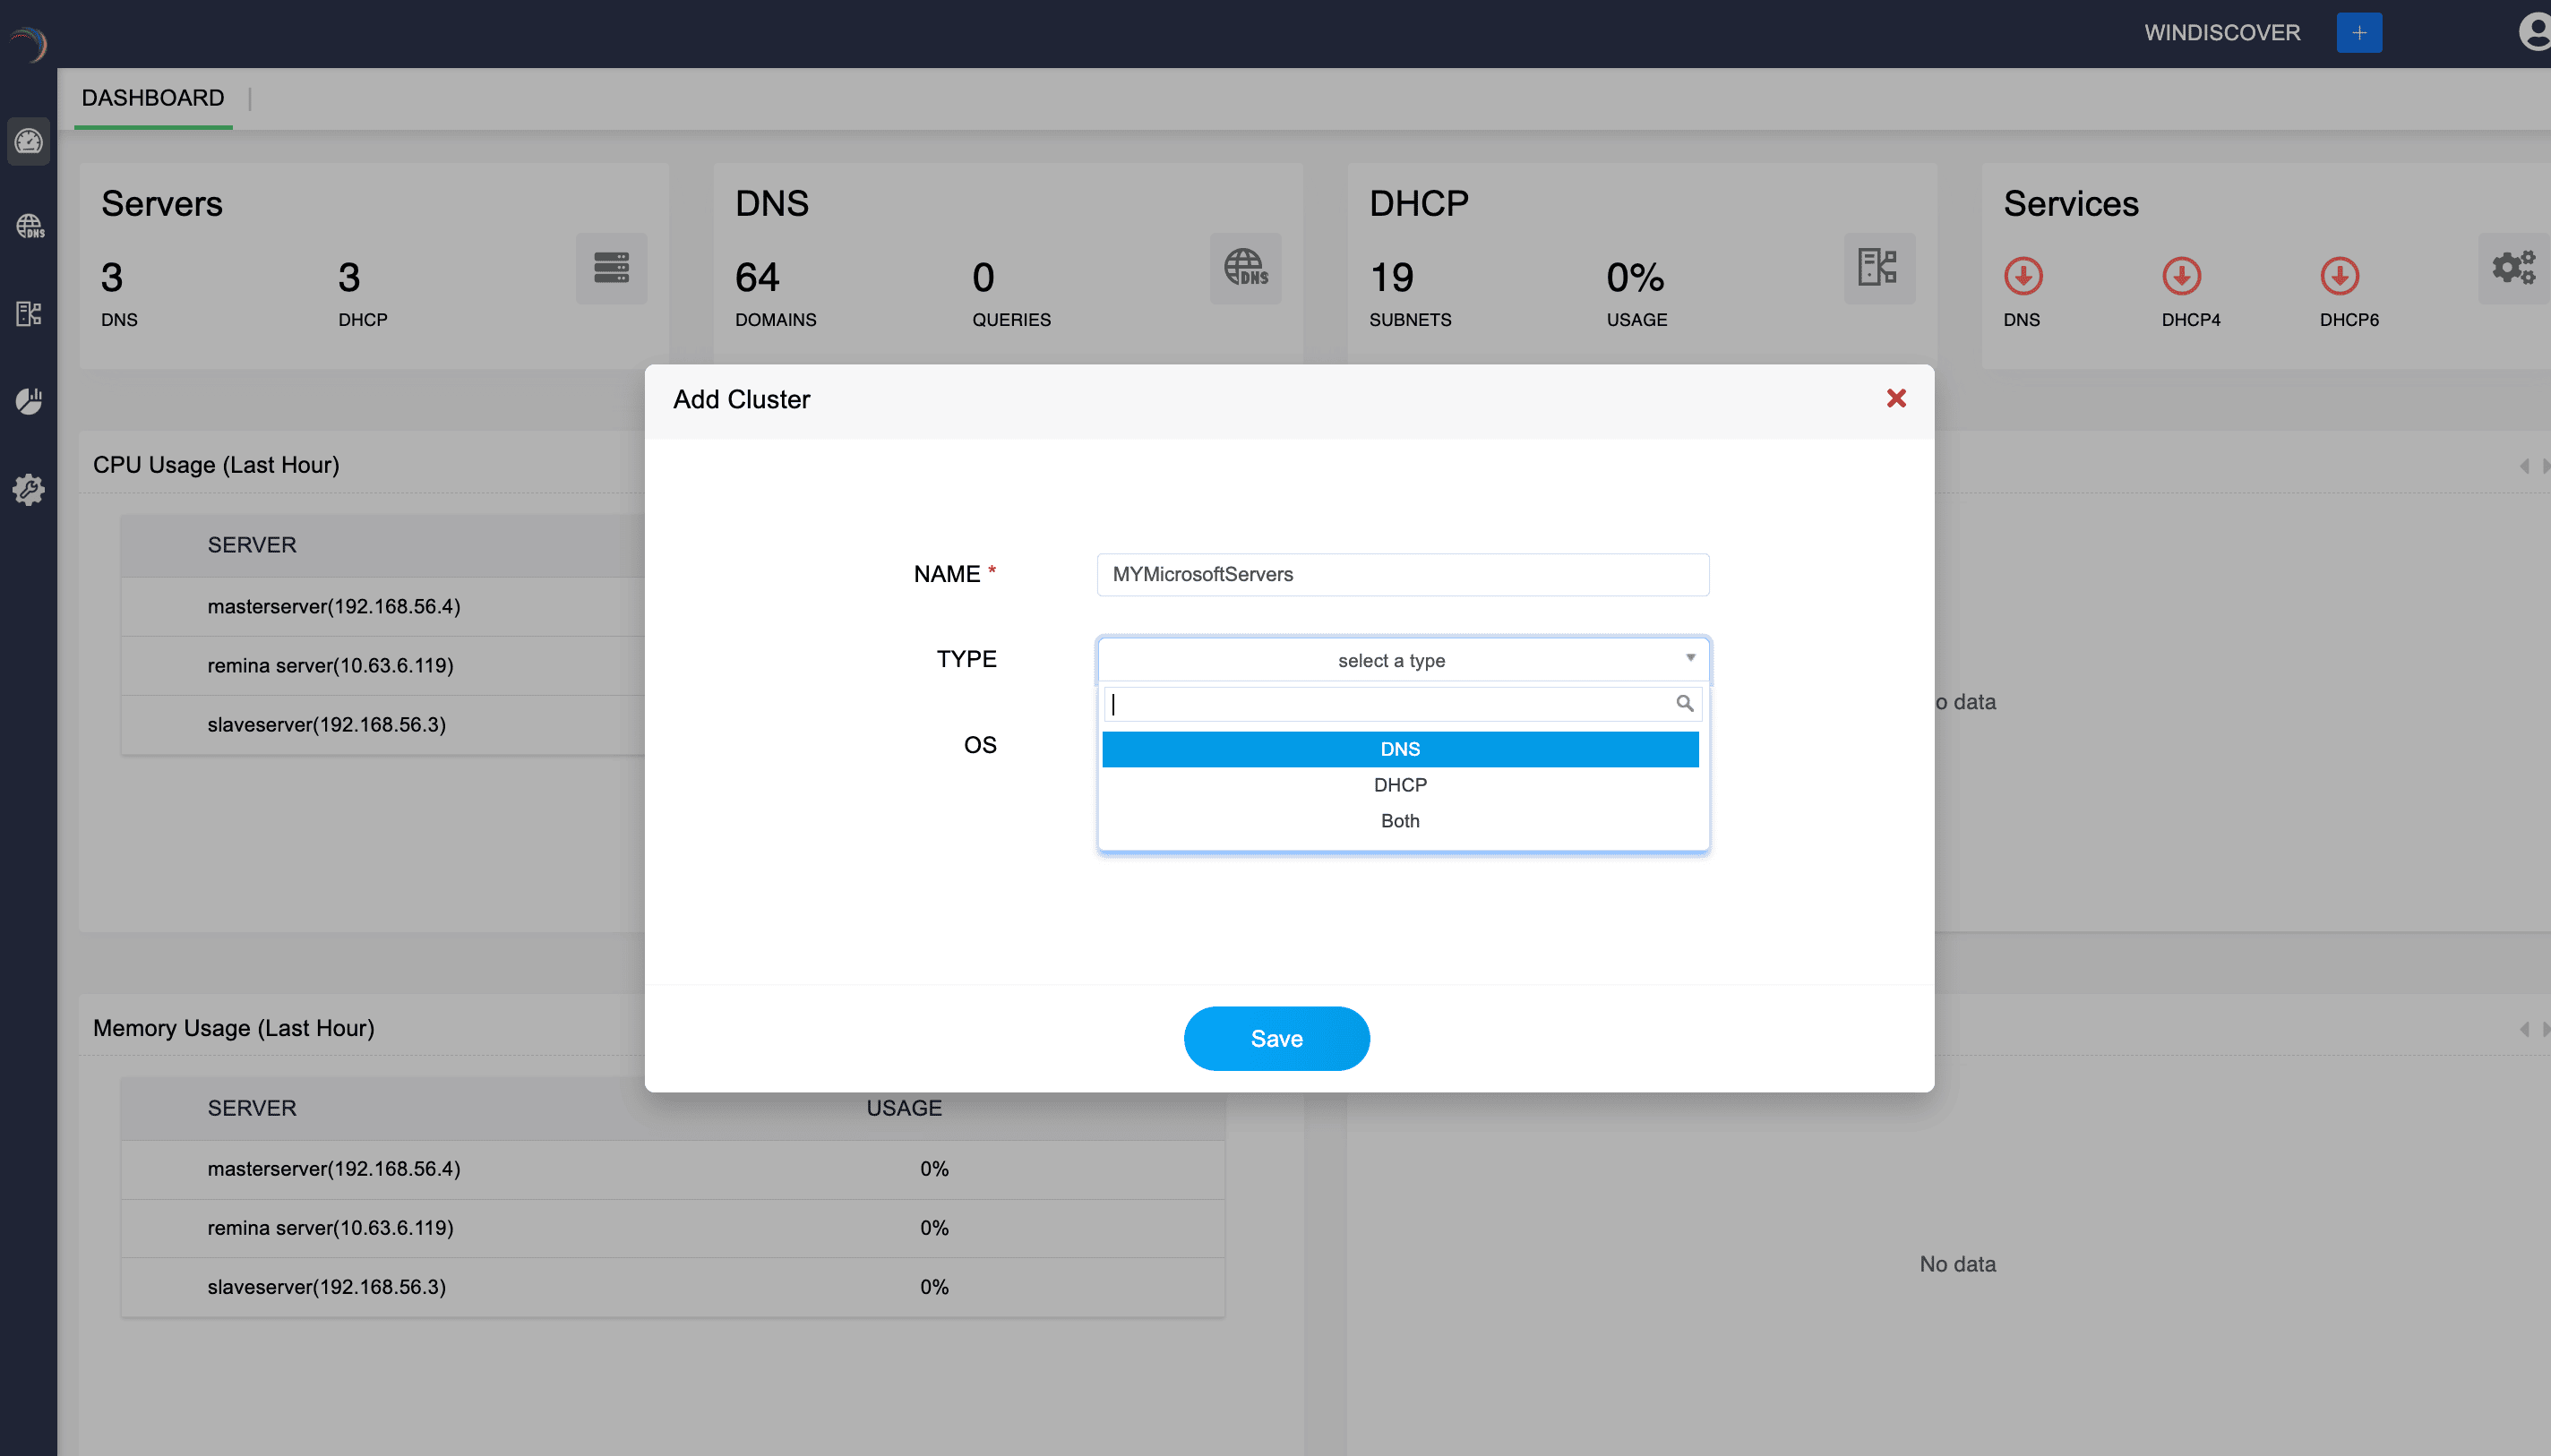
Now select the OS (Operating System). This dropdown allows you to select the operating system of the servers that will be part of the cluster.
Options include:
- Linux (ISC): Indicates the servers that are managed using Linux OS and are implementing ISC's (Internet Systems Consortium) DNS and DHCP software.
- Windows: Indicates the servers that are managed using Microsoft Windows OS and are implementing Microsoft DNS and DHCP software. This ensures that the cluster configuration is compatible with the operating systems of the included servers. Choose Windows.
-
Note: Clusters in DDI Central are logical groupings of servers - DNS, DHCP or both organized for identification and administrative purposes. These clusters operate independently of other clusters configured within DDI Central. Each cluster you add has its own internalized IP address plans, IP inventory, IP Address Manager, DNS manager and DHCP manager. A single cluster can accommodate any number of DNS servers and DHCP servers.
- Click Save to finalize the cluster configurations.
- Once the cluster is created. You'll be immediately directed to Settings->Servers page, prompting you to add new Microsoft servers into the Cluster.
Adding Microsoft DNS and DHCP servers
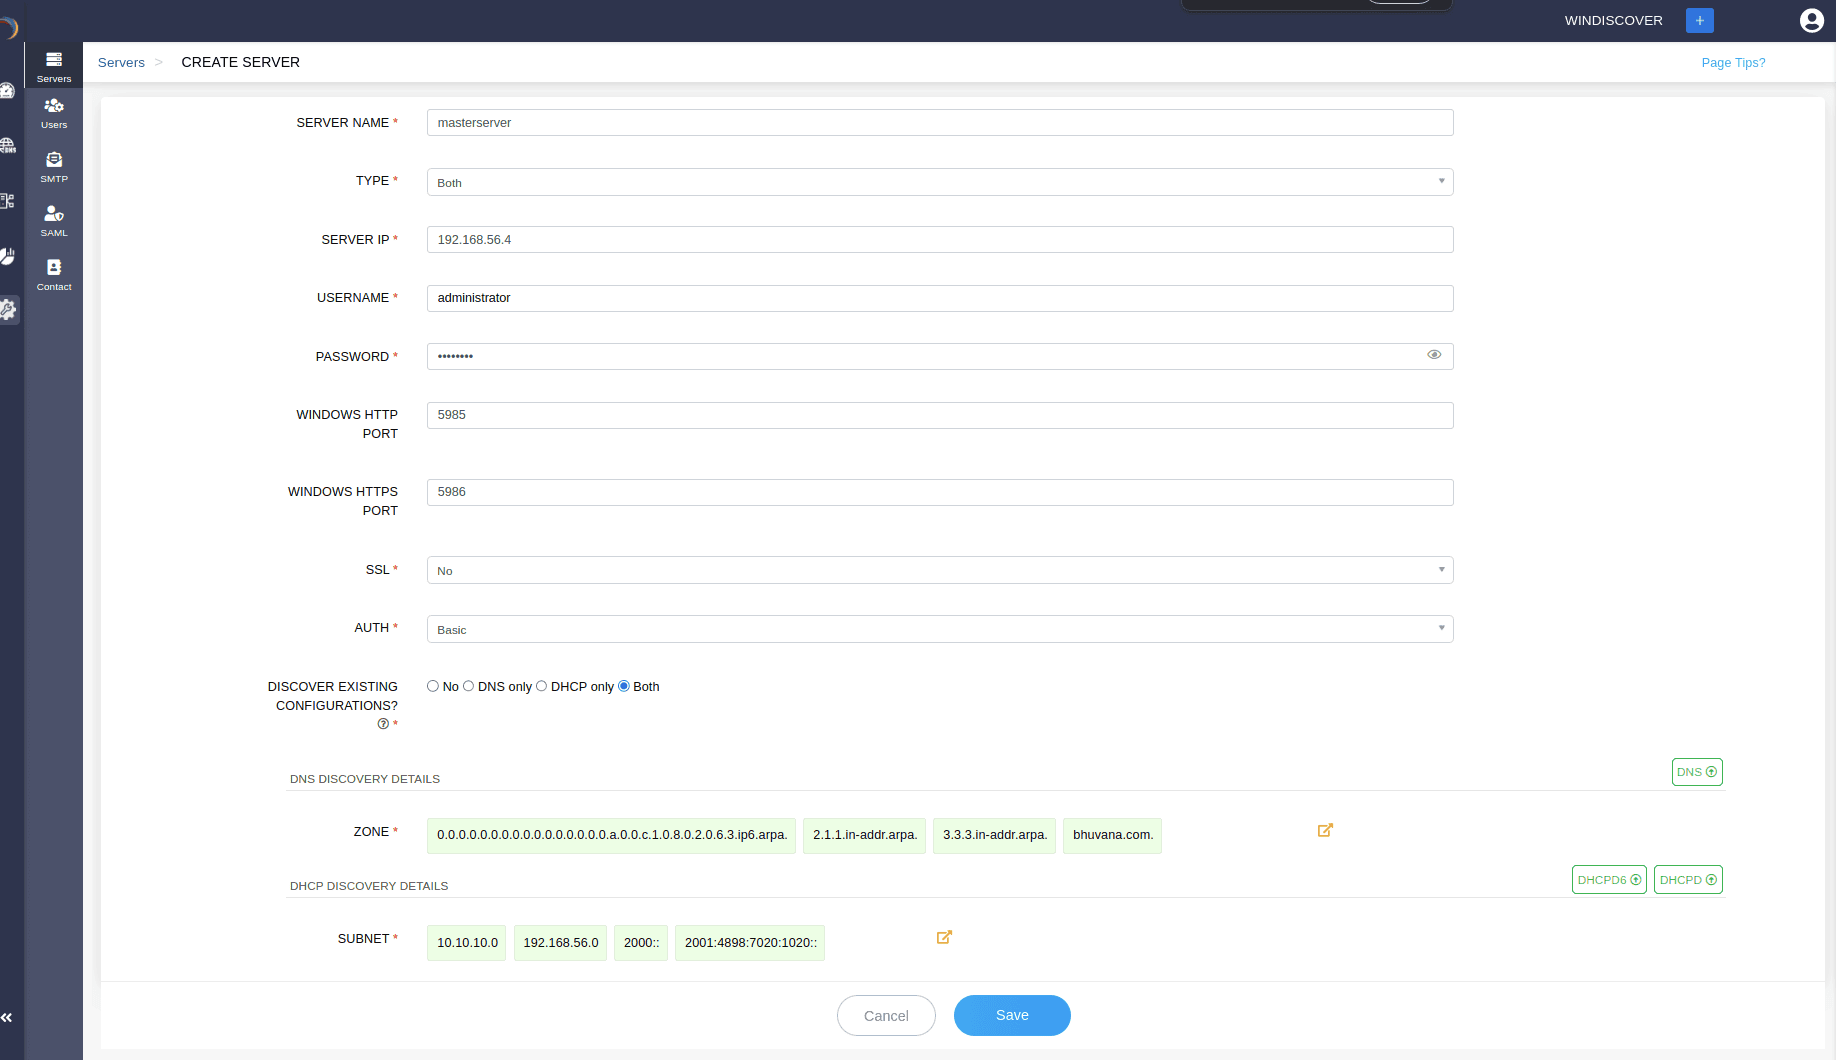
- On the Servers page, click the Add Server button in the top left corner.
-
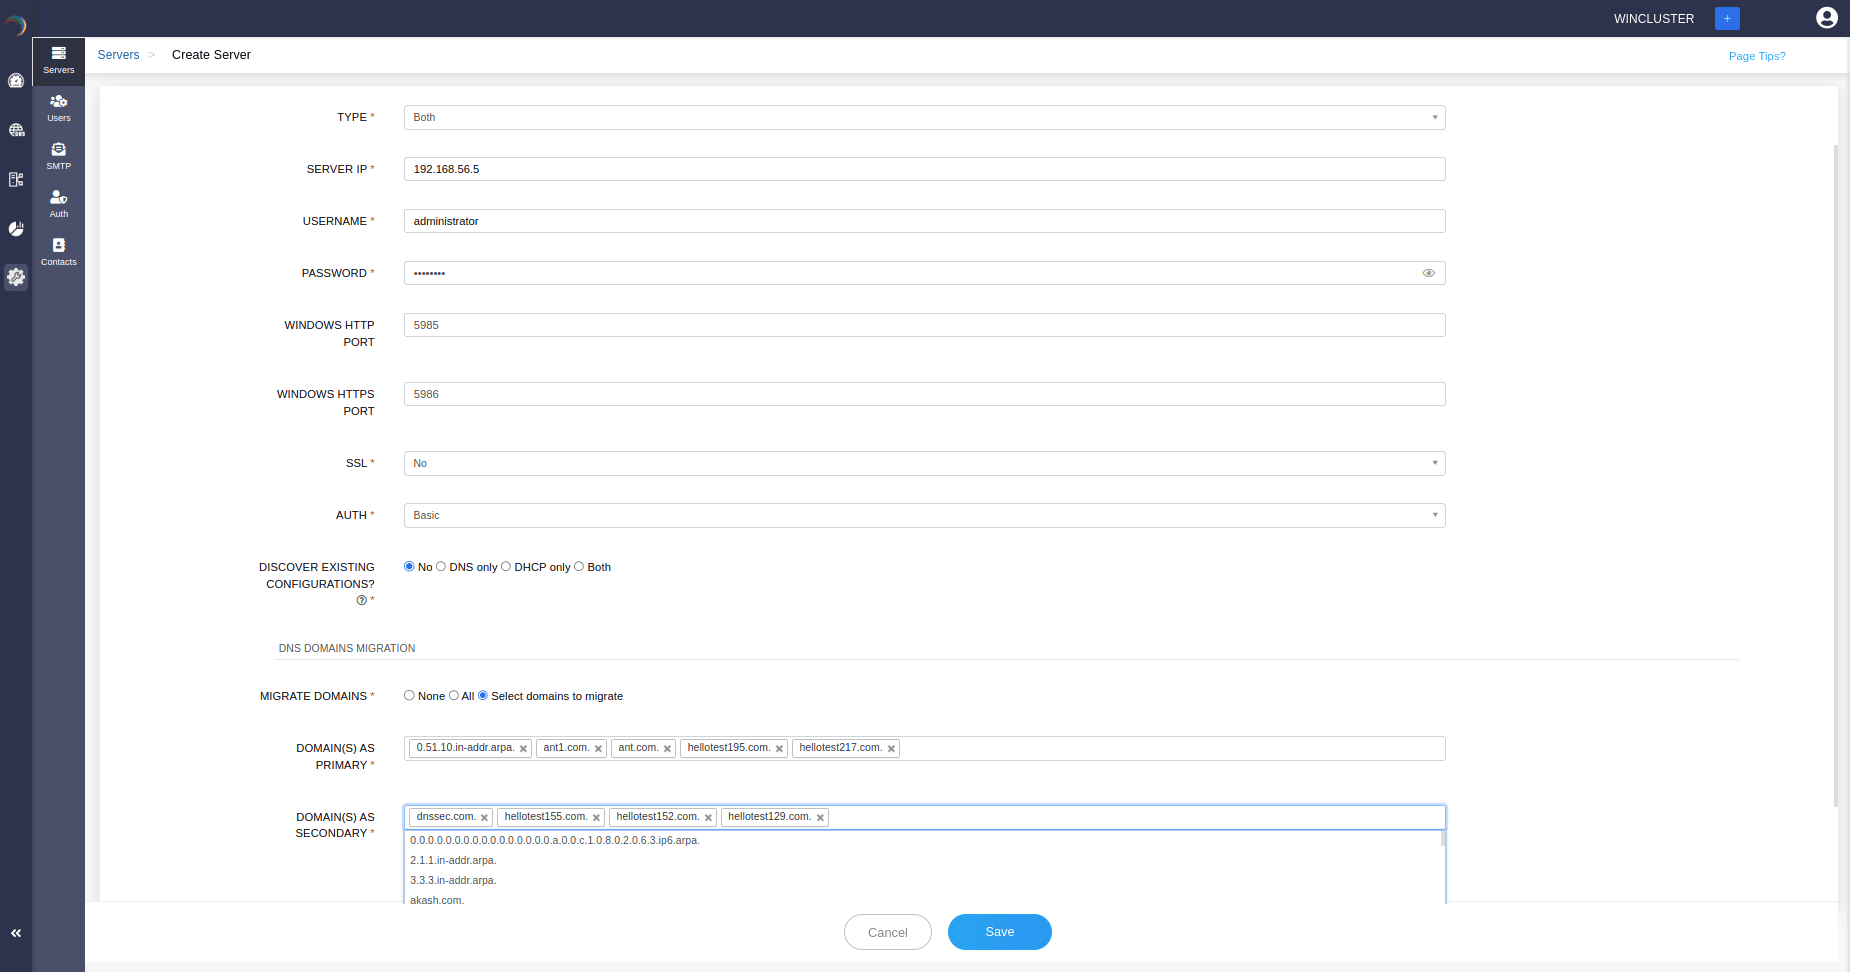
The Create Server page appears on the screen. Here, you can add your DNS-DHCP servers either by discovering existing server configurations or by simply adding the server to the DDI Central console and configure it using the DDI Central user interface at later stages.
-
Enter the server details like,
SERVER NAME: Assign a unique name to the server for identification purposes. This helps administrators easily identify and manage the server within the management console.
- TYPE:Defines the scope of services managed by the server. Here specify the type of network services the server will provide. Options include:
-
SERVER IP: Enter the IP address of the server. DDI Central console uses this IP address to connect to and manage the server remotely.
-
USERNAME: Username is used to authenticate with the server. This way DDI Central ensures that only authorized users can manage and configure the server.
Special Instructions for entering usernames when adding microsoft DNS and DHCP servers in DDI Central (installed via .exe installer)
For successful authentication using CredSSP, Negotiate, or NTLM, follow these cases:Case 1:
If the Domain Controller is running on the Windows DNS/DHCP machine, enter the username in the format:
username@domainname
Case 2:
If the Domain Controller is not running on the Windows DNS/DHCP machine, enter the username as:
hostname\\username
hostname: The Windows machine’s hostname
username: The Windows machine’s username
-
PASSWORD: Enter the password in conjunction with the username to authenticate with the server. Provides secure access to the server for management and configuration.
-
WINDOWS HTTP PORT: Specify the port number to be used by the DDI Central Console for non-secure HTTP connections directly to the Microsoft server. The default port is typically 5985.
-
WINDOWS HTTPS PORT: Specify the port number to be used by the DDI Central Console used for secure HTTPS connections directly to the Microsoft server. The default port is typically 5986.
-
Specify whether SSL (Secure Sockets Layer) is to be used for secure communication. This way, it enhances the security by encrypting data transmitted between the server and clients. Options include:
Choosing Yes: SSL is enabled, ensuring encrypted communication.
Choosing No: SSL is disabled, meaning communication is not encrypted.
-
Select the authentication method that is to be used to verify the identity of users. This defines the security level and method of the authentication process, ensuring secure access to the server.Options include:
Basic: Basic authentication, where the username and password are encoded with Base64. This method is simple but less secure.
CredSSP (Credential Security Support Provider): Provides a secure delegation of user credentials from the client to the target server, allowing the server to access network resources on behalf of the user.
Negotiate: Uses either Kerberos or NTLM protocol for authentication. The protocol used depends on the client's environment and configuration.
NTLM (NT LAN Manager): A suite of Microsoft security protocols intended to provide authentication, integrity, and confidentiality to users.
-
ENCRYPTION: Ensures that data transmitted to and from the server is encrypted, providing security against data interception. Options include:
Encryption is never used, meaning all data is transmitted in plain text. This option is the least secure and should only be used in trusted, secure environments.
Encryption is used based on the capabilities of the client and server. If both support encryption, it will be enabled. This option provides a balance between security and compatibility.
Always: Encryption is always used, ensuring that all data transmitted to and from the server is encrypted. This option provides the highest level of security
-
DDI Central discovery process
DISCOVER EXISTING CONFIGURATIONS? : Specify whether to discover existing DNS and DHCP configurations on the server. This helps in discovering and importing all the existing DNS-DHCP-IP configurations into the DDI Central management console for easier management. Options include:
No: Do not discover existing configurations. Specify No if you just want to add and setup a new server from the scratch. You can setup the required DNS, DHCP or combined configurations to your server to get it configured through the user-friendly DDI Central user interface later.
DNS only: Discovers only DNS configurations.
DHCP only: Discovers only DHCP configurations.
Both: Discovers both DNS and DHCP configurations.
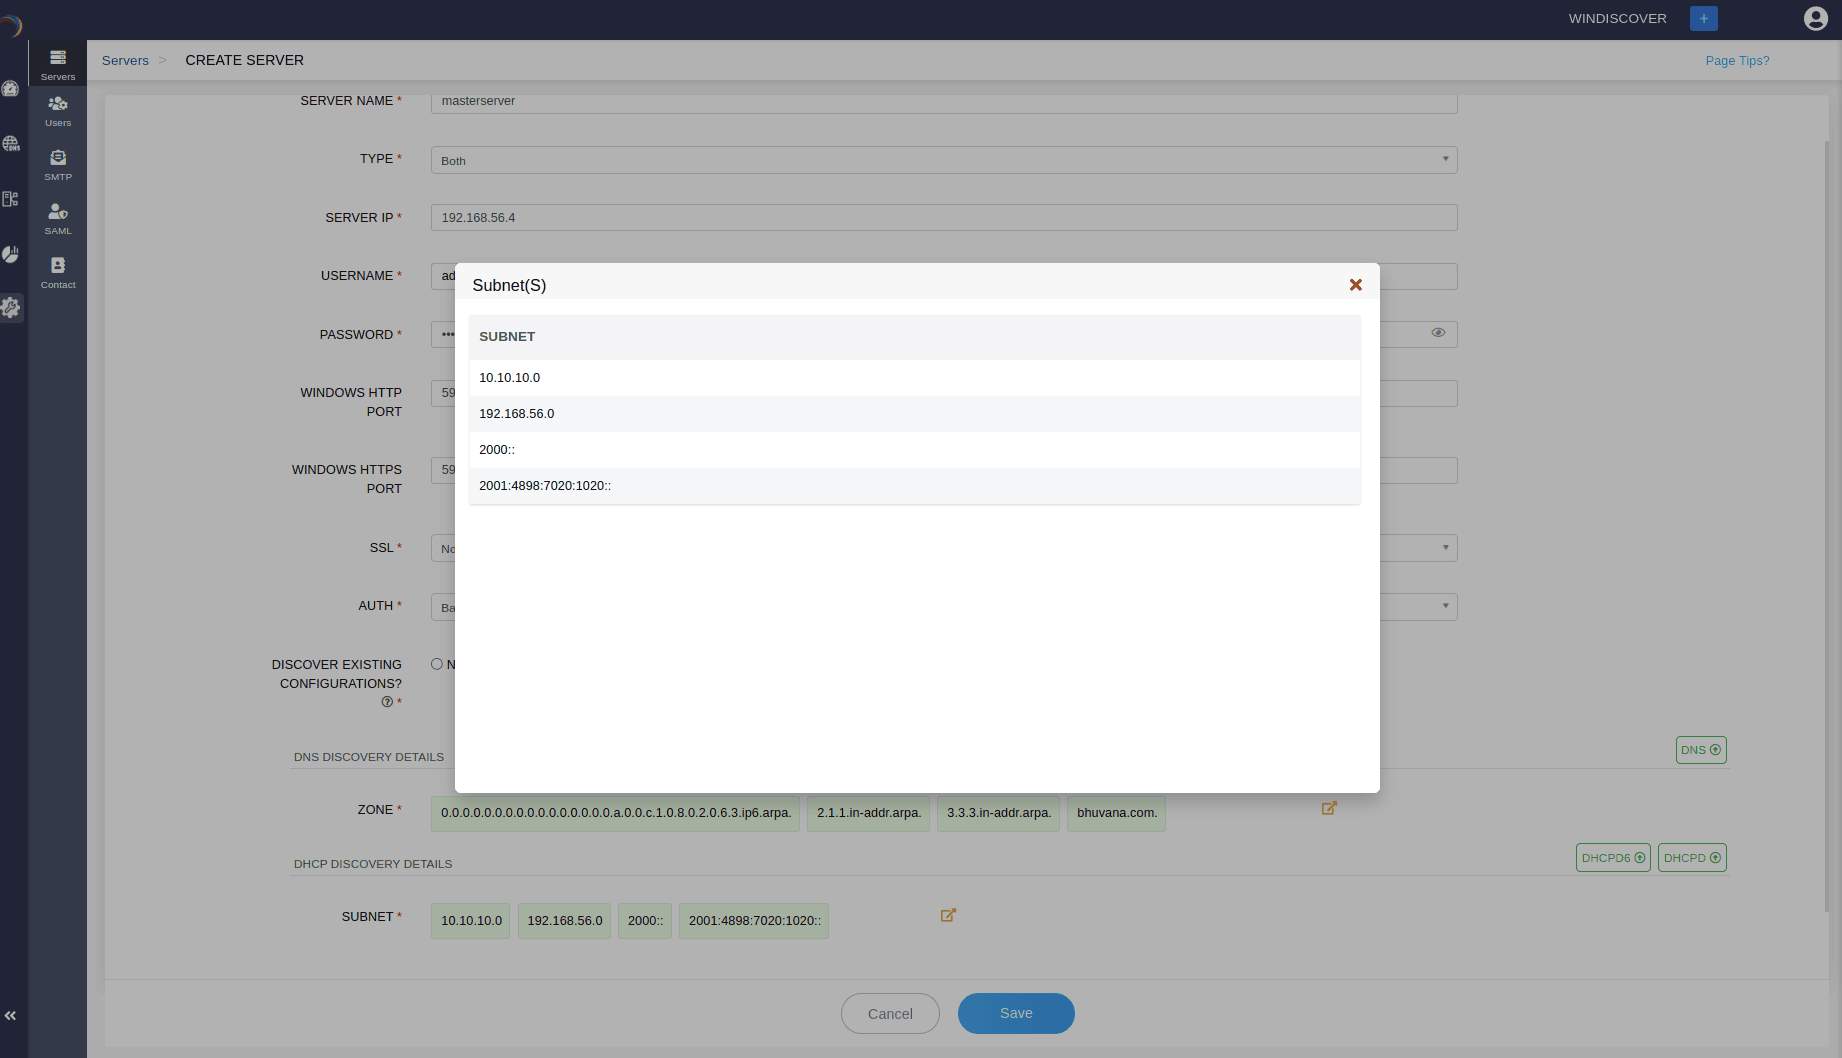
- Specifying any one of the options :DNS, DHCP, or Both above prompts DDI Central to instantly connect to the target Microsoft server to fetch and list all the existing configurations from the server, in the DNS DISCOVERY DETAILS and DHCP DISCOVERY DETAILS sections respectively. DDI Central in discovery mode discovers all the advanced configurations of DNS-DHCP services, the whole IP address plan and the current IP address inventory.
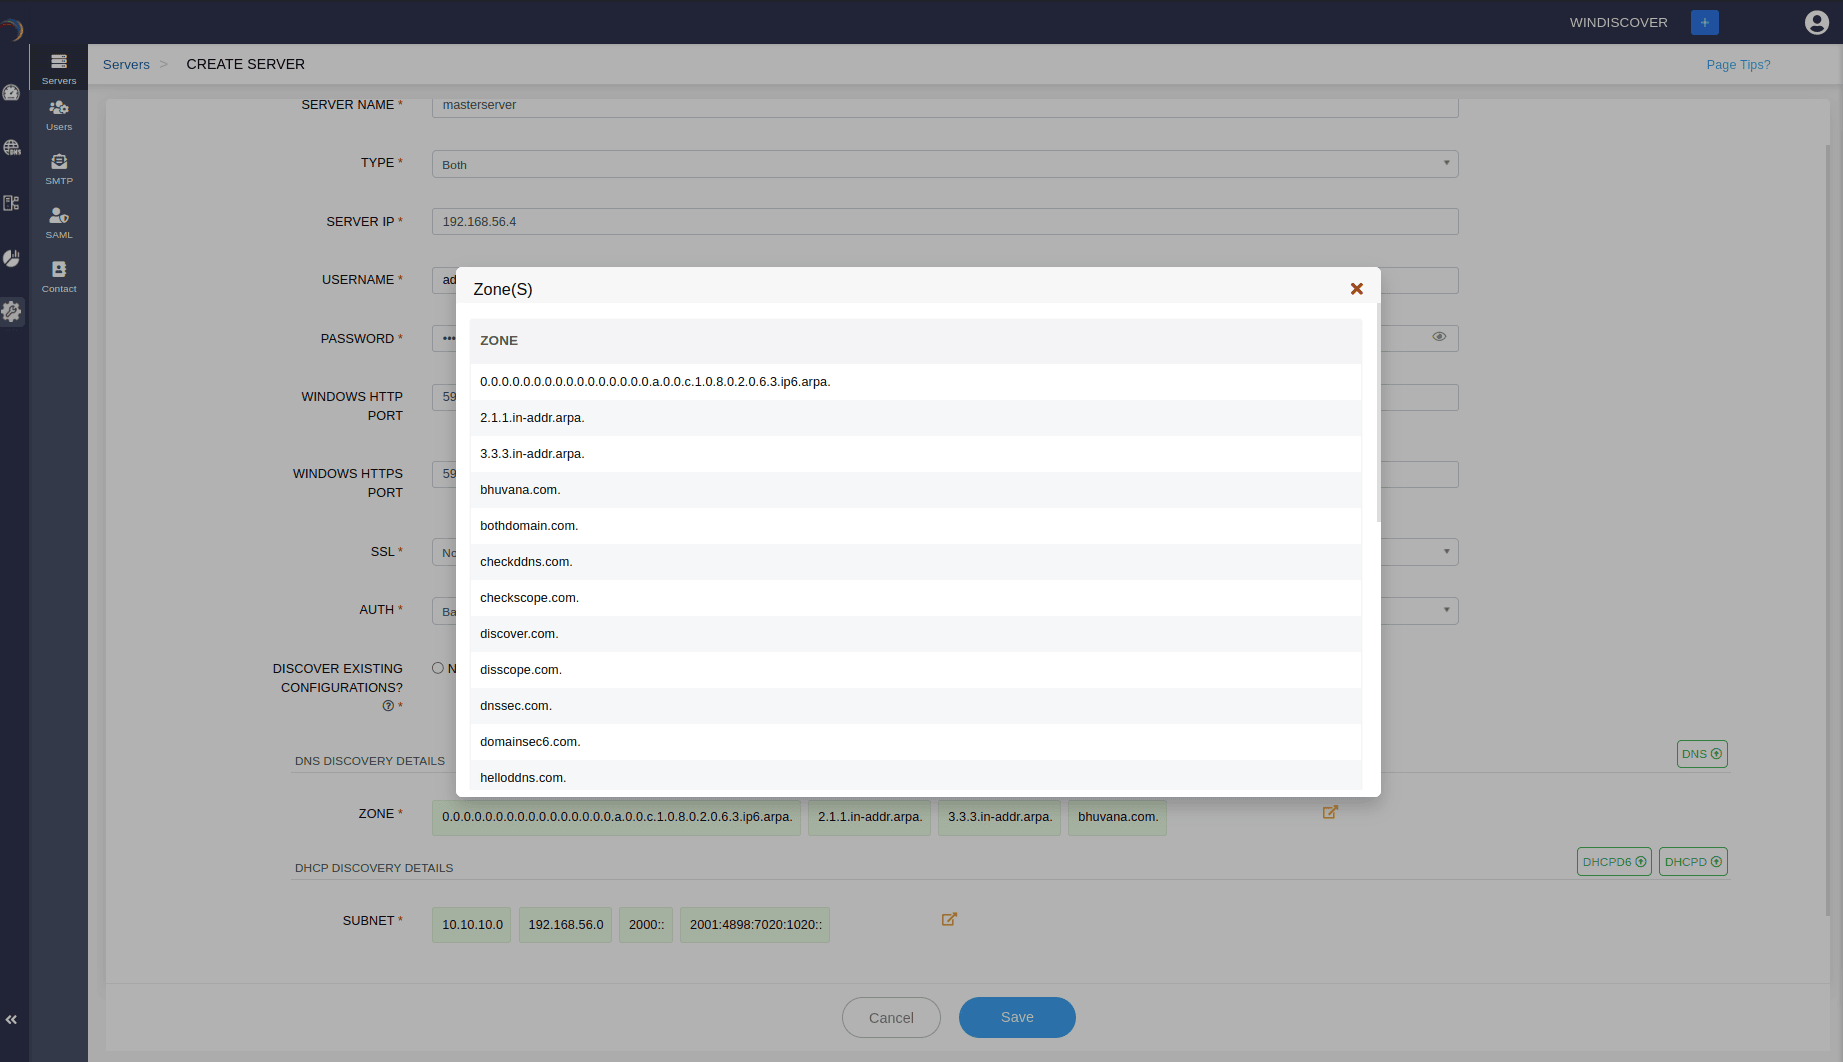
- DNS Authoritative Zones and their respective records
- Active Directory or AD Zones and their records
- Stub Zones and Forwarders
- DDNS Zones (Discovery of both DNS and DHCP configurations required)
- DNS Zone Scopes
- Named IPv4 and IPv6 ClientSubnets
- Named Query resolution Policies
- Response Rate Limiting setting
- Named Response Rate Limiting exception policies
- Forwarders list
- DNS Recursion Settings
- DHCP scopes including, Subnets with declared address pools, Superscopes, Multicast subnets
- DHCP reservations/ Host Configurations
- DHCP policies
- Dual stack IP address plan
- Dual Stack IP address inventories of configured subnets along with their availability status
- DHCP failover configurations
- DHCP Vendor Classes
- DHCP User Classes
- Standard DHCP options under each Vendor and User Classes
- Custom option under each Vendor and User Classes
-
Specify No if you just want to add and setup a new server from the scratch. You can setup the required DNS, DHCP configurations to your server through the user-friendly DDI Central user interface later.
-
This way you can add new servers to DDI Central's Management UI console and enable DDI Central to implement, configure, and manage DNS, DHCP and IPAM services of your network infrastructure from scratch.
-
If you have chosen the discovery option as outlined in Step 14, ManageEngine DDI Central will begin to discover configurations from the designated Microsoft server for each service.
Note: The discovery process takes a considerable amount of time depending on the volume of configurations in the servers. Wait until the whole process completes.
Once you add your server into the DDI Central console you can further proceed modifying the discovered DNS-DHCP-IPAM configurations or quickly start setting up the DNS-DHCP-IPAM configurations for the new server through the user-friendly DDI Central user interface.
-
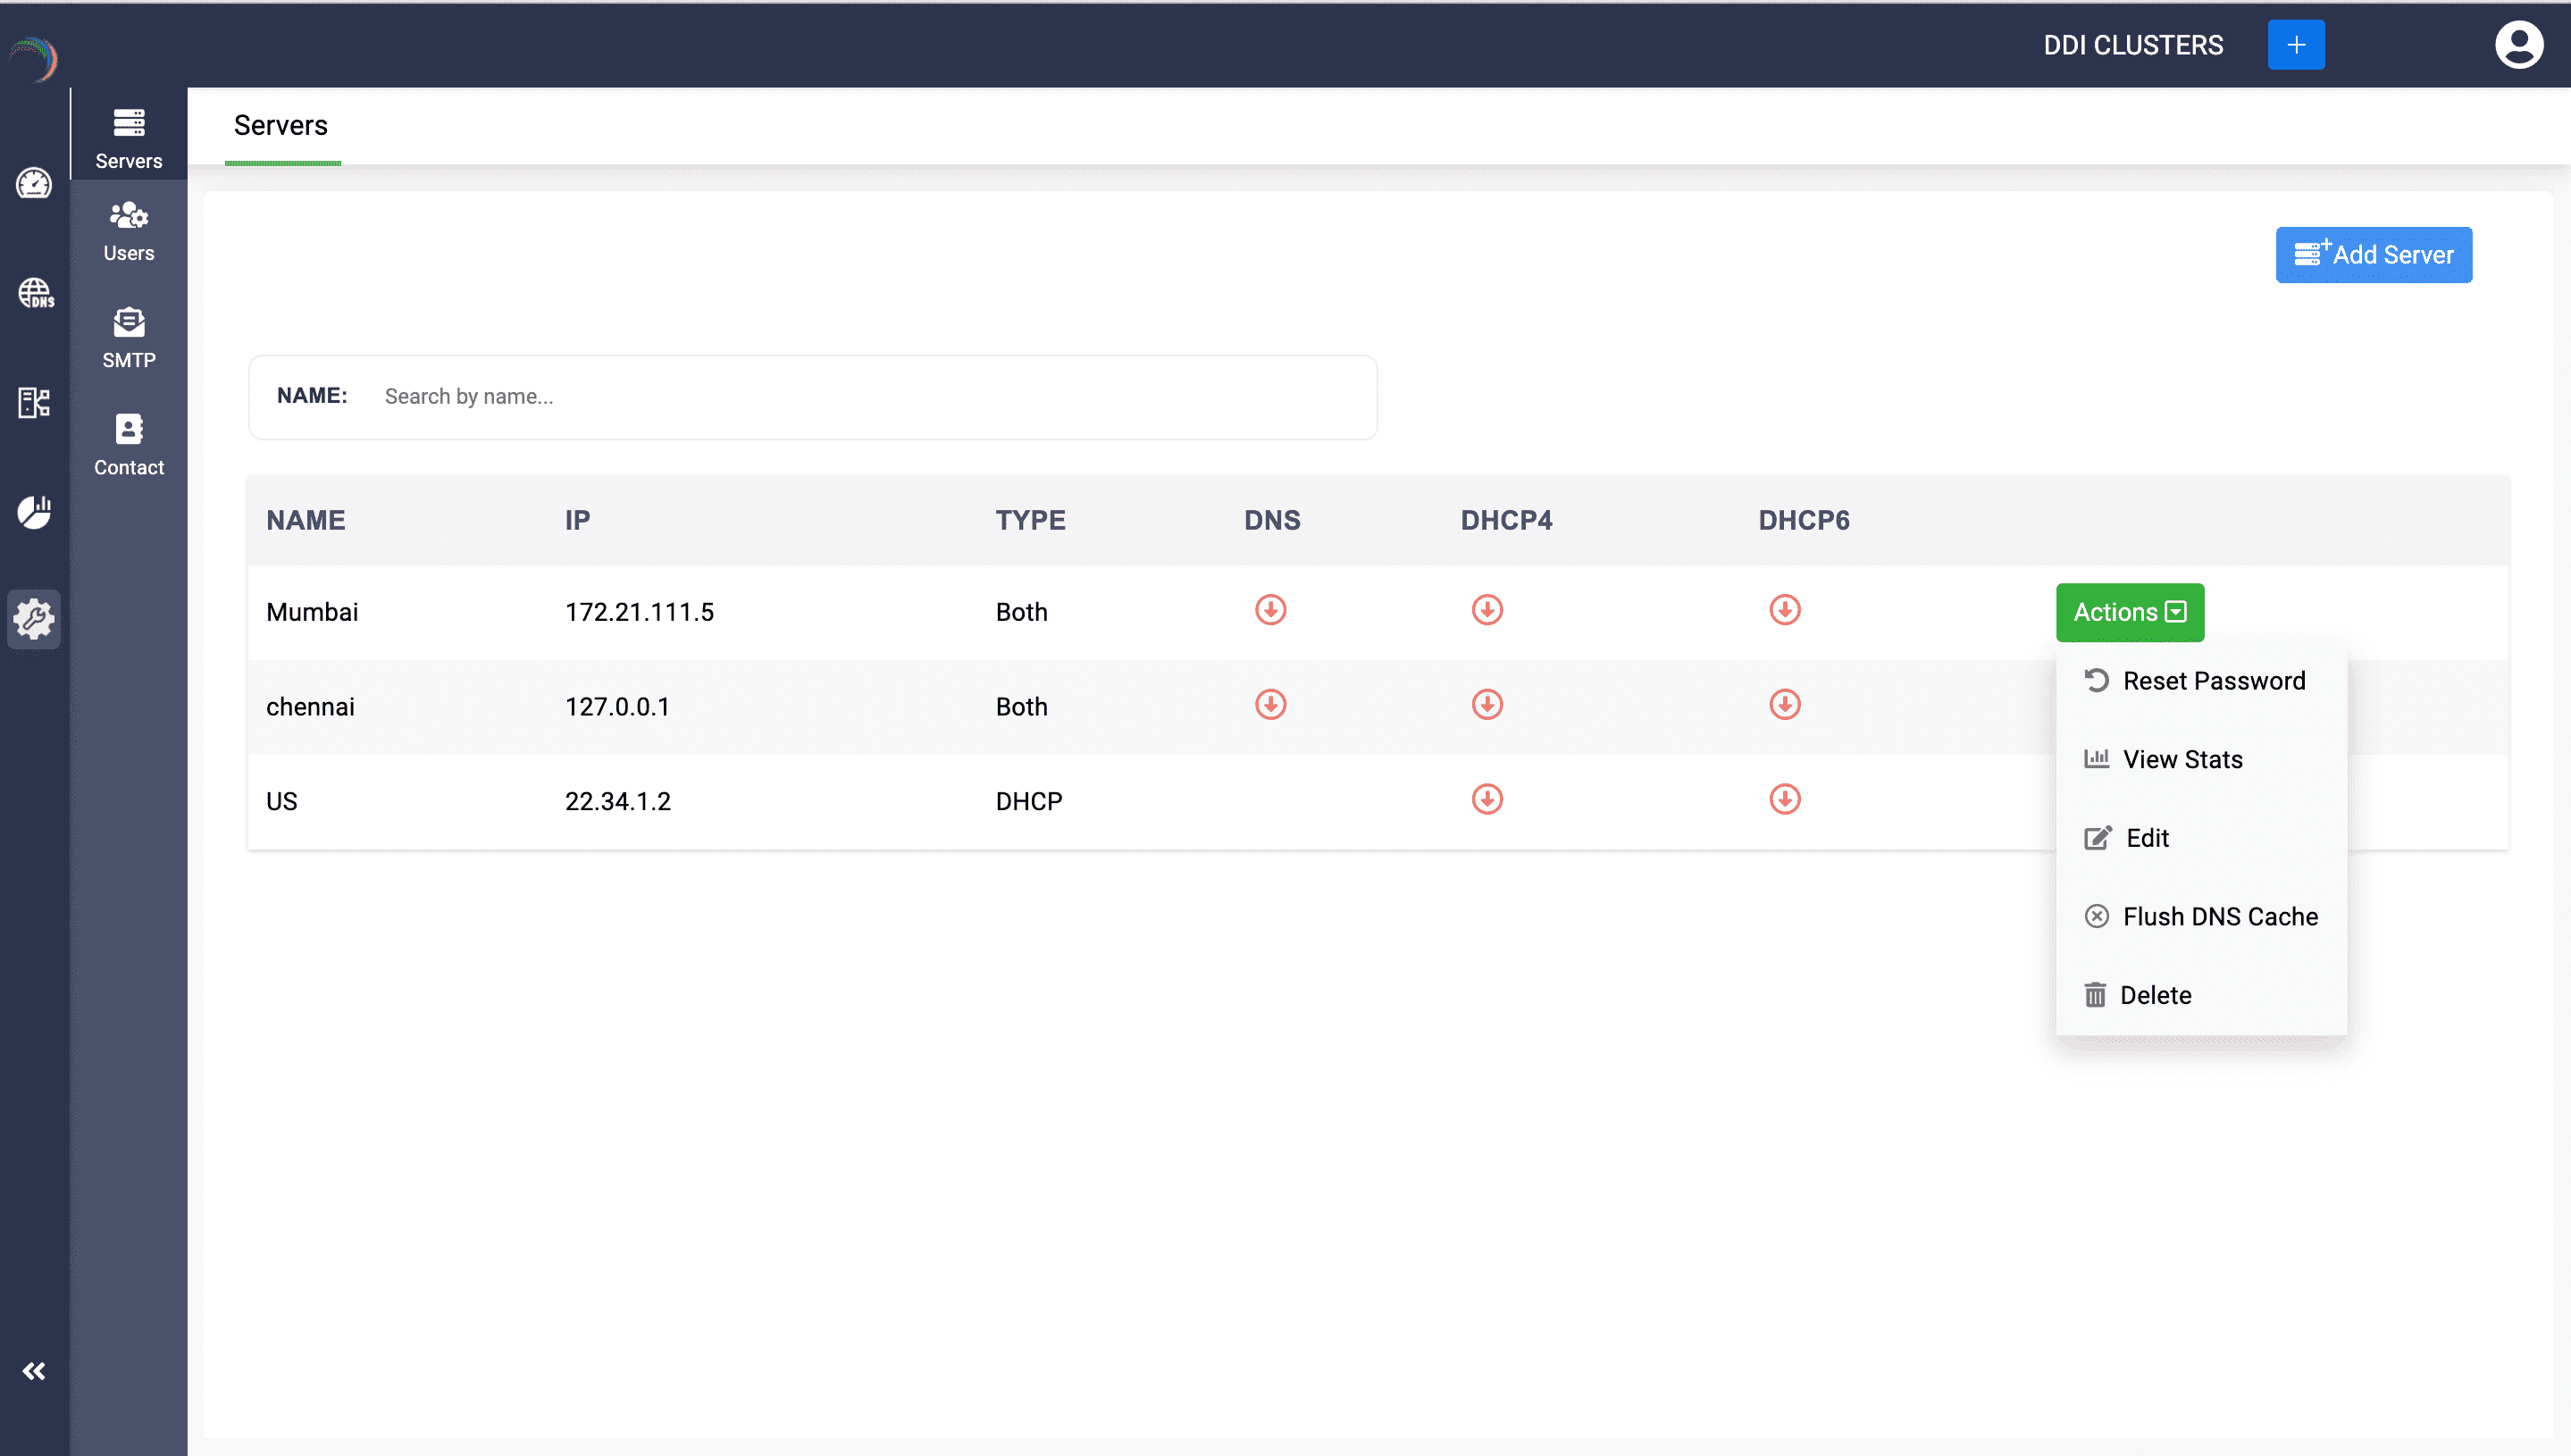
You can access the added servers with all the configurations in place, listed under the Setting->Servers Page. Here you can perform general actions like editing the server configurations, deleting the server, monitoring the server(s) health stats.
-
Other than the general actions, you can also perform the following actions:
Action 1: Flush DNS Cache:
Hit the button Flush DNS Cache to refresh the DNS cache of the selected server to ensure that the DNS information hosted on the server is up-to-date.
-
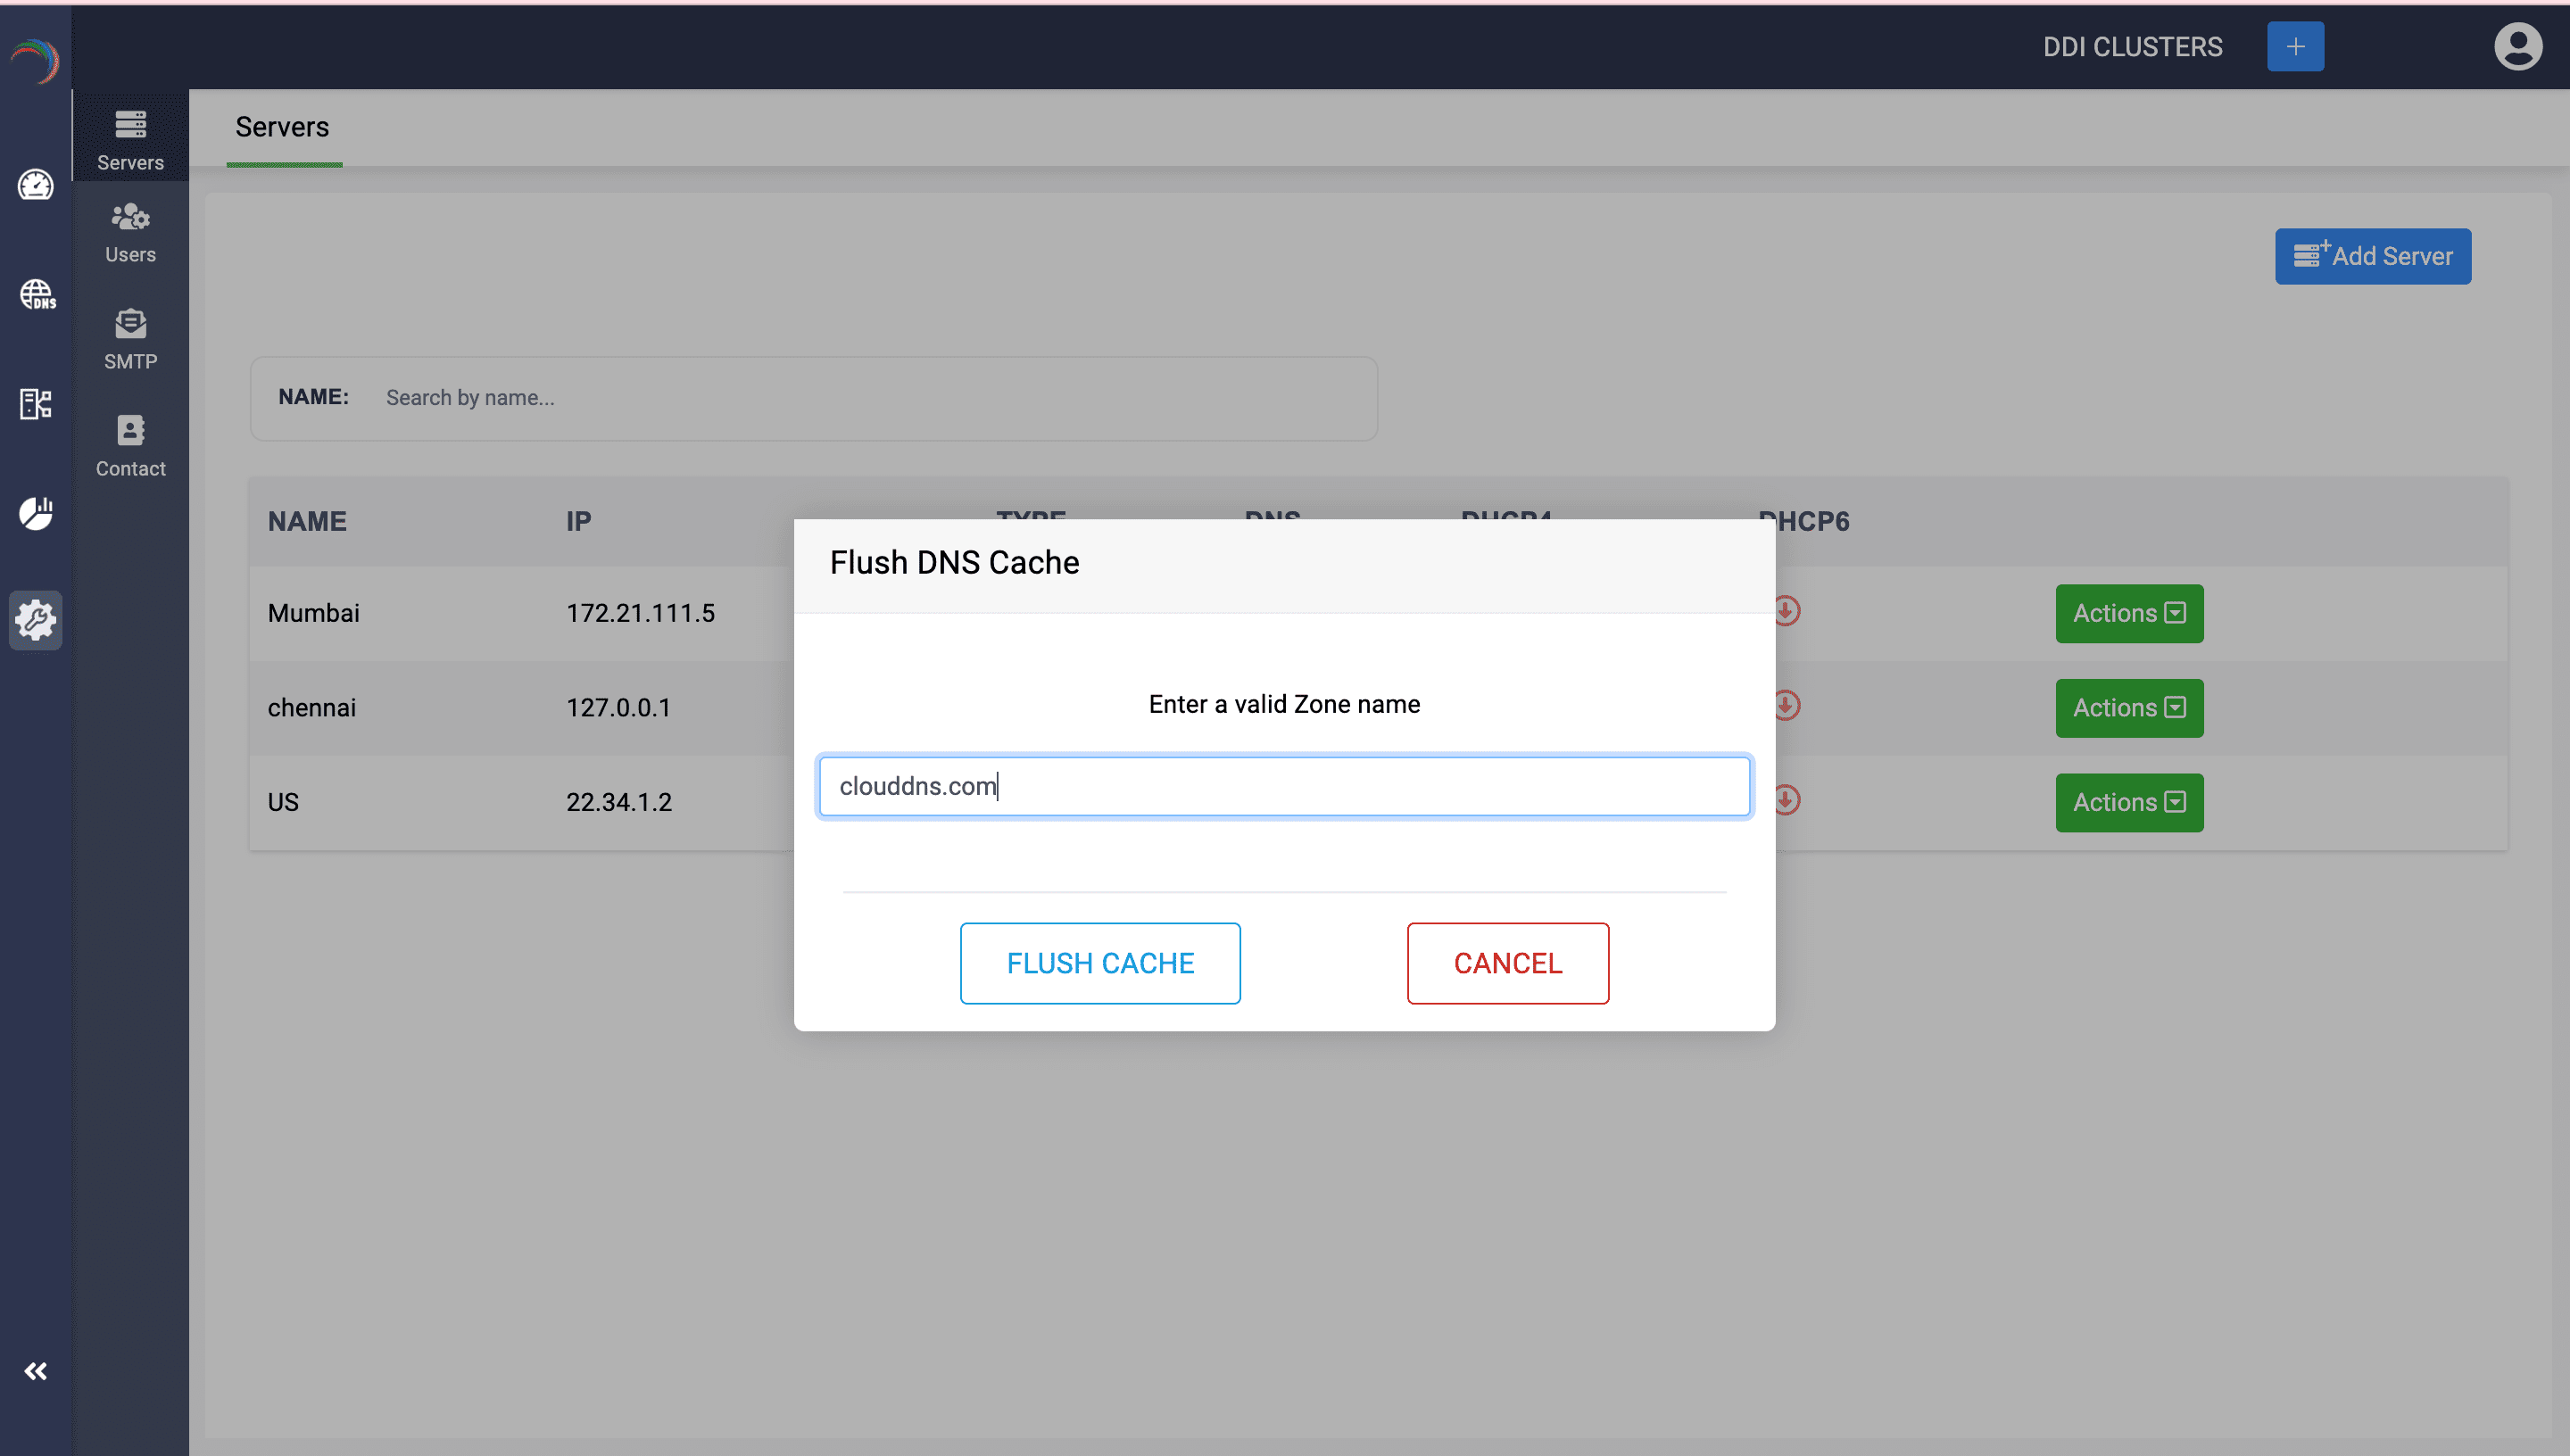
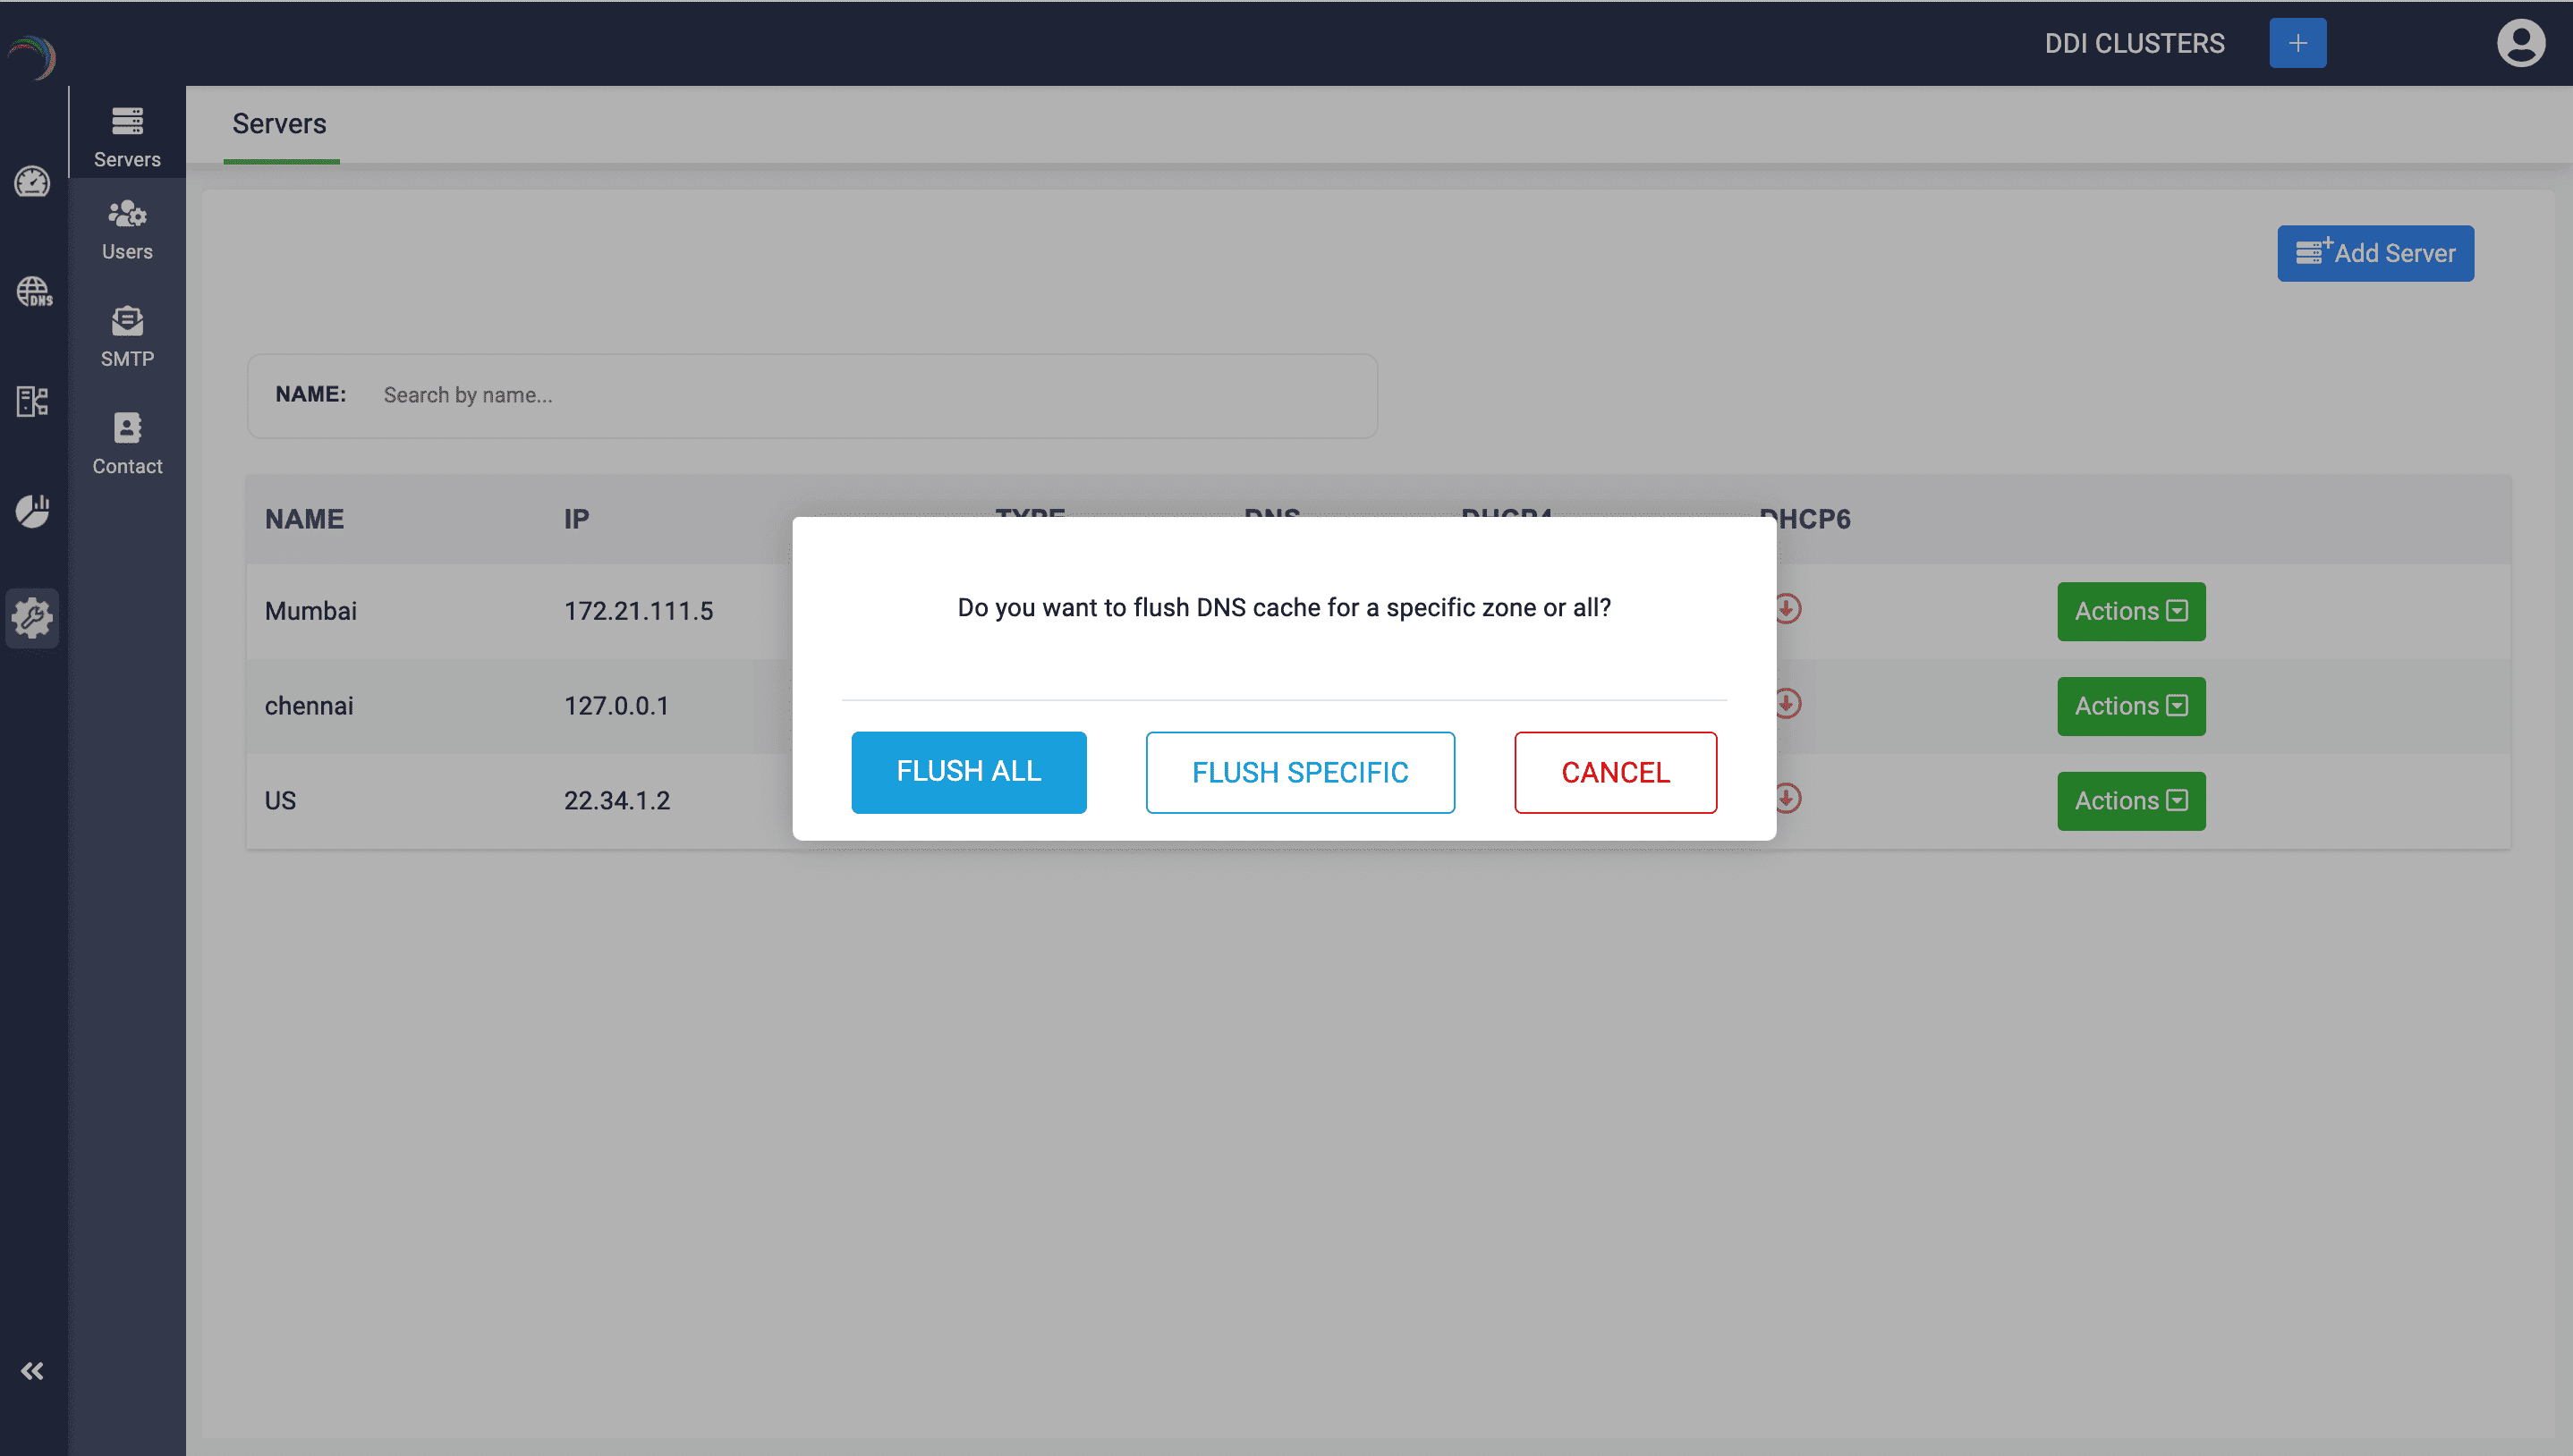
A dialog box appears prompting you to specify the scope of the cache flush. If you want to flush the cache of all the zones on the server, click Flush All, or if you just want to flush the cache of a specific zone on the server, click Flush Specific
-
Subsequently, specify the zone name and click Flush Cache.
Note: Flush DNS Cache action is crucial for maintaining the reliability and speed of DNS resolutions of within your network.
-
Action 2: Server Reconfiguration:
The Server Reconfiguration action in DDI Central simplifies the recovery process for failed or ejected Windows DNS and DHCP servers. If a server goes down, administrators can seamlessly replace it with a new server using the same IP address. By selecting Server Reconfiguration from the Actions menu under Settings → Server, all DNS and DHCP configurations from the original server are automatically transferred to the new server, ensuring minimal downtime. This eliminates the need for manual data restoration and accelerates service recovery, allowing for quick and effortless server replacement while maintaining network stability.

-
Action 3: DNS and DHCP Rediscover:
The Rediscover option ensures that Windows-based DNS and DHCP configurations remain synchronized, even when changes are made outside DDI Central using Windows UI, PowerShell, or remote tools. By selecting Rediscover from the Actions menu under Settings → Server, administrators can automatically detect and apply the DNS or DHCP configuration changes, keeping the system updated without manual intervention. Additionally for DNS, just clicking on a zone name will trigger zone rediscovery, fetching the latest settings from the primary/master server. This feature provides real-time synchronization, centralized visibility, and consistent network management.
Both: The server will provide both DNS and DHCP services.
DNS: The server will provide only DNS services.
DHCP only: The server will provide only DHCP services.
What are the DNS configurations discovered during DDI Central's discovery process?
DDI Central sweeps in the following DNS configurations from your remotely managed Windows DNS server into its unified UI
What are the DHCP configurations discovered during DDI Central's discovery process?
DDI Central sweeps in the following DHCP configurations from your remotely managed Windows DHCP server into its unified UI:
With the discovered configurations consolidated and catalogued in DDI Central, you can begin making updates targeting specific DNS or DHCP objects, or set up configurations and policies for individual servers or groups of servers in a particular cluster. You can also add new configurations directly through the DDI Central interface and the same will be updated onto your DHCP and DNS to modify the existing configurations as needed.
Note:
AD zones can be discovered from your existing Microsoft DNS servers, and their records can be seamlessly managed within DDI Central. However, you cannot create an AD zone or perform advanced configurations for AD Zones using DDI Central, as it does not have full-fledged integration with Active Directory and its services.
When discovering dynamic AD zones updated via Group Policy, DDI Central retains and preserves their active, ongoing live timestamps without disrupting the automatic scavenging procedures of Windows AD. Any update operations carried out using DDI Central do not interfere with Windows AD's ability to continue scavenging records based on the stipulated aging policies. This ensures accurate record lifecycle management and enhances synchronization between DDI Central and Windows DNS servers for dynamic updates.
Any record added or updated in the discovered AD domains through DDI Central will be subject to Windows scavenging procedures as per Group Policy. However, for any new subdomain created using the DDI Central UI, all records added or updated under it will remain static, and Windows Group Policy or scavenging procedures will not apply to them.
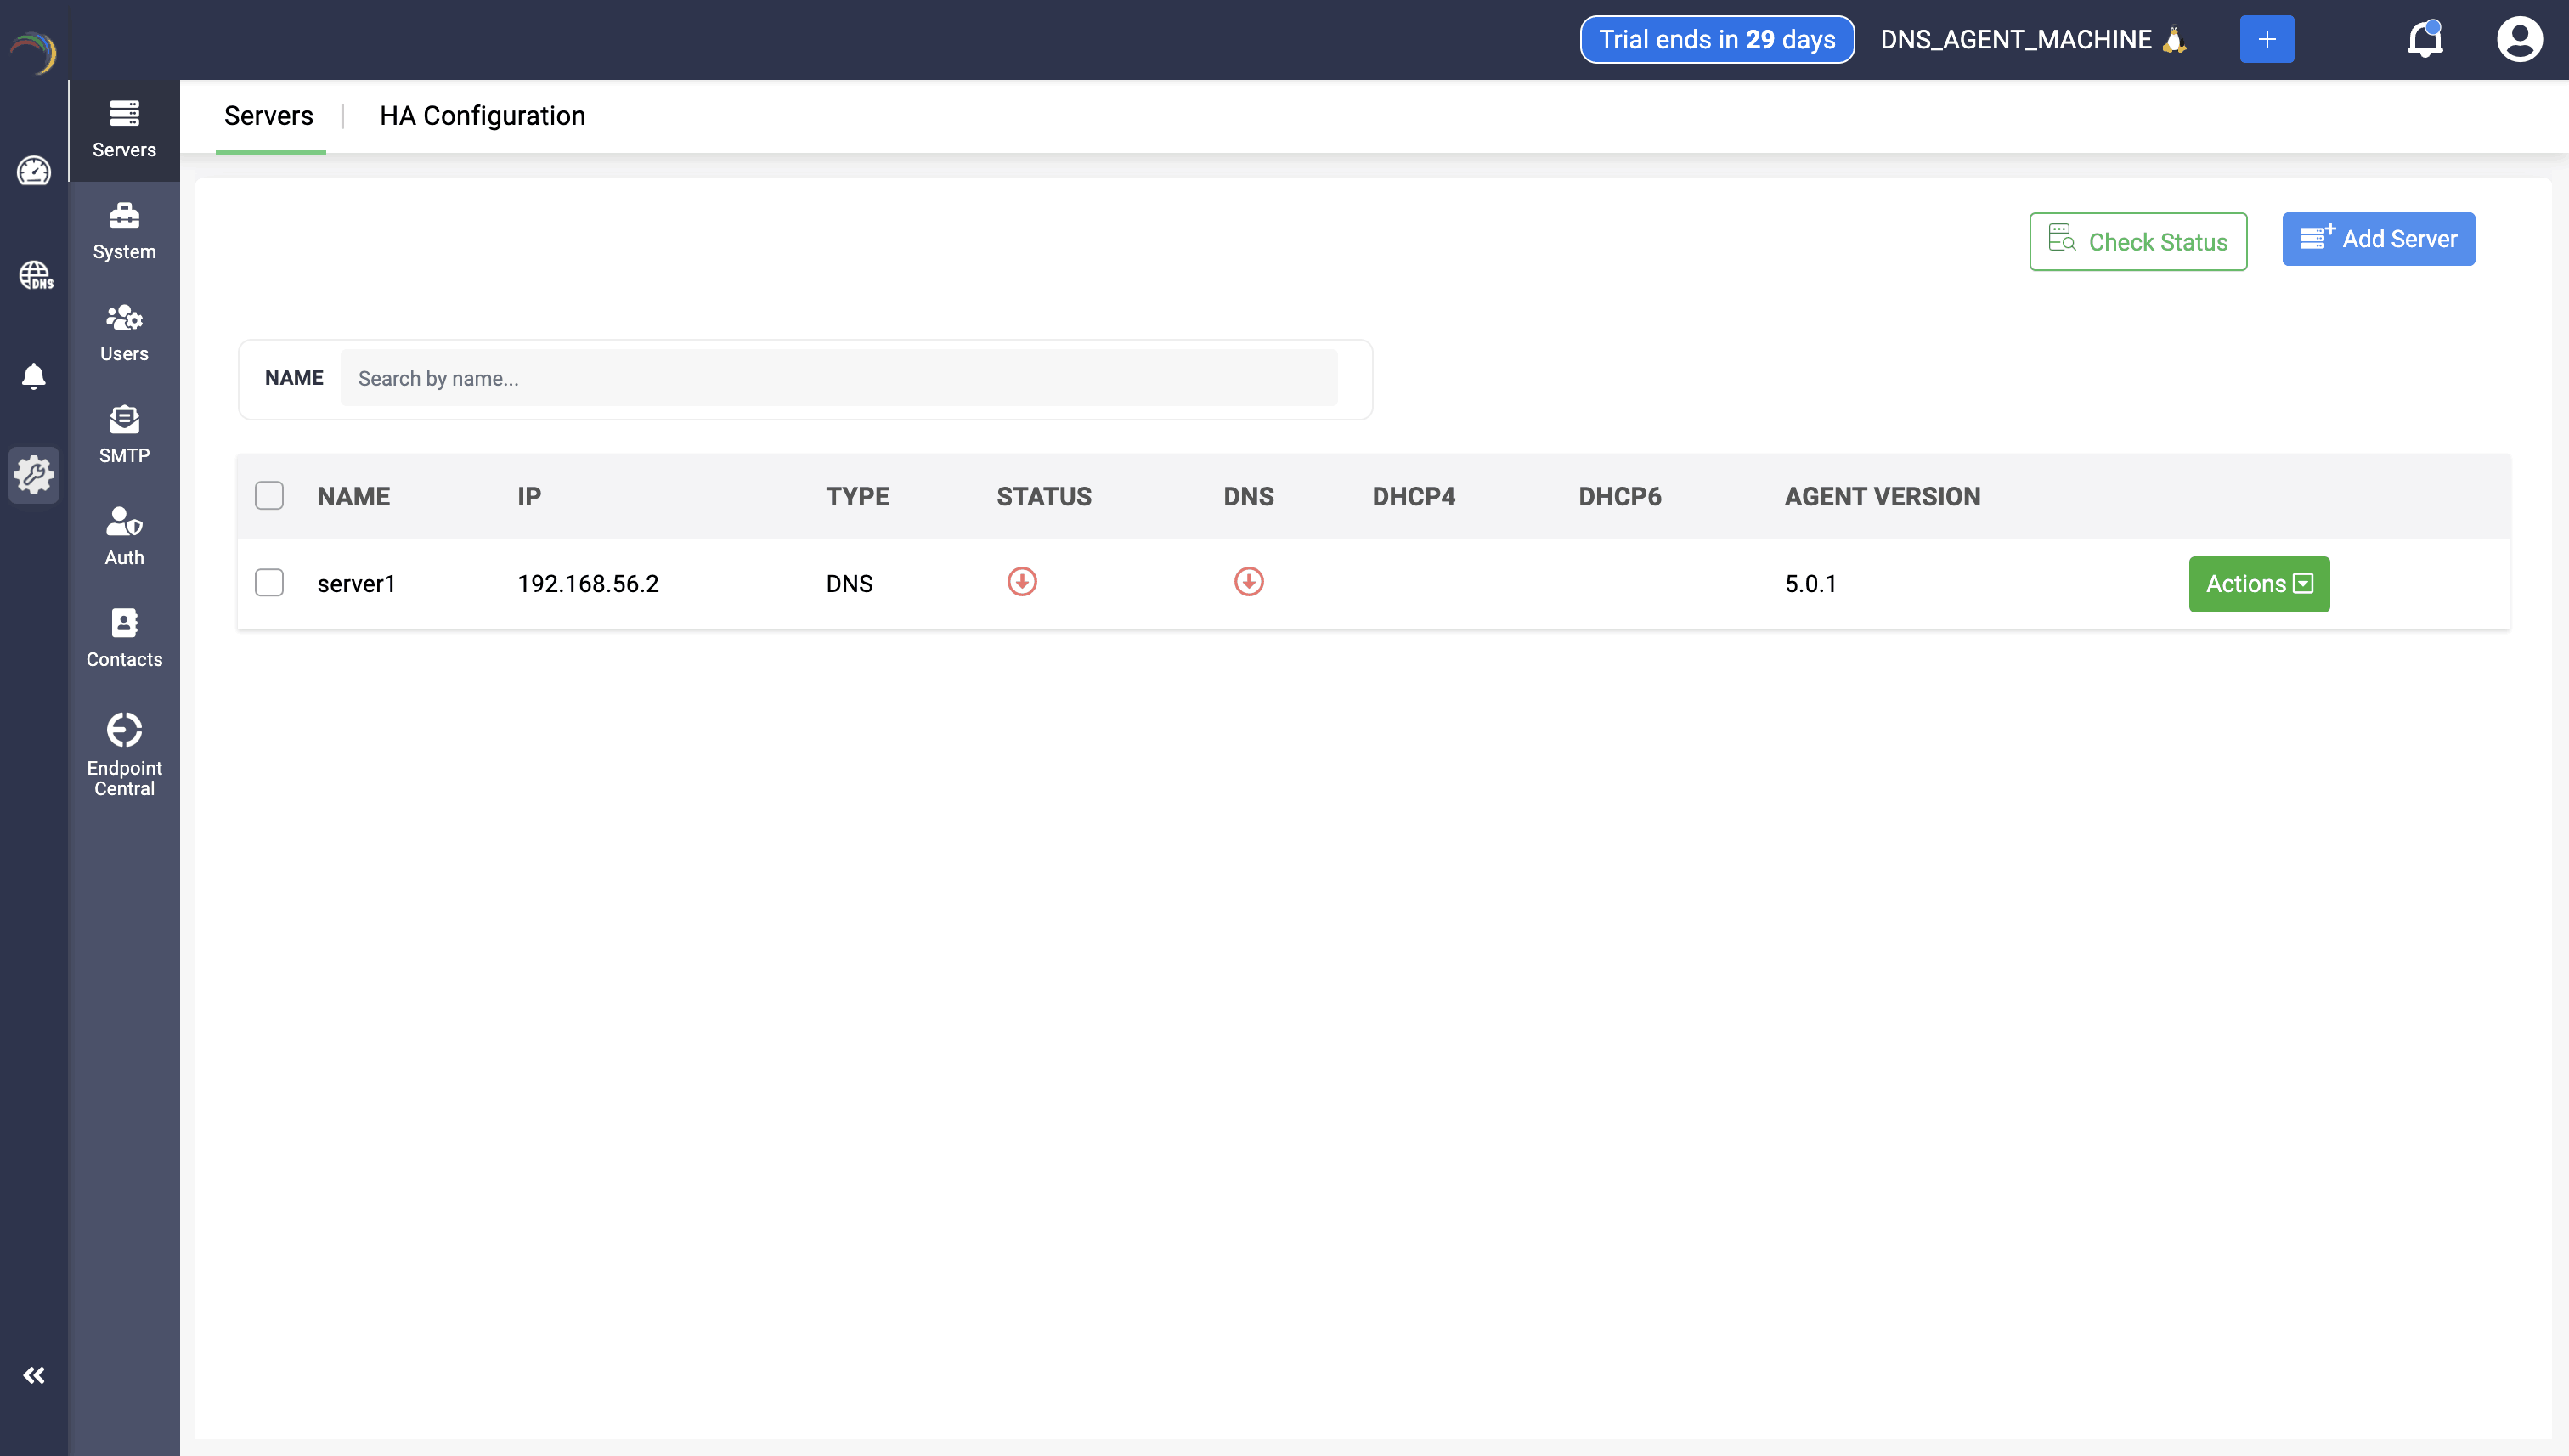
DDI Central now enables users to update their server status, including the status of the service, by clicking on Check status button after selecting the specific server you want to update. This reloads the current status of both the server and service hosted in it. You can single and multi select servers for updating the server status.


New to ADSelfService Plus?
Related Articles
Agentless management of Microsoft DNS and DHCP servers(NEW)
Agentless management of Microsoft DNS and DHCP servers Agentless management of Microsoft DNS and DHCP management refers to managing and monitoring these services without installing additional software (agents) on the servers themselves. This approach ...Step-by-step guide to enable WinRM HTTP on the App Console server and all DNS/DHCP servers to be onboarded (2)
Note: PowerShell version 5.1.2 or higher is required for a successful setup. Ensure that Windows Remote Management services are running on the Windows DNS and DHCP servers you plan to onboard into DDI Central's Management UI Console. Step 1. WinRM ...Step-by-step guide to enable WinRM HTTP on the App Console server and all DNS/DHCP servers to be onboarded(NEW)
Note: PowerShell version 5.1.2 or higher is required for a successful setup. Ensure that Windows Remote Management services are running on the Windows DNS and DHCP servers you plan to onboard into DDI Central's Management UI Console. Step 1. WinRM ...Cisco DHCP Service
Cisco DHCP service Cisco DHCP service in DDI Central allows network admins to add and manage routers within the application for better visibility and configurations. Cisco DHCP service can be accommodated with both Linux and Windows clusters, and ...Configuring DHCP Pool data for DHCPv4
Configuring DHCP pool data for DHCPv4 Under the DHCP section, you can view the Cisco section in the right side menu. Clicking on it showcases the subsection for DHCP pool data. DHCP pool data allows network admins to view their pool ranges in tabular ...