Adding servers
Adding Servers
Creating Servers
Once the cluster is created, you'll be immediately directed to the Servers page to add your DNS and DHCP servers. If not, you can add servers by selecting the Settings menu from the menu bar along the left side of the screen. From the submenus that appear in parallel, choose Servers.
- On the Servers page, click the Add Server button on the top left corner.
- The Create Server page appears on the screen. Here, you can add your DNS-DHCP servers either by discovering existing server configurations or by simply adding the server to the DDI Central console and configure it using the DDI Central user interface at later stages.
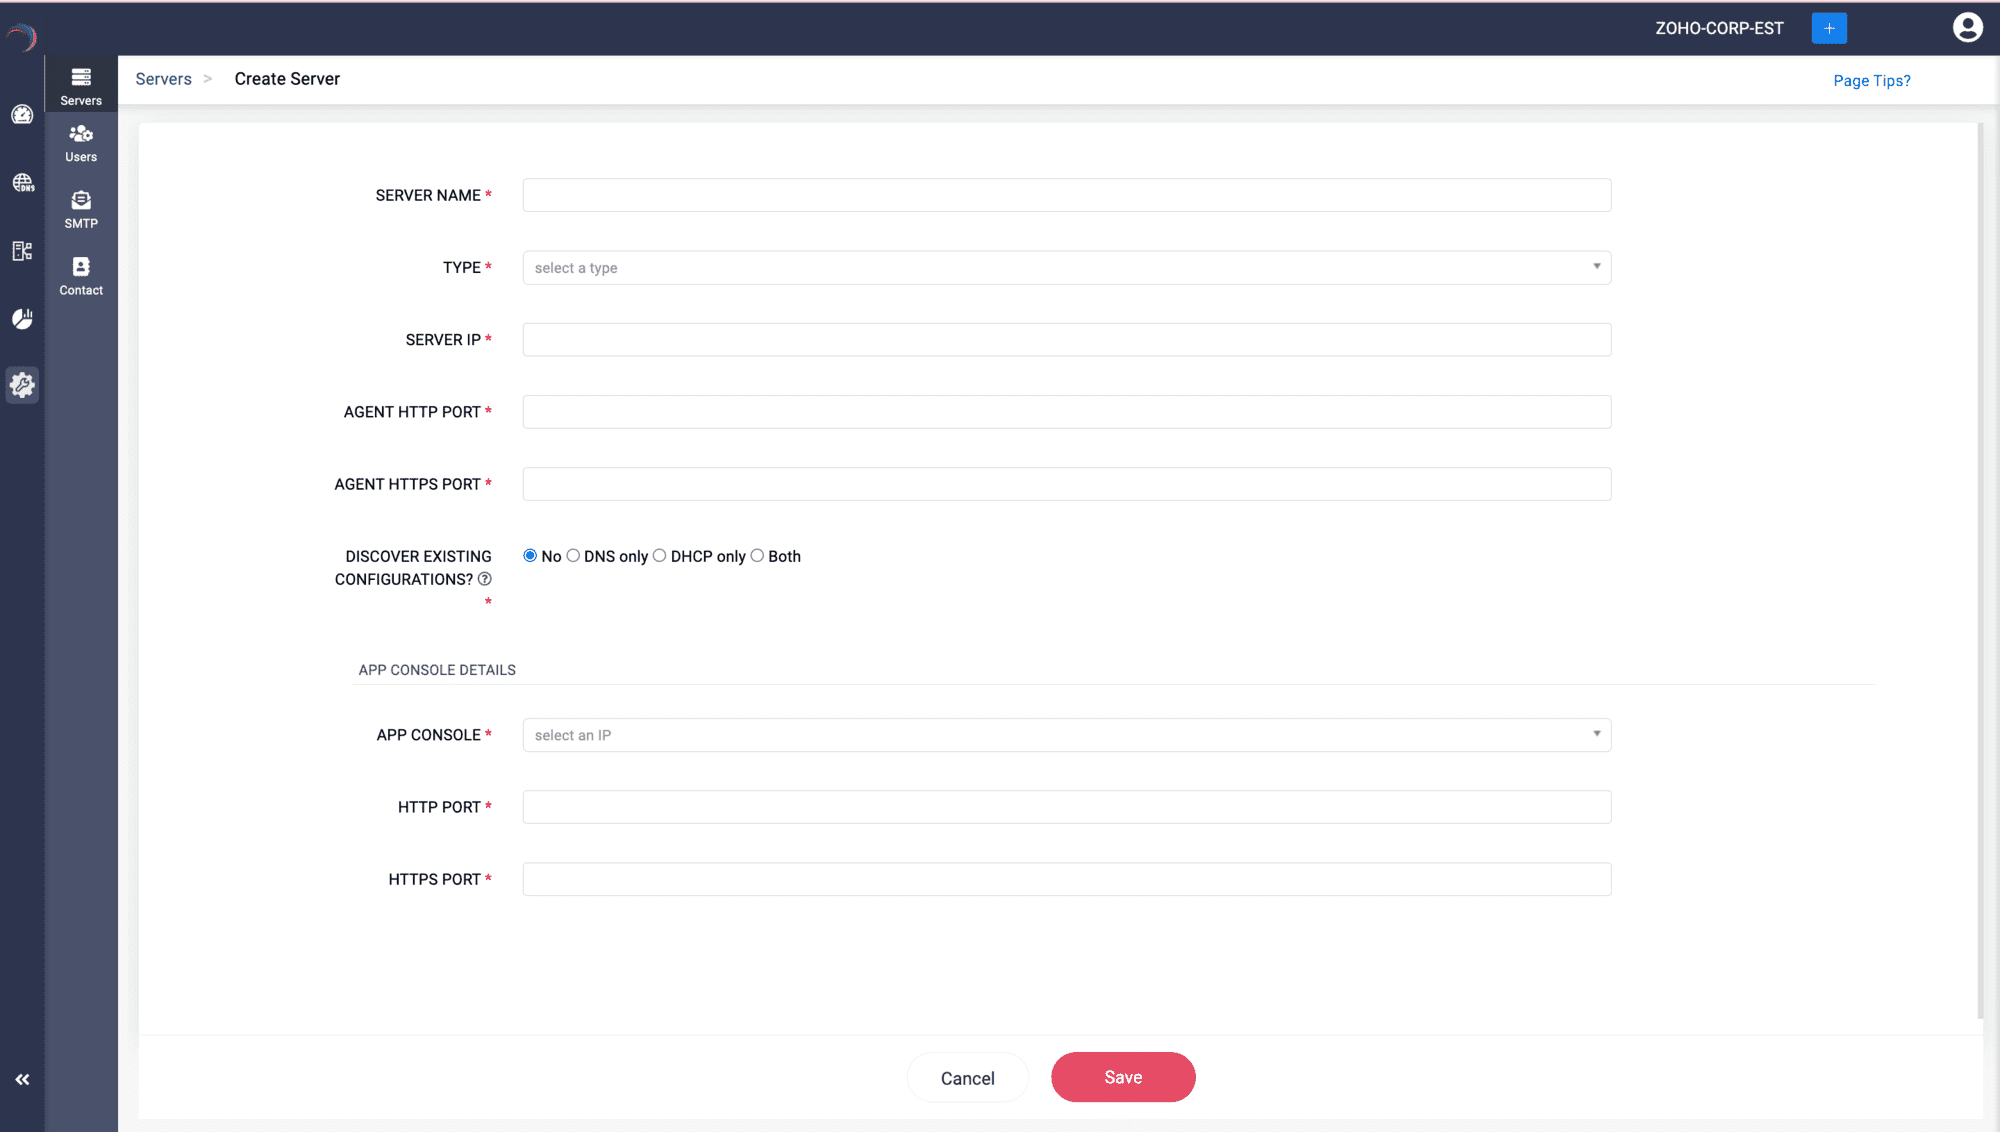
Enter the server details like
-
SERVER NAME: A required field where you assign a unique name to the server being configured or added for identification.
Note: No two servers in the same or different clusters can have the same name. - TYPE: Select the type of server being set up, such as DNS, DHCP, or both (server that is configured for both DNS and DHCP services).
- SERVER IP: Specify the IP address of the server being added.
- AGENT HTTP PORT: Specify the port number used by the DDI Node Agent installed in the server for HTTP connections.
- AGENT HTTPS PORT: Specify the port number used by the DDI Node Agent installed in the server for HTTPS connections.
-
DISCOVER EXISTING CONFIGURATIONS?: You have two choices to make here; opt for Step 7 or Step 8 depending on your requirement.
Step 7 -> Advanced DNS-DHCP-IP address discovery
Specify any one of the options :DNS, DHCP, or Both to discover all the existing configurations from the server, or
Step 8 -> Adding and configuring servers using DDI Central
Specify No if you just want to add and setup a new server from the scratch. You can setup the required DNS, DHCP or combined configurations to your server to get it configured through the user-friendly DDI Central user interface later.

Advanced DNS-DHCP-IP address discovery
To discover all the advanced configurations of DNS-DHCP services, the whole IP address plan and the current IP address inventory
Choose any one of the three options: DNS, DHCP, Both, for the Discover Existing Configurations?.
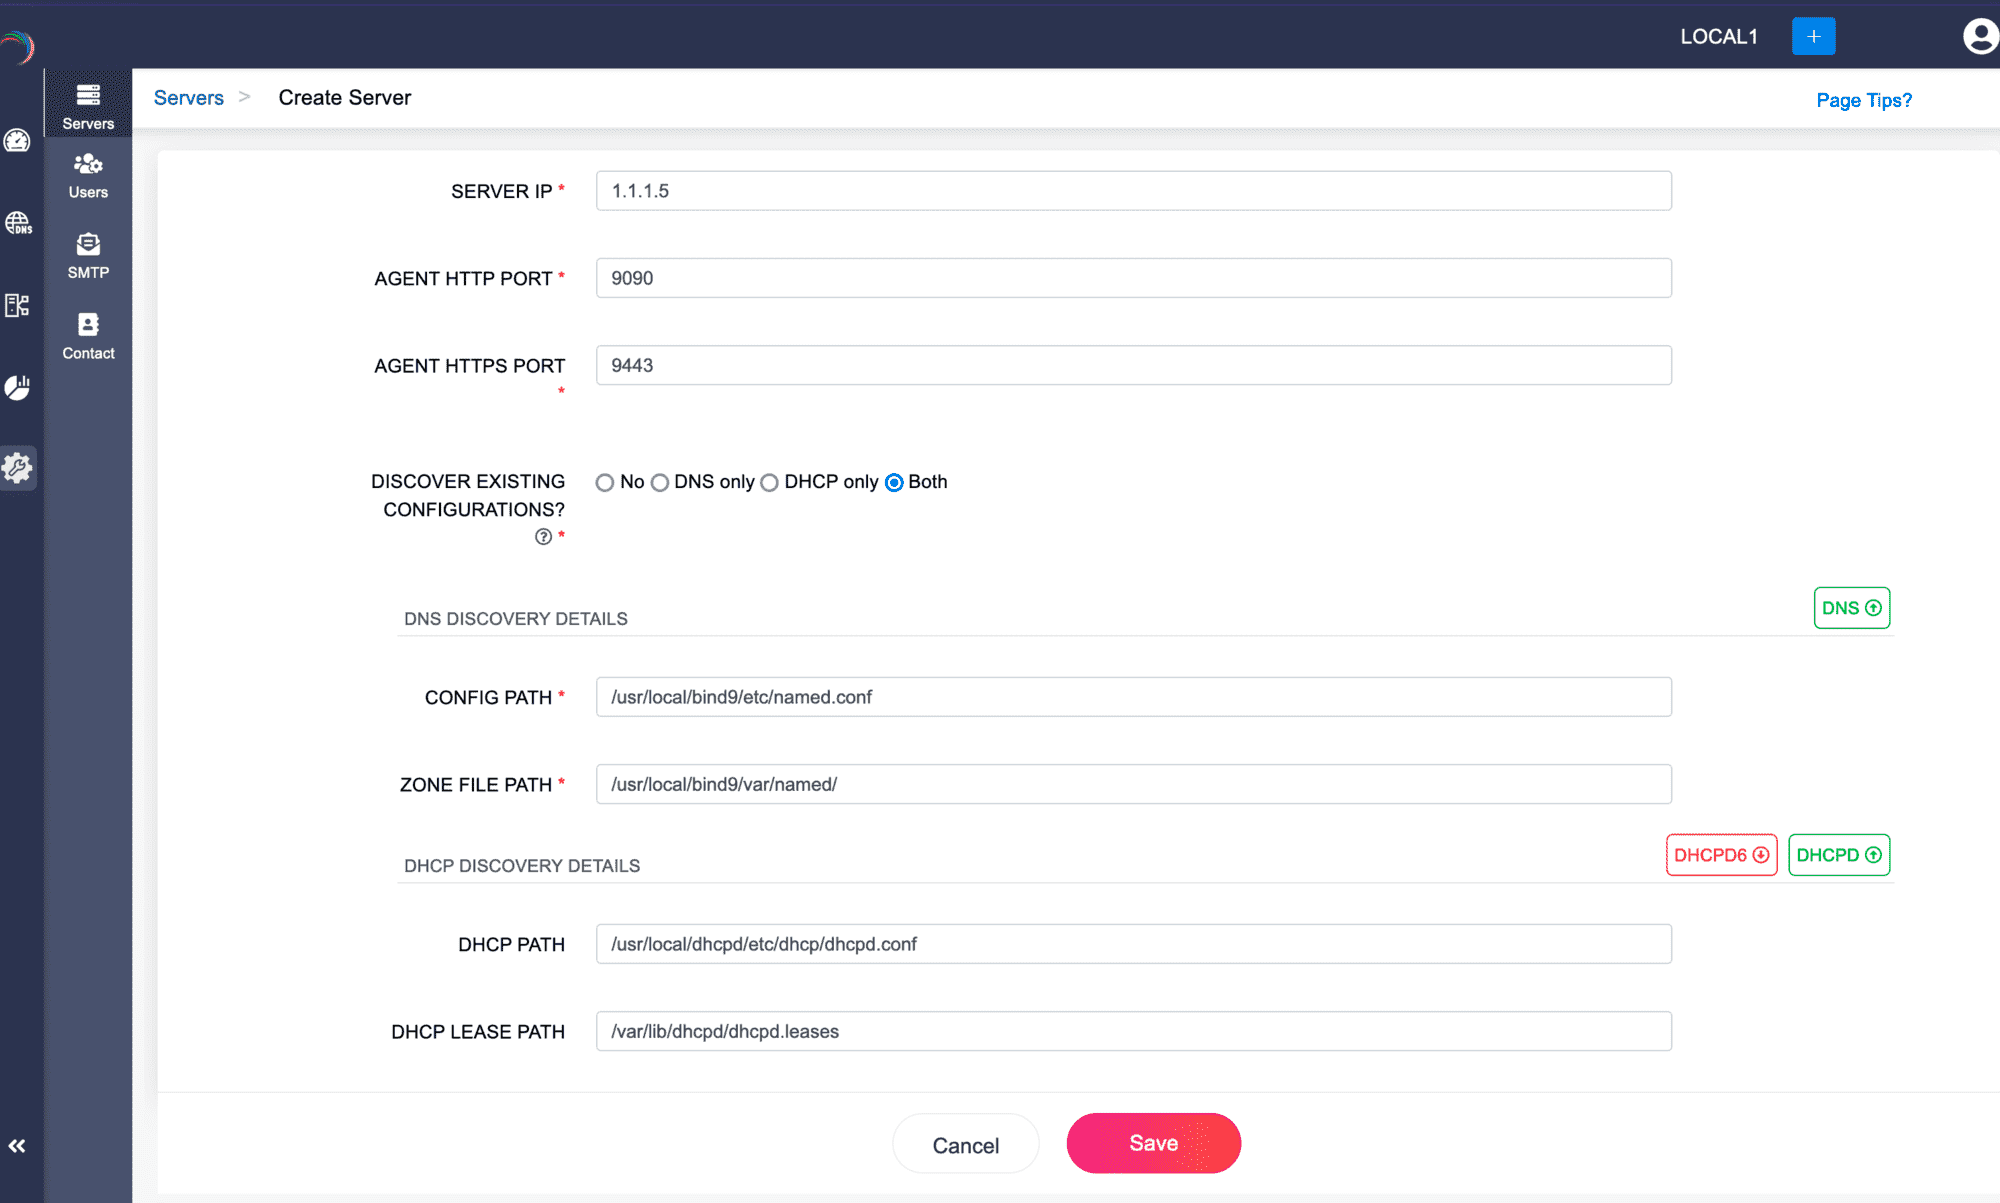
Provide the essential Config Path and the Zone File path for the DNS servers, while providing the Lease Path and the DHCP server path for the DHCP servers.
Setting up servers through DDI Central
You can add new servers to DDI console and enable ManageEngine DDI Central to implement, configure, and manage DNS, DHCP and IPAM services on your network infrastructure from scratch.
As DDI Central has DNS and DHCP bundled with the product and it gets deployed on your servers while installing the product.
For this, you'll have to choose No for Discover Existing Configurations? option.
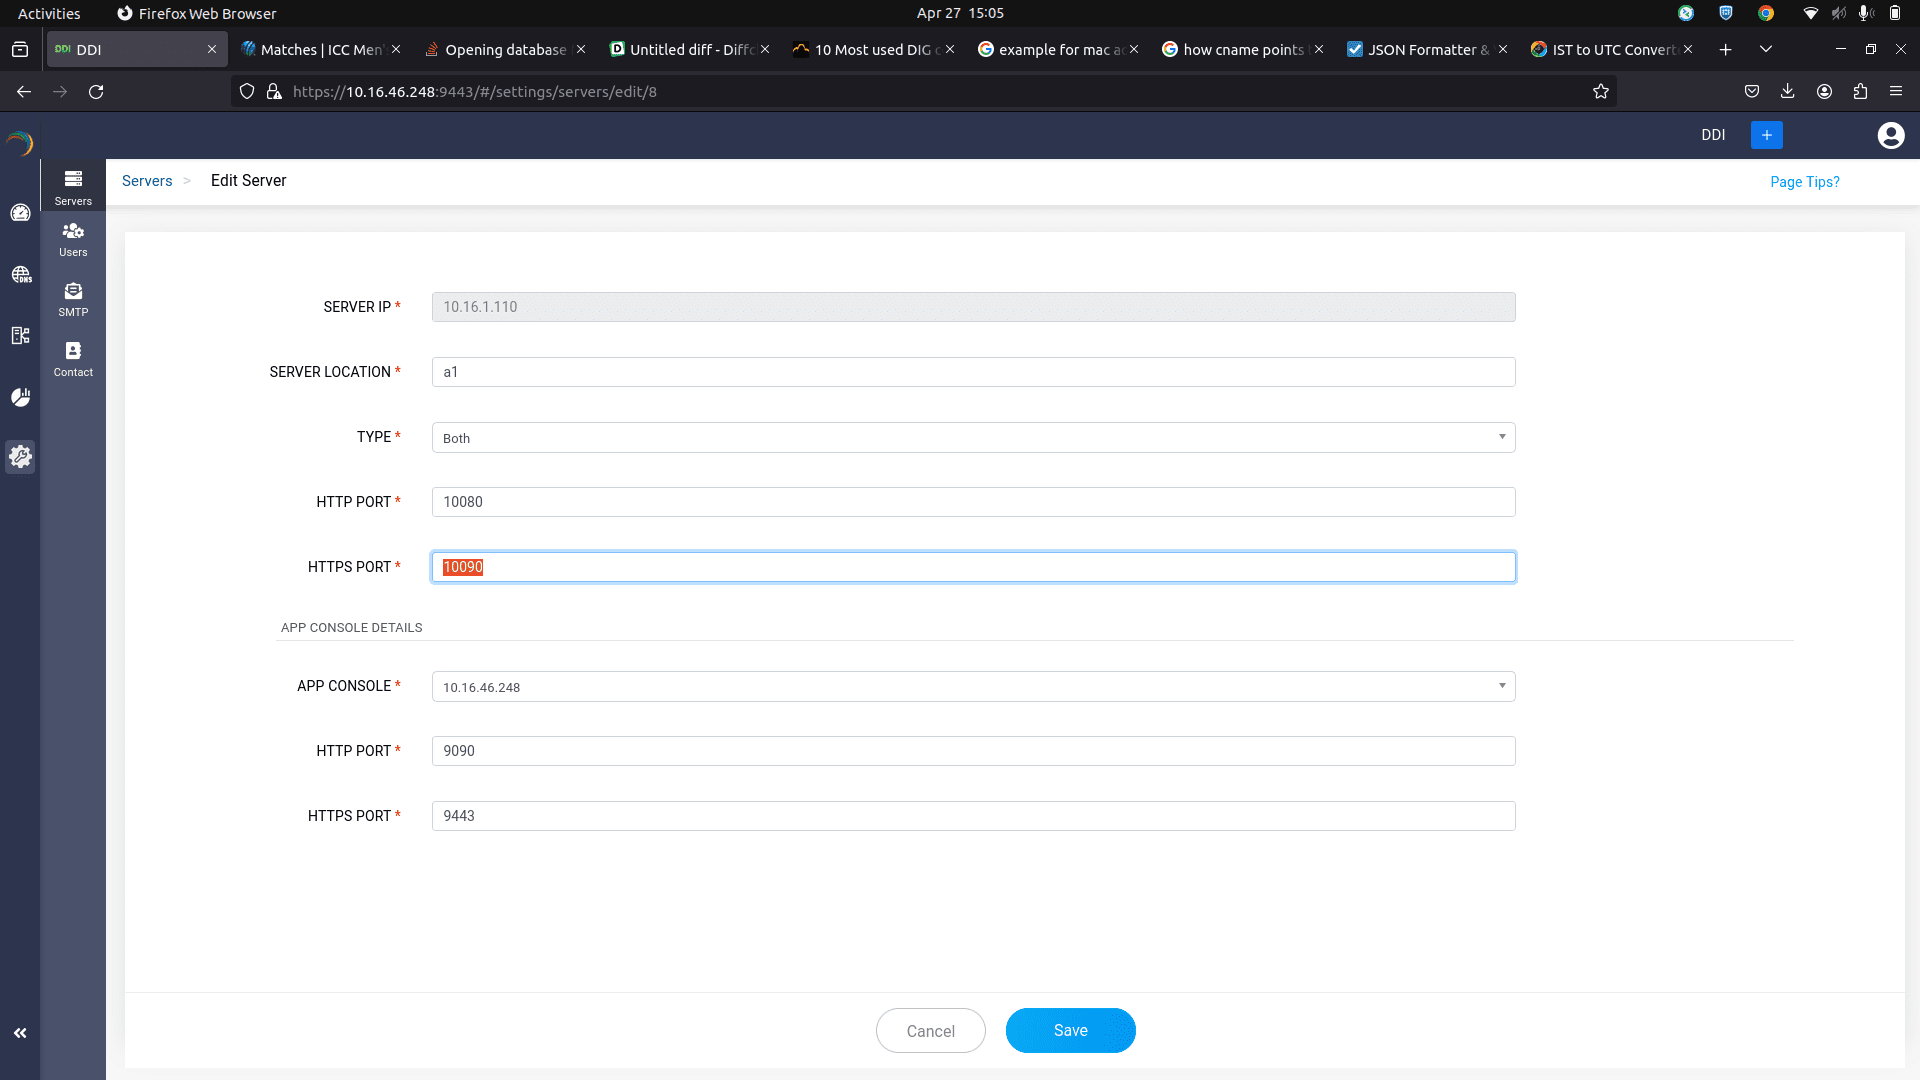
App Console Details
-
APP CONSOLE: Enter the static IP address of the central server that hosts the DDI application console associated with this server.
Note: It is crucial that this IP address remains constant to maintain consistent connection between the central DDI console server and the Node Agents installed in all your DNS and DHCP servers. - HTTP PORT: Specify the port number of the central DDI application console server for HTTP connections.
- HTTPS PORT: Specify the port number of the central DDI application console server for HTTPS connections.
-
Click Save to add the server into the ME DDI console.
If you have chosen the discovery option as outlined in Step 7, ManageEngine DDI Central will begin to discover configurations from the designated paths for each service.
Note: The discovery process takes a considerable amount of time depending on the volume of configurations in the servers. Wait until the whole process completes.Once you add your server into the DDI Central console you can further proceed modifying the discovered DNS-DHCP-IPAM configurations or quickly start setting up the DNS-DHCP-IPAM configurations for the new server through the user-friendly DDI Central user interface.
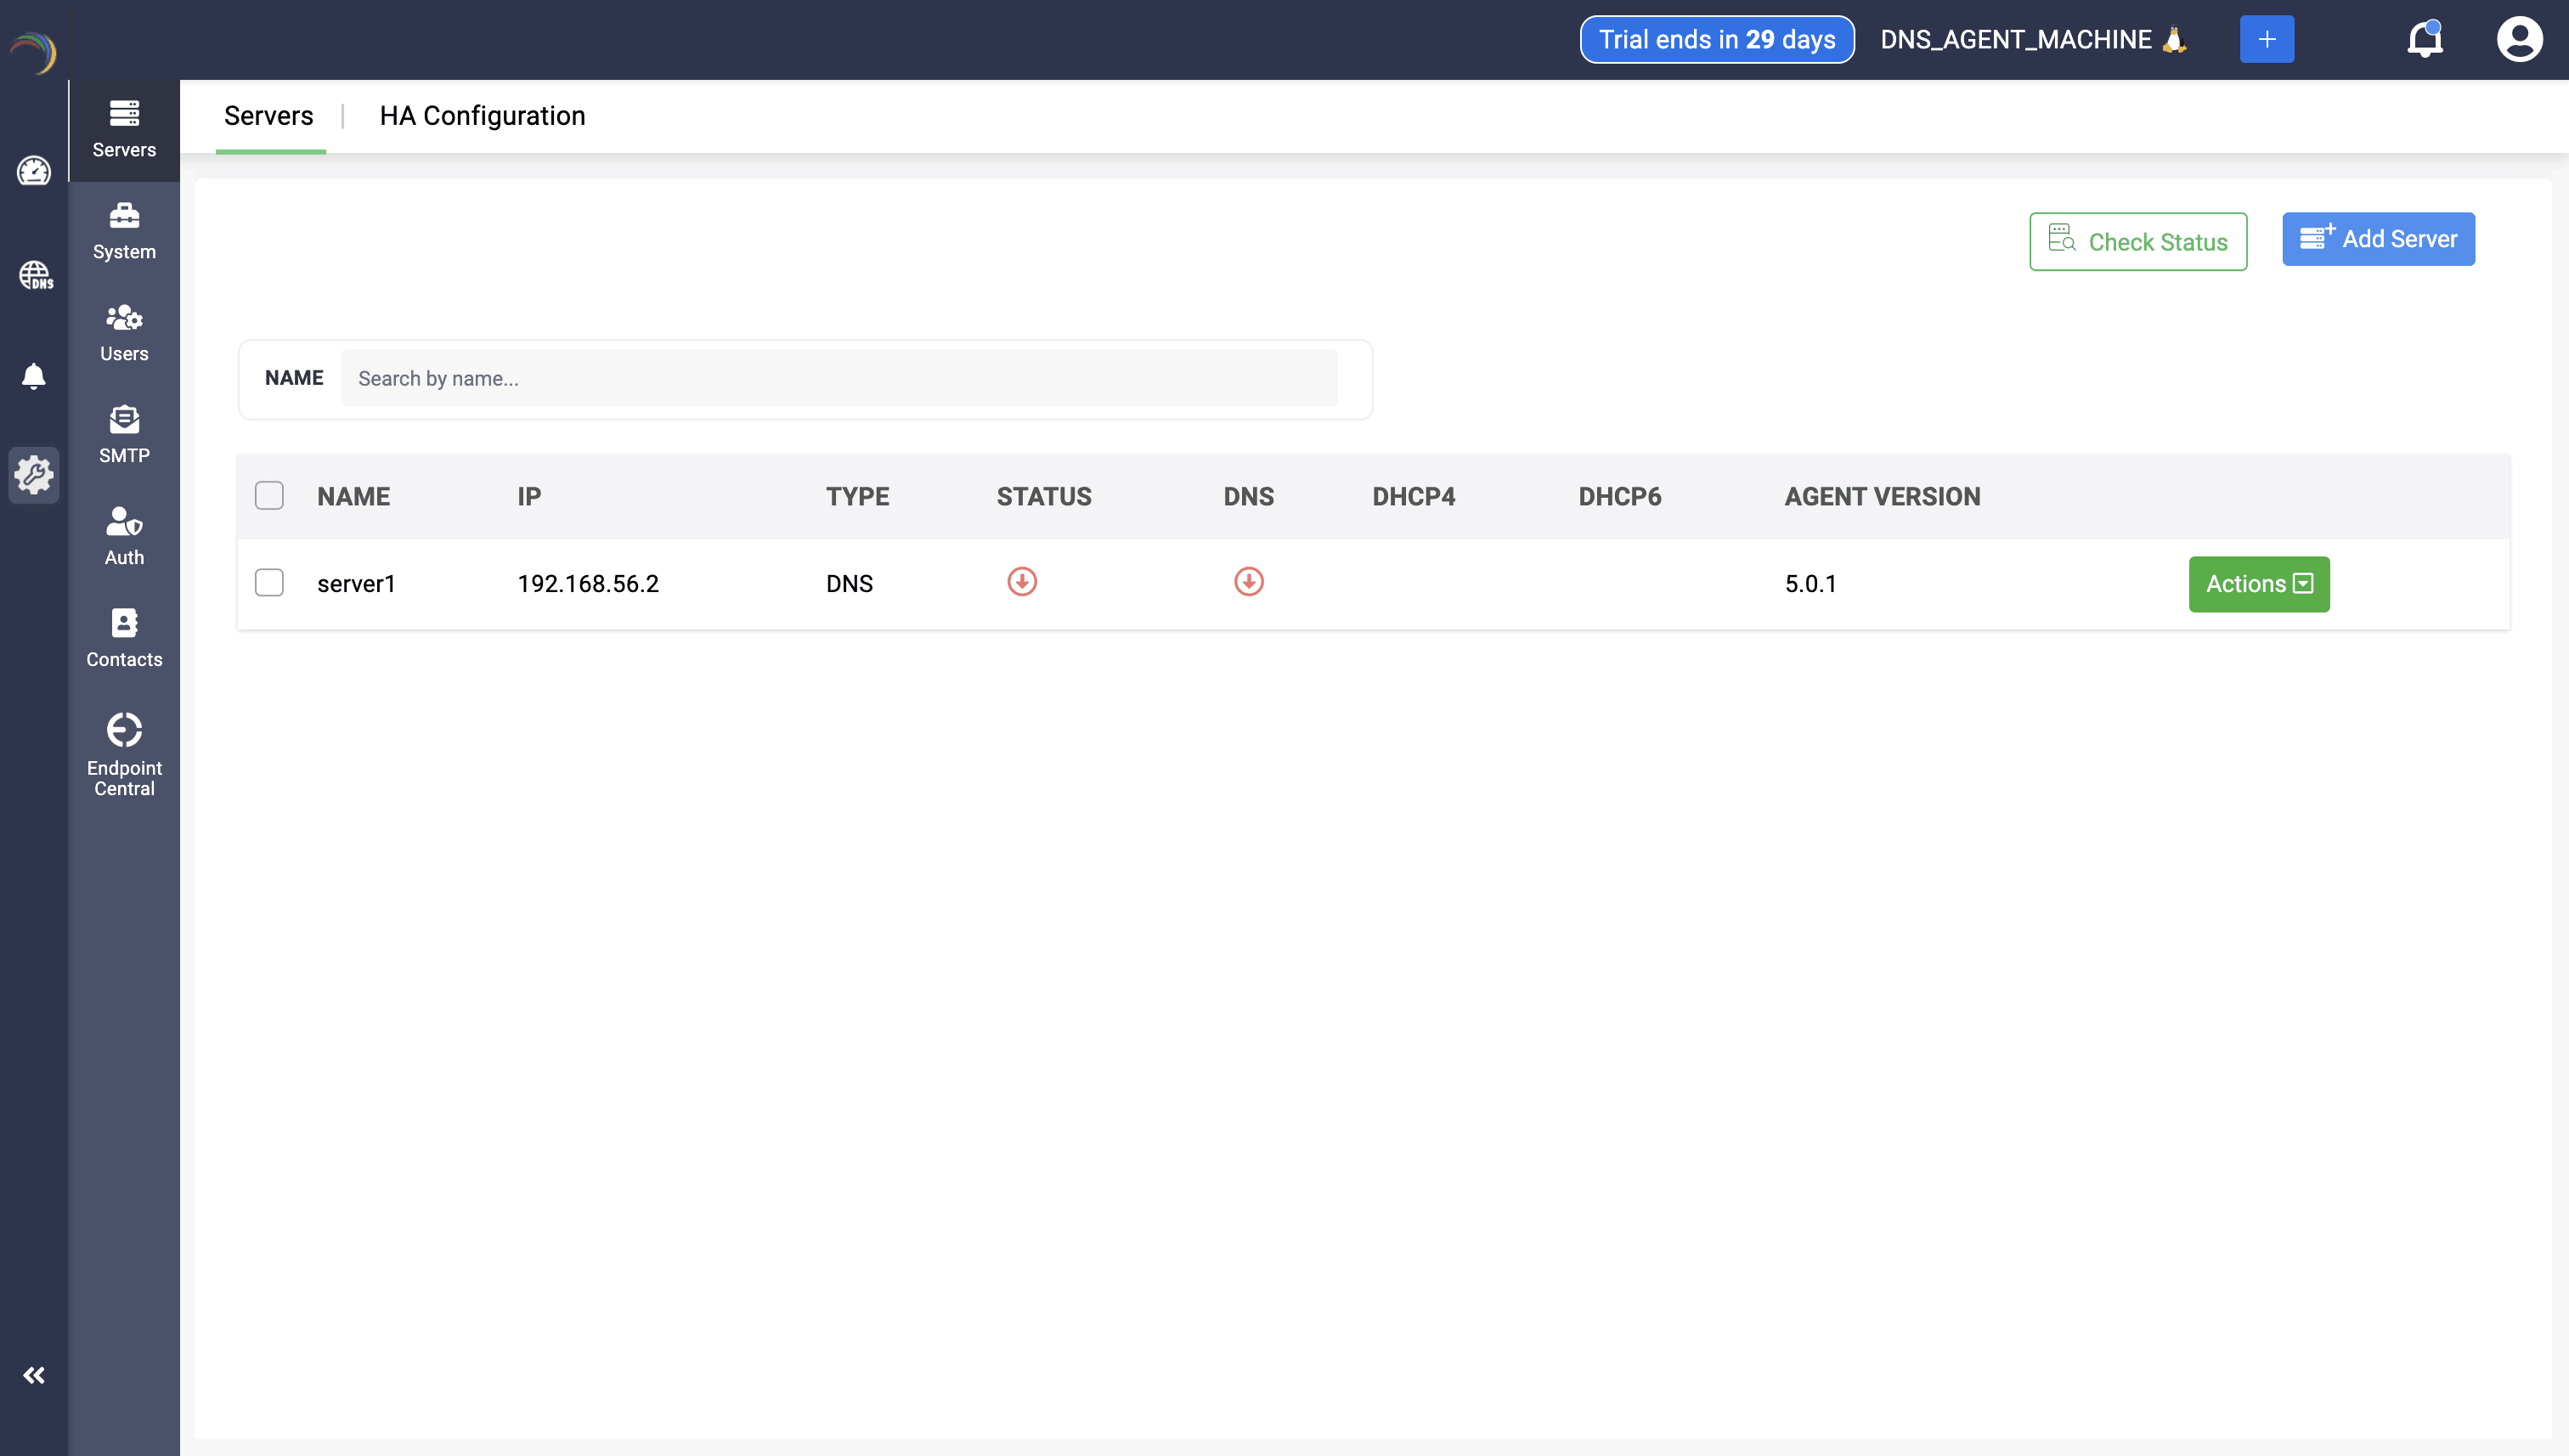
- You can access the added servers with all the configurations in place, listed under the Setting->Servers Page. Here you can perform general actions like editing the server configurations, deleting the server, monitoring the server(s) health stats.
-
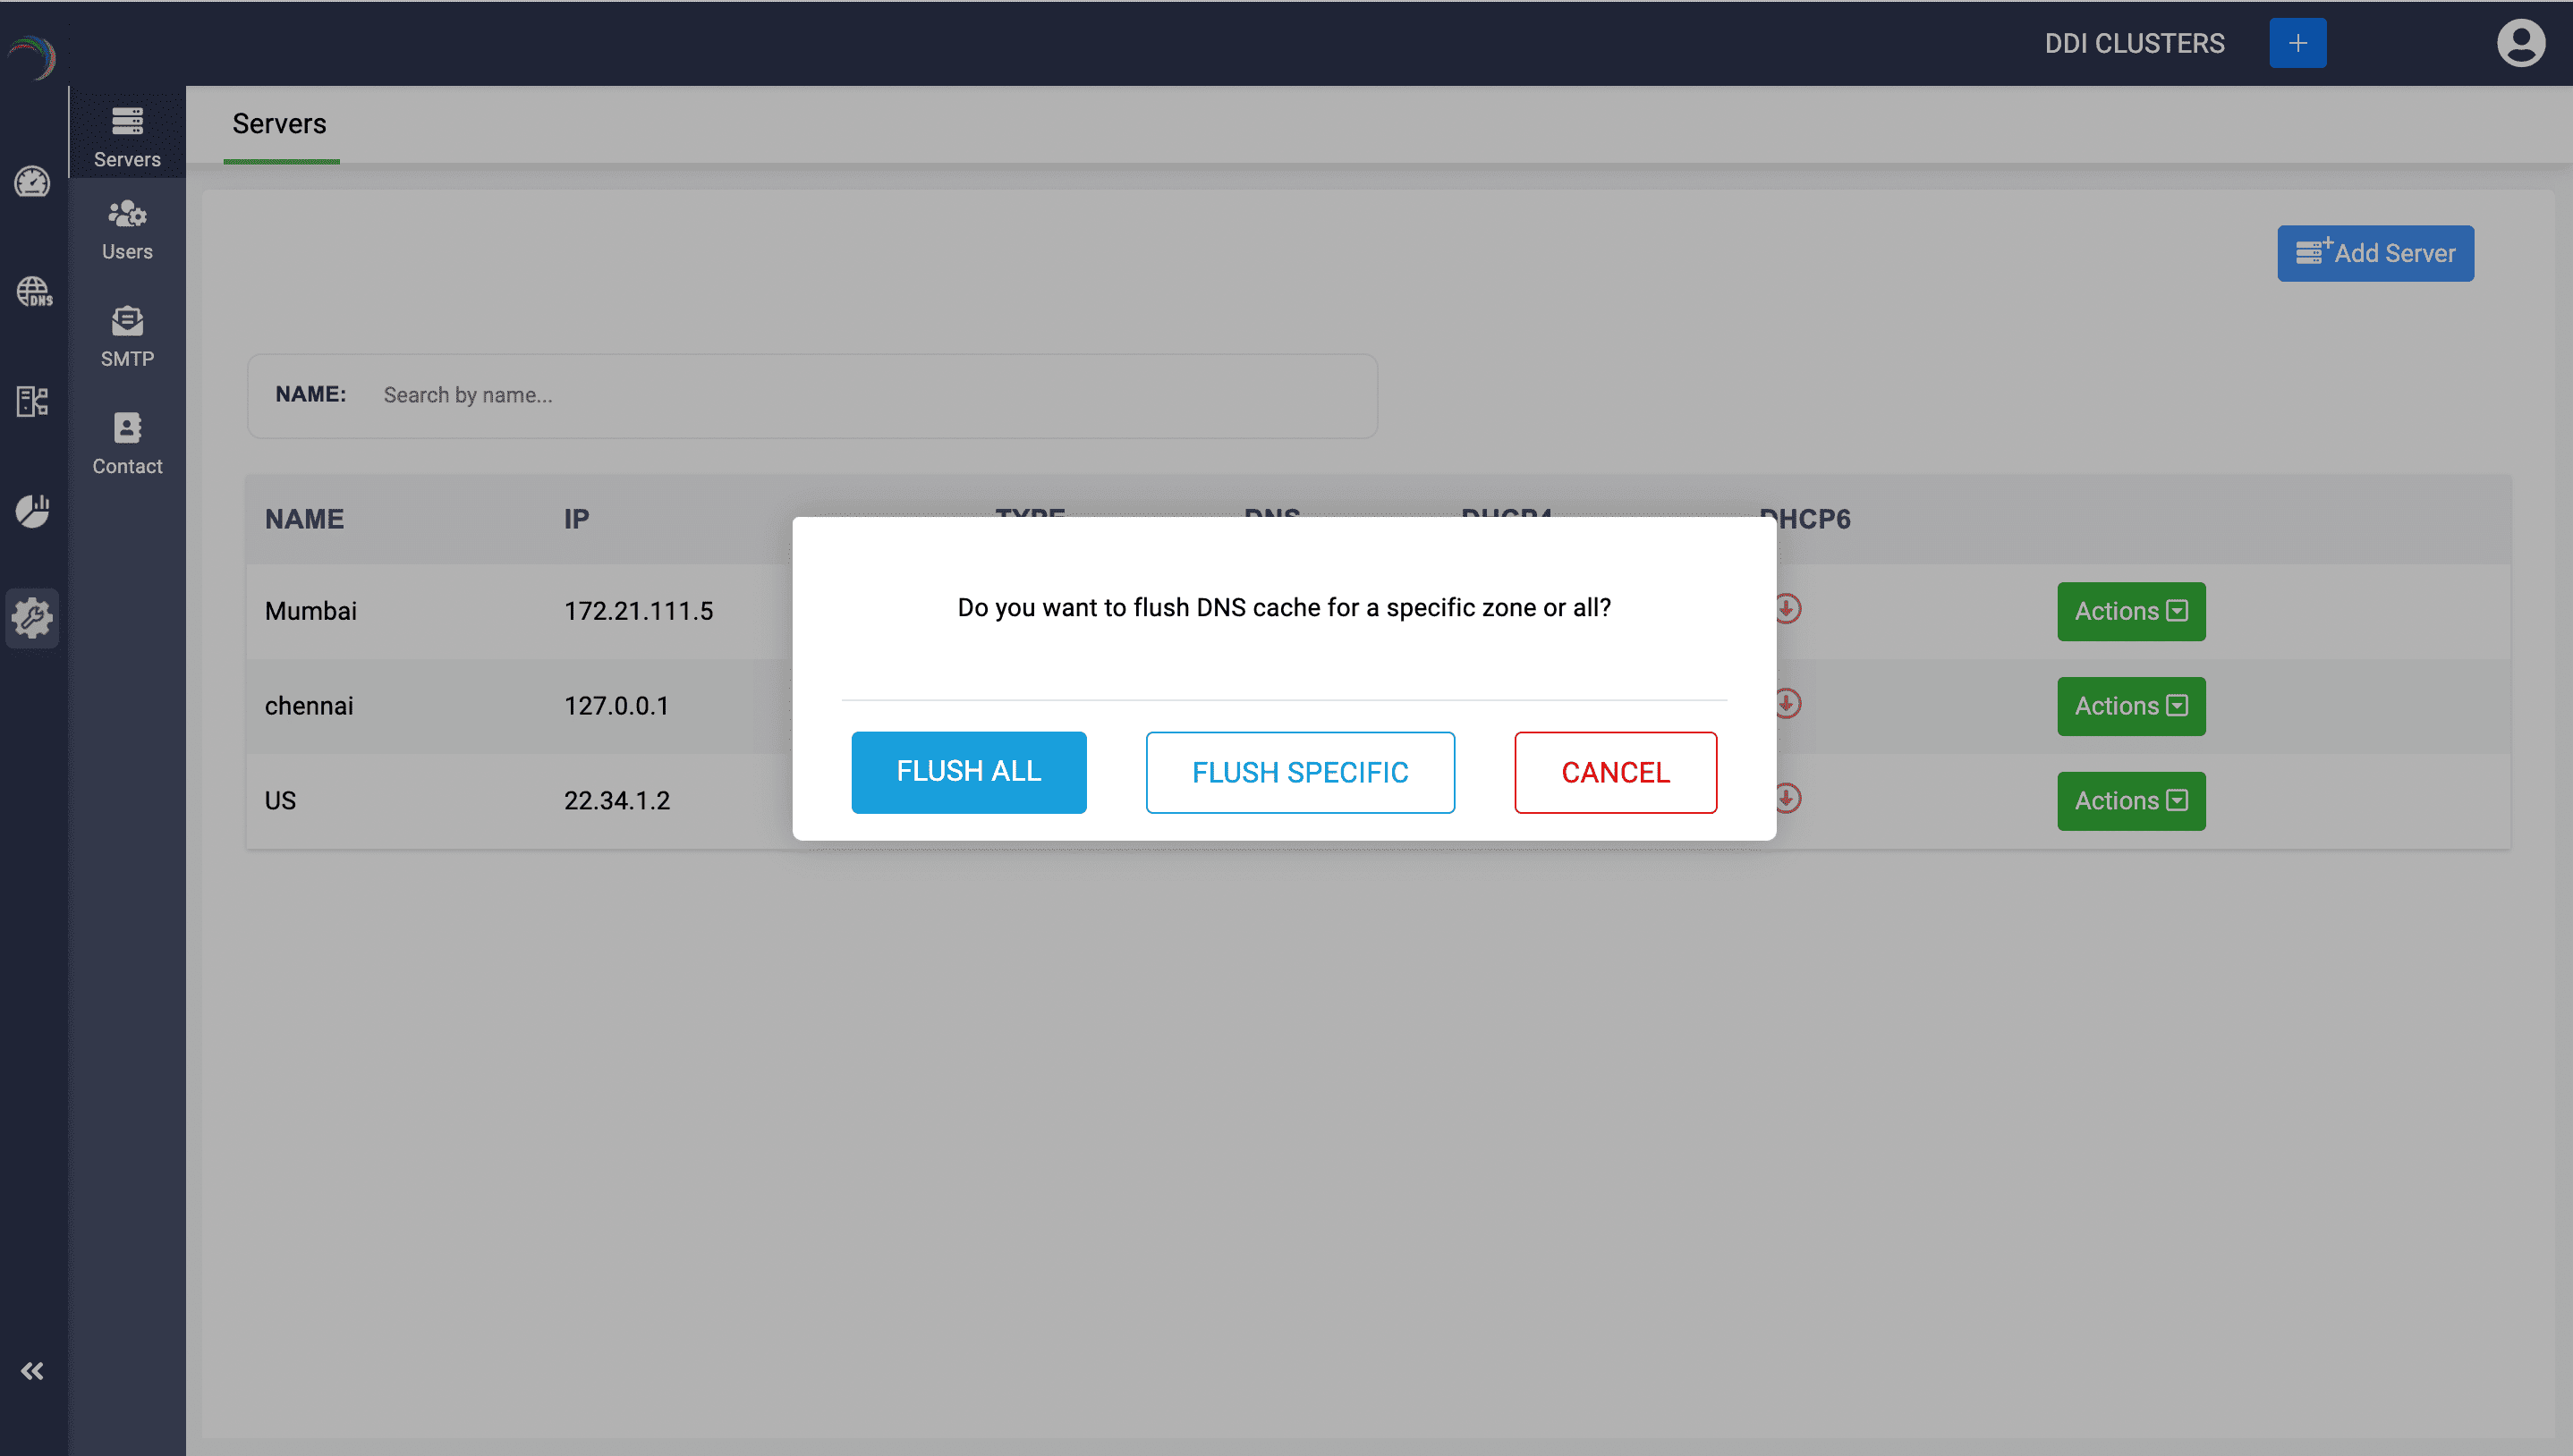
Other than the general actions, you can also perform the following actions: Flush DNS Cache: Hit the button "Flush DNS Cache" to refresh the DNS cache of the selected server to ensure that the DNS information hosted on the server is up-to-date.
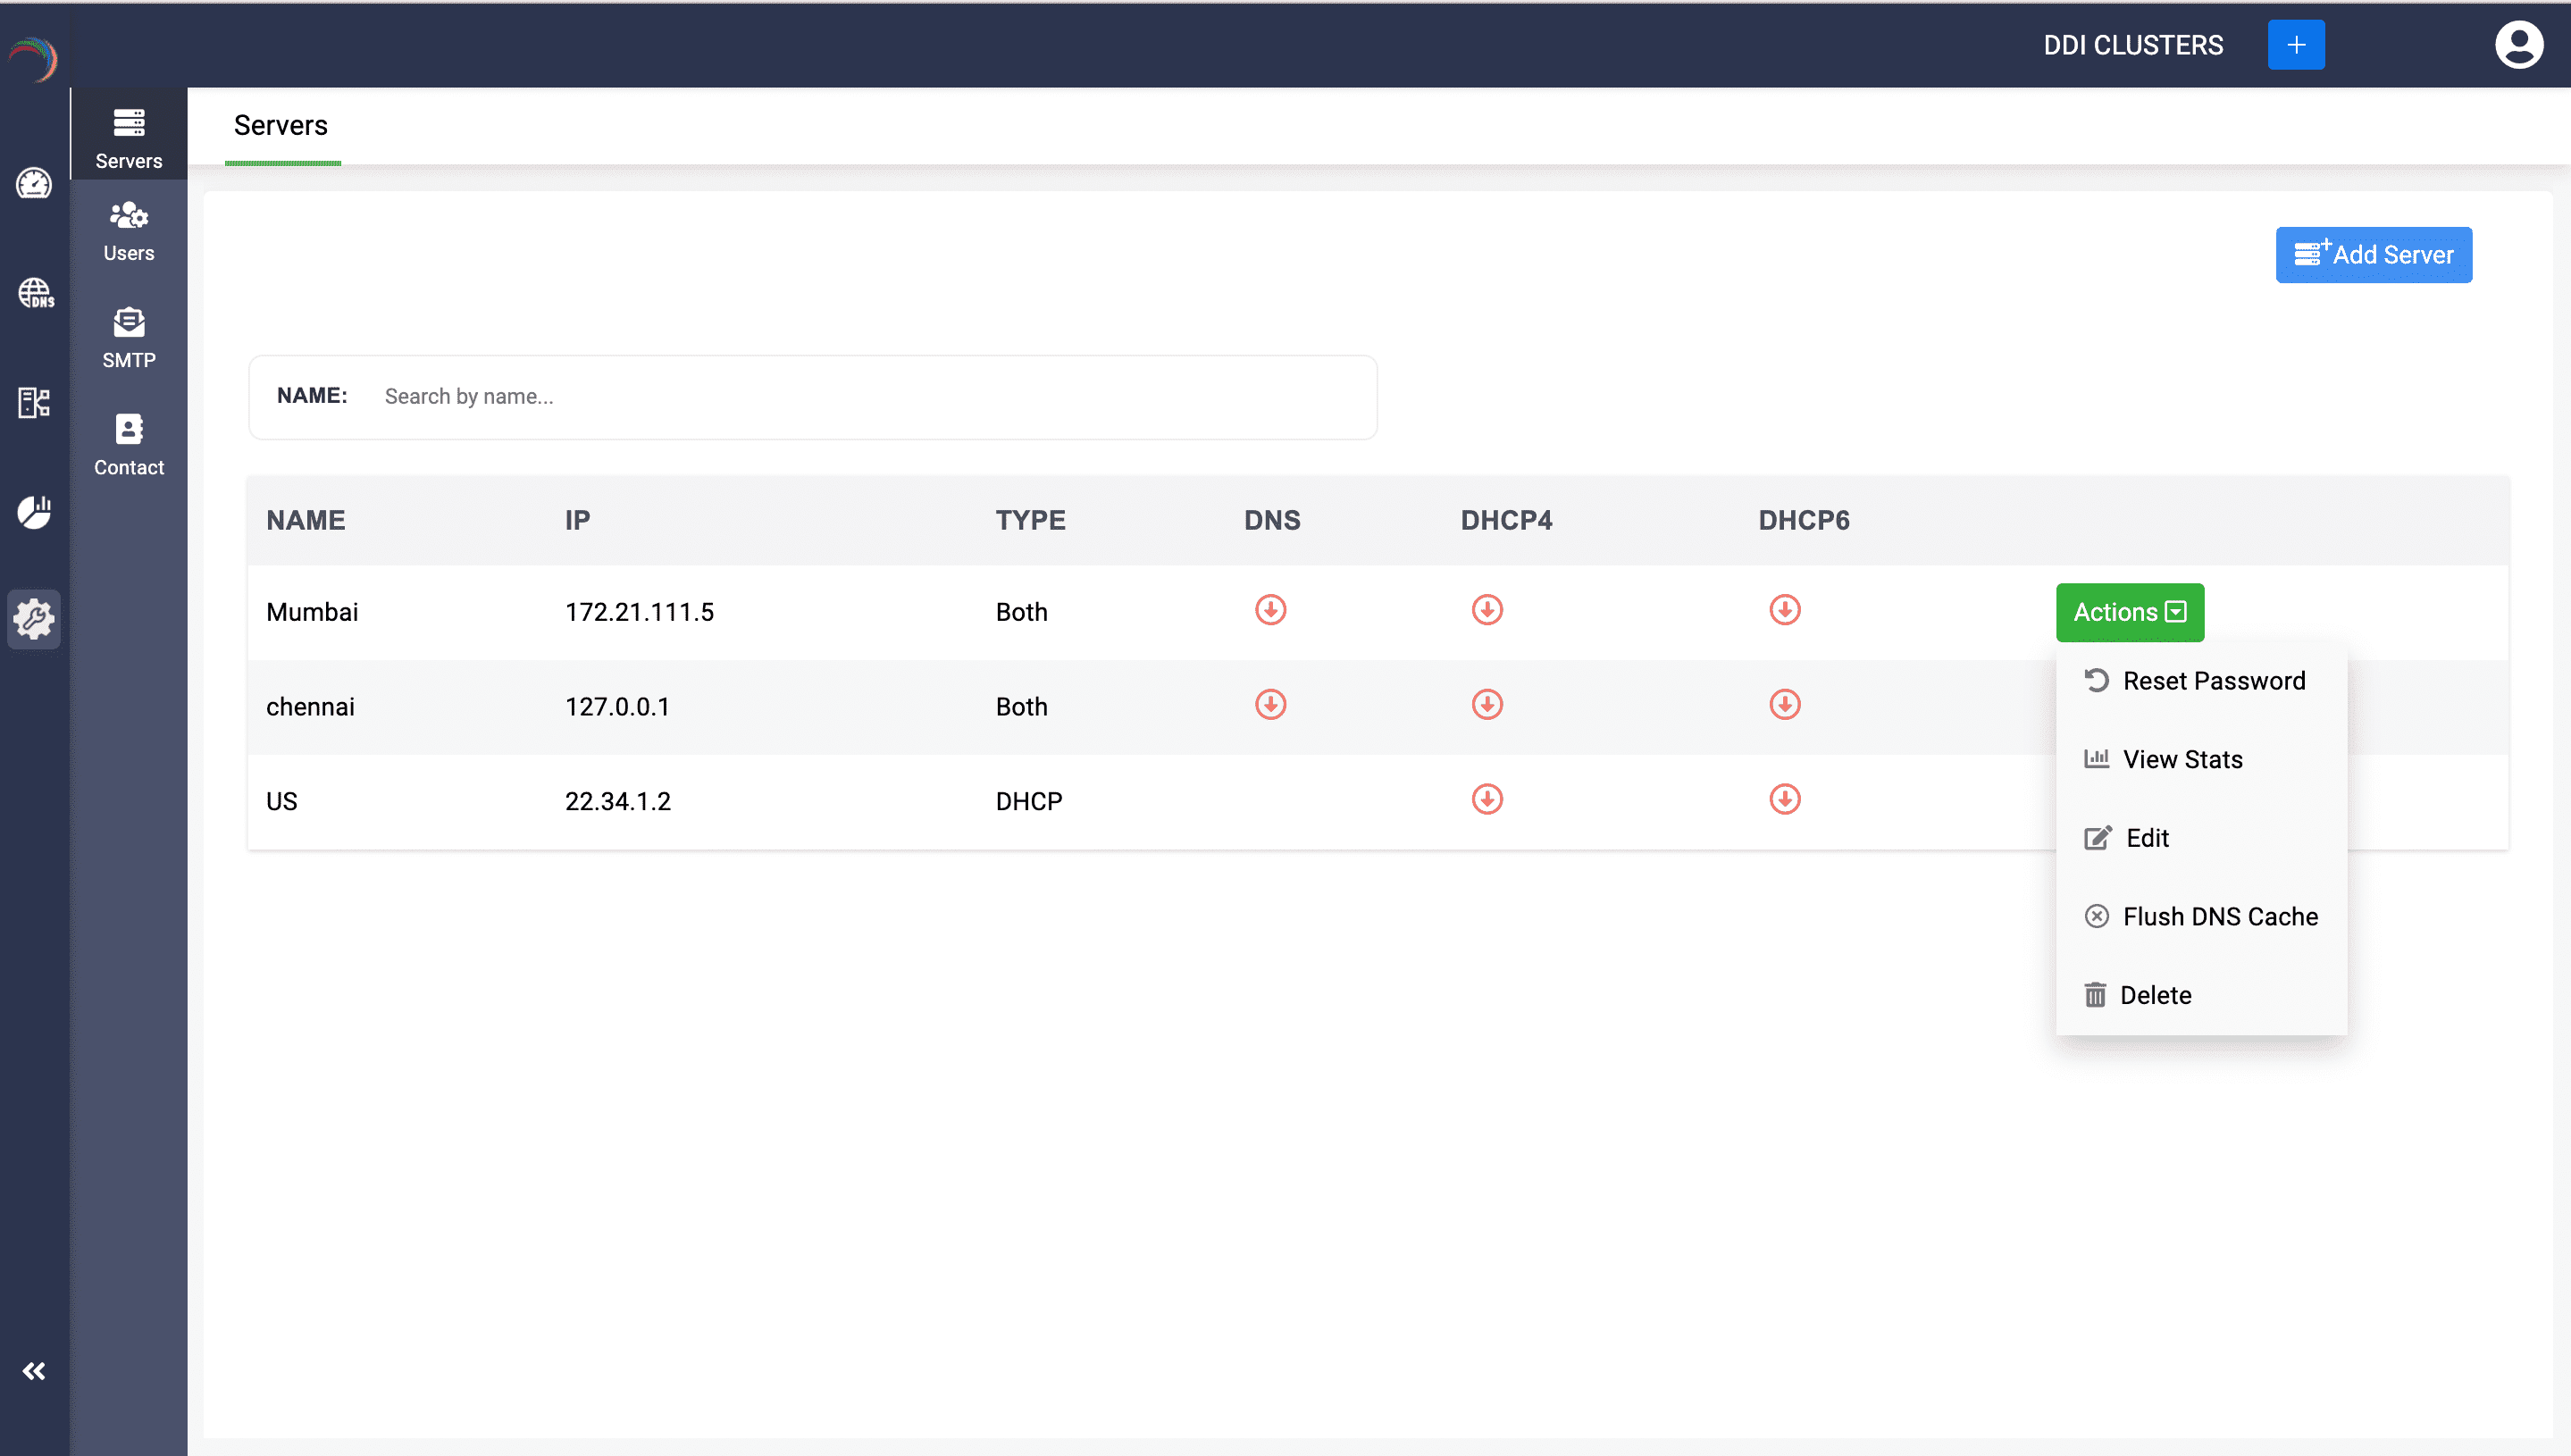
A dialog box appears prompting you to specify the scope of the cache flush. If you want to flush the cache of all the zones on the server, click Flush All or if you just want to flush the cache of a specific zone on the server, click Flush Specific.
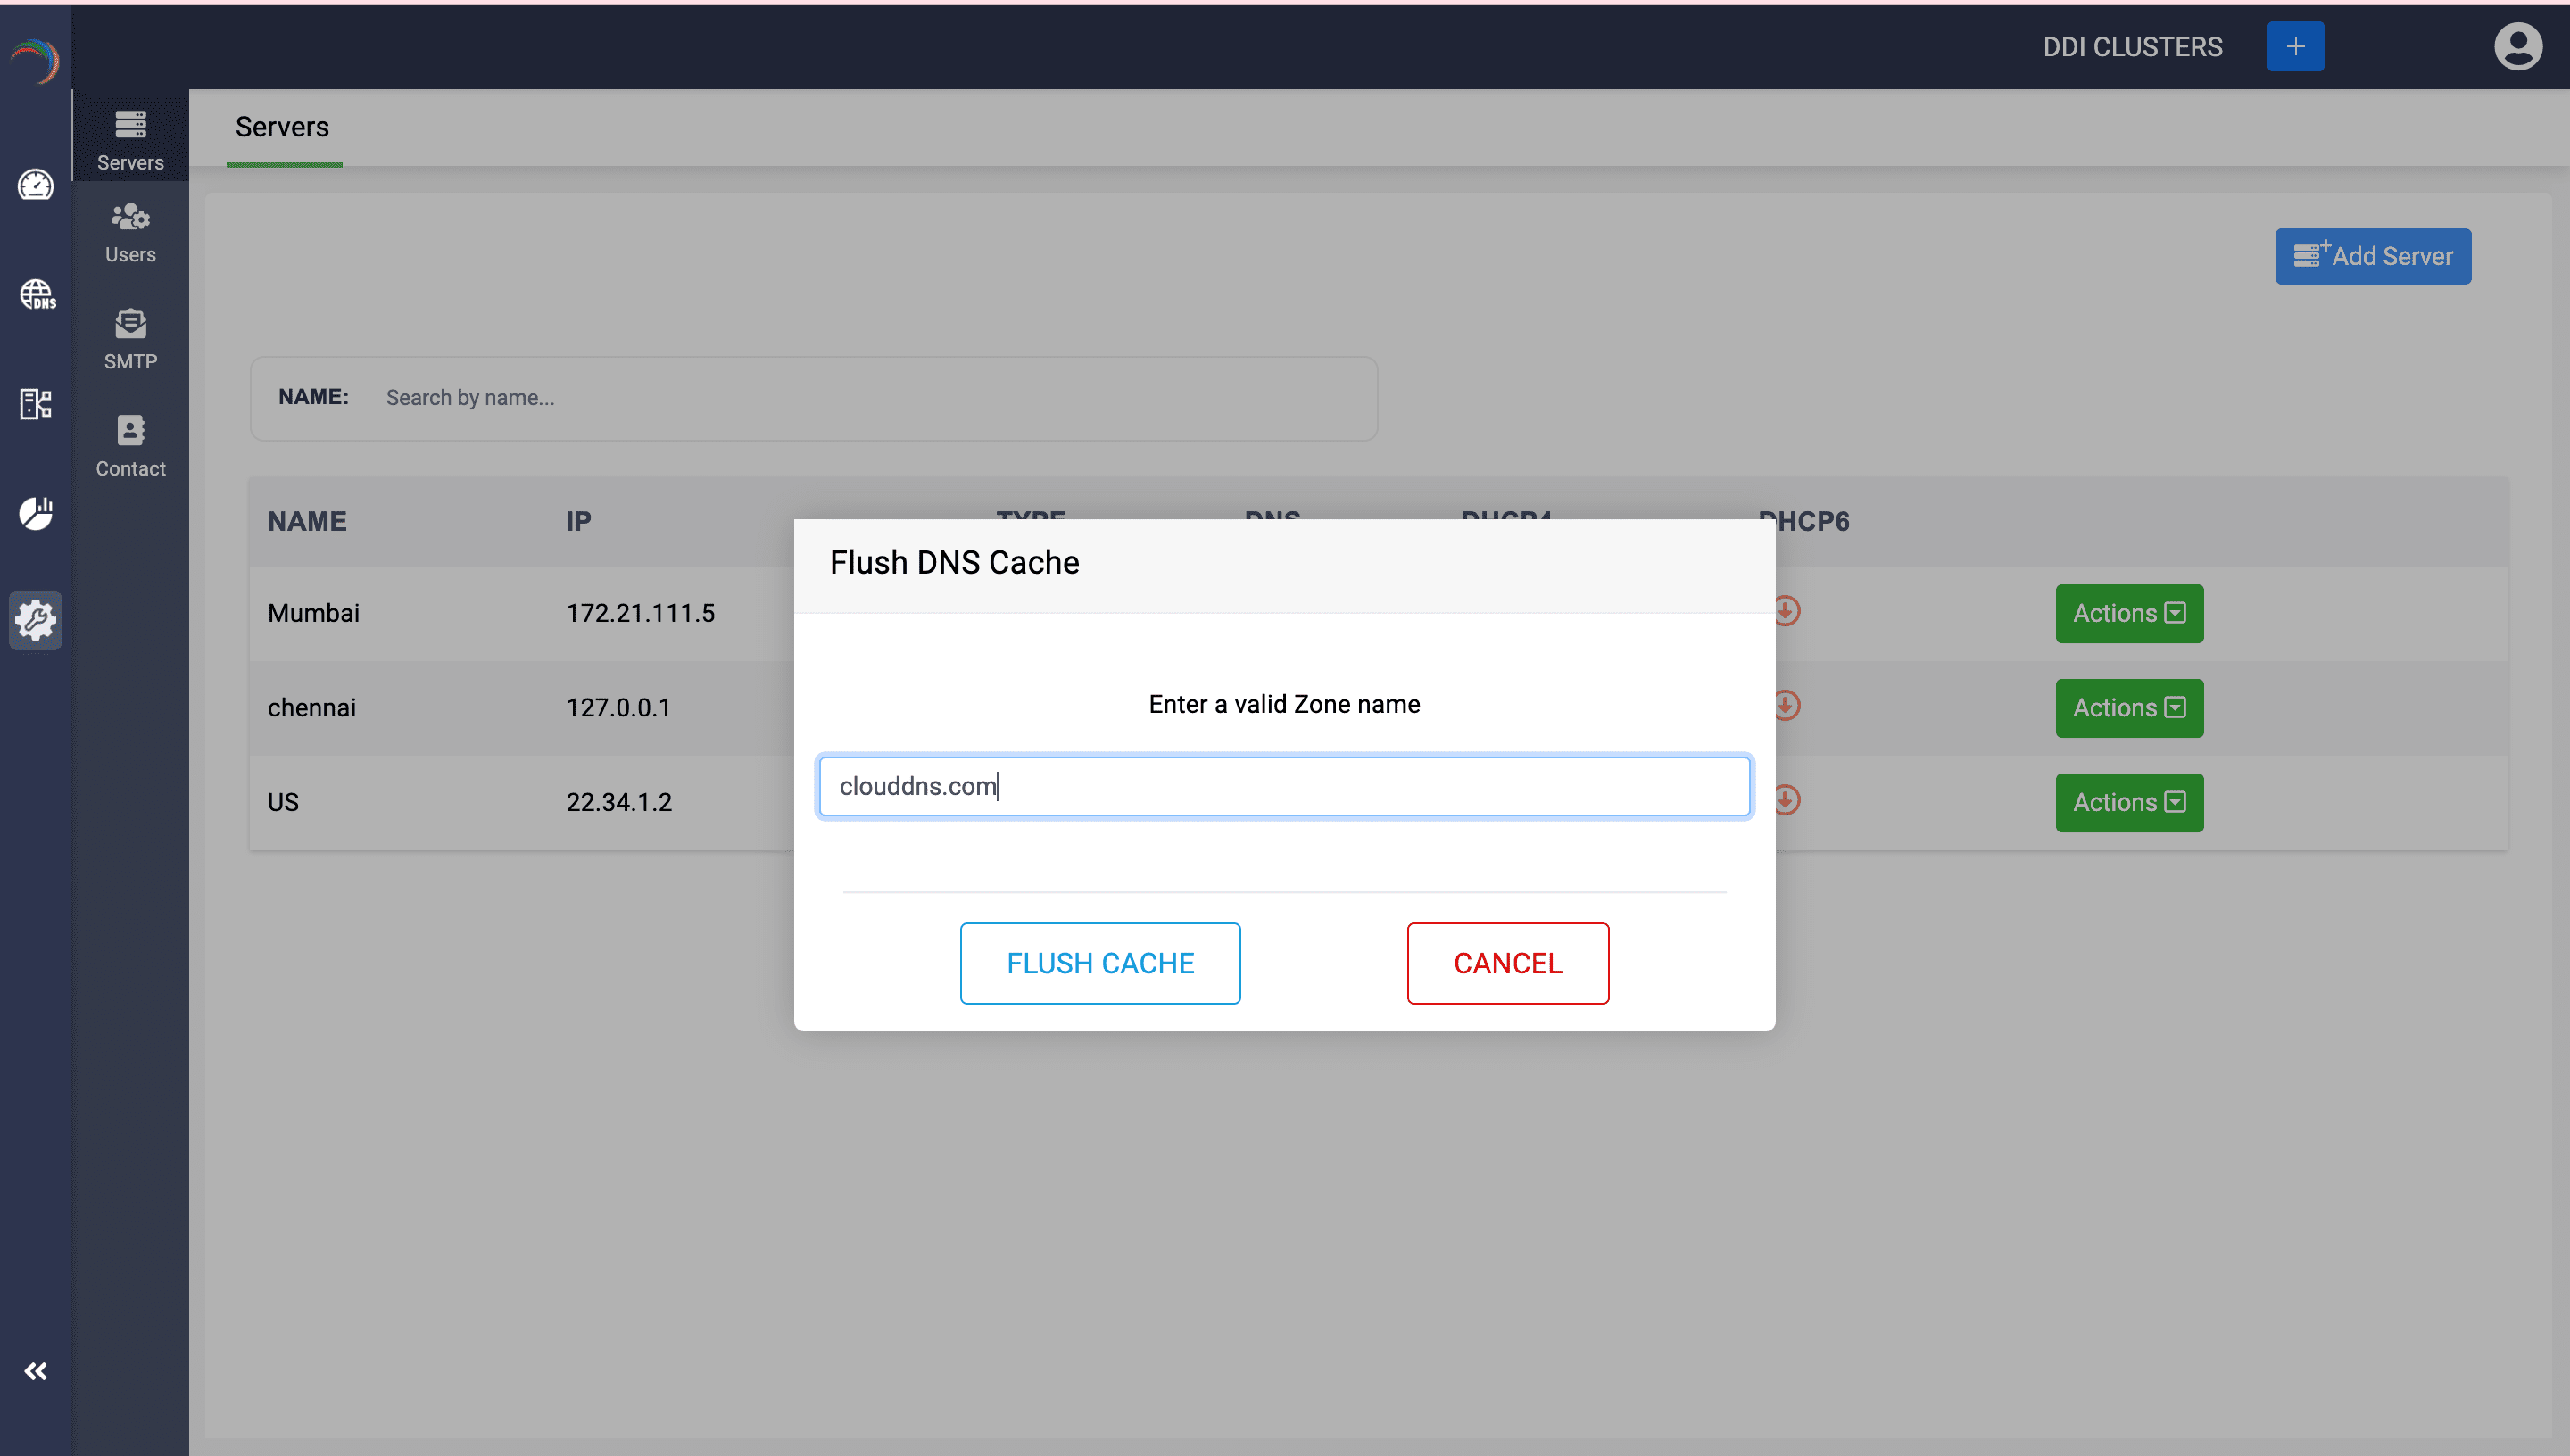
- Subsequently, specify the zone name and click Flush Cache.
Note: Flush DNS Cache action is crucial for maintaining the reliability and speed of DNS resolutions of within your network.
- The other special action is Reset Password which enables network admins to improve security with enhanced controls over DDI Central's Node Agent authentication. This option allows admins to reset passwords to ensure secure transactions between DDI Central's Node Agent and DDI Central's App Console.
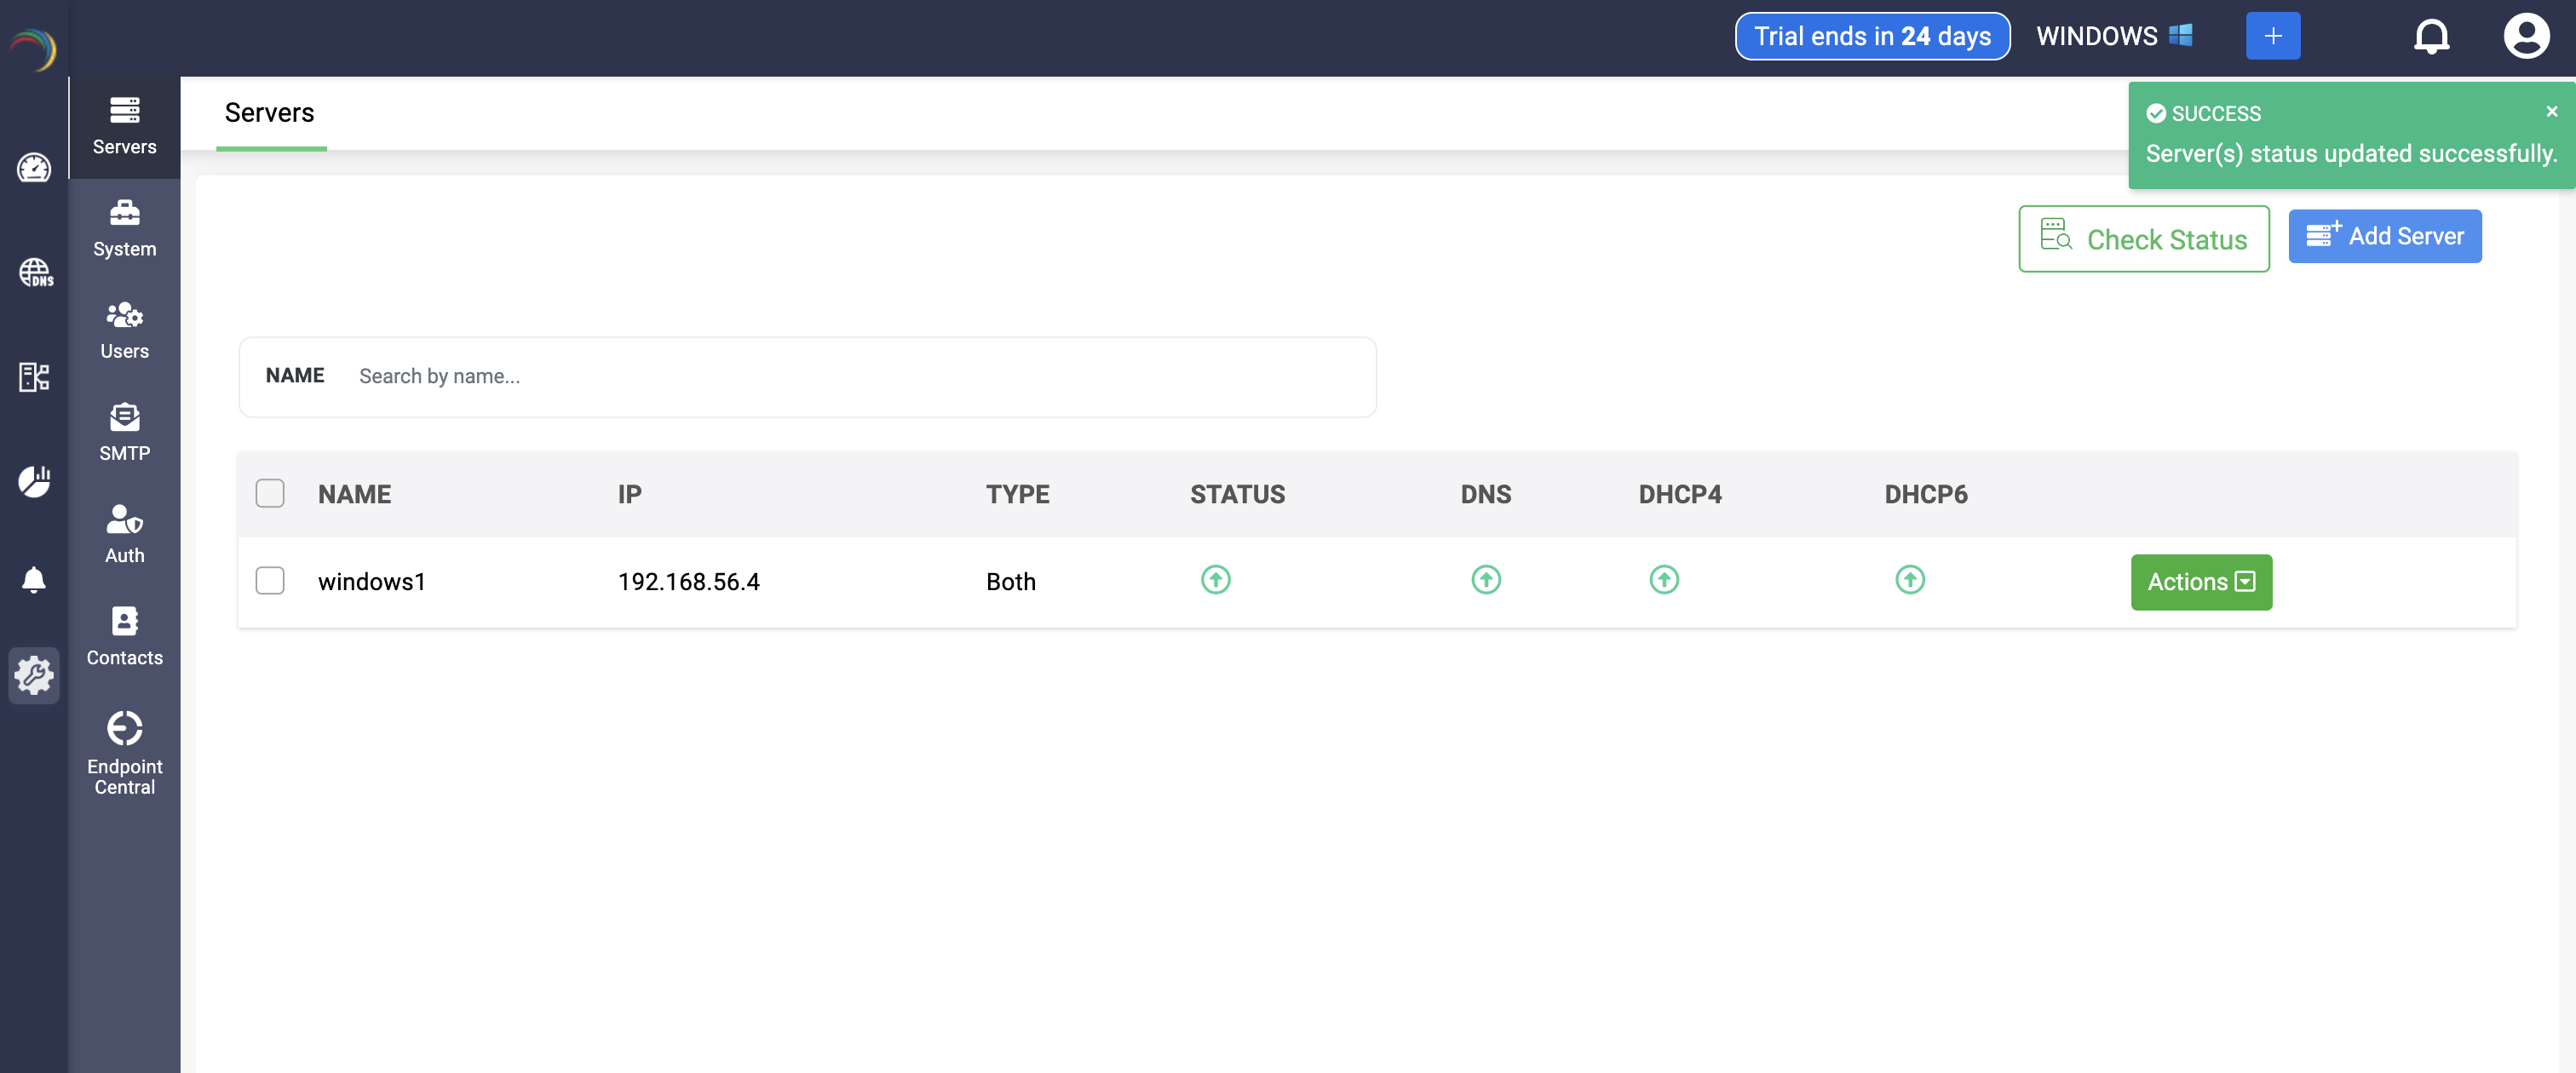
DDI Central now enables users to update their server status, including the status of the service, by clicking on Check status button after selecting the specific server you want to update. This reloads the current status of both the server and service hosted in it. You can single and multi select servers for updating the server status.


New to ADSelfService Plus?
Related Articles
Adding Windows DNS-DHCP servers
Note: PowerShell version 5.1.2 or higher is required for a successful setup. Ensure that Windows Remote Management services are running on the Windows DNS and DHCP servers you plan to onboard into DDI Central's Management UI Console. Step 1. WinRM ...Adding Clusters
Adding Clusters Upon successful signup, the first glimpse within the DDI console reveals an empty dashboard. To get started, create clusters and add your DNS and DHCP servers to your clusters for effective management of your network infrastructure. ...Adding Users
Adding Users To add users as an admin: Select Settings->Users. Under the User Management tab, click on the Add User button in the right corner. Enter the essential details of the user, including Name, Username, email, and password. You can enable or ...Adding users
Onboarding Users To add users as an admin: Select Settings->Users. Under the User Management tab, click on the Add User button in the right corner. Enter the essential details of the user, including Name, Username, email, and password. You can enable ...Adding Users(NEW)
Adding Users To add users as an admin: Select Settings->Users. Under the User Management tab, click on the Add User button in the right corner. Enter the essential details of the user, including Name, Username, email, and password. You can enable or ...