Managing microsoft windows DHCP server
Managing Microsoft Windows DHCP Scopes
Table of Contents
-
What is a Scope in Microsoft Windows DHCP servers?
-
Subnets (DHCPv4 and DHCPv6 Subnets)
-
Special case for IPv6 based subnet
-
Multicast subnets
-
Shared Networks or Superscopes
-
Hosts or DHCP Reservations
-
Supernet
-
VLANs (Virtual LANs)
-
Static subnets
-
DHCP scope tree visualization
-
Bulk Import of IPv4/IPv6 Subnets, Multicast Subnets, and Hosts/DHCP Reservations in DDI Central
-
Guidelines for Importing DHCP Scopes Using CSV Files
- Name: Name the subnet for easy identification.
- Network Address: Provide the network or the first address of the pool to be associated with the new subnet.
-
Prefix: Specify the subnet size using an appropriate prefix, which denotes the number of IP addresses that the subnet can accommodate.
Note: The Subnet Calculator in DDI Central helps administrators efficiently plan and allocate IPv4 and IPv6 address spaces. Learn more about the Subnet Calculator Tool. - Subnet Description: Provide a suitable description for the subnet to quickly identify its purpose and convey the policy associated with it, for a common understanding of its layout.
- Failover DHCP: Enable DHCP failover and select a DHCP server to take over the task of assigning IP addresses for the subnet without any significant downtime.
- DHCP Server: Select the DHCP Server under which you require this subnet to be configured.
- Assign to: Select the relevant option from the two options, Global or Shared Network. Specify whether the subnet is assigned to a global or shared network. Global applies to the entire cluster, while shared is for specific network segments.
- Supernet: Select from the dropdown list of available supernets. If applicable, this field allows you to assign the subnet to a supernet. A supernet is a larger network segment that encompasses multiple subnets.
- State: Indicates whether the subnet is active or inactive. Toggle switch to enable or disable the subnet.
- Lease Duration: Specify the length of time an IP address is leased to a client.
- Specify the duration in days, hours, and minutes.
- Unlimited: No expiration for the lease.
- Range: Specify the range of IP addresses that can be assigned to clients.
- Exclusion range: Specify the addresses within the defined range that should not be assigned to clients.
- Navigate to DHCP-> Network-> Multicast Subnet. Click on the Add Multicast Subnet button in the top right corner.
- On the Create Multicast Subnet page that appears, provide the following details:
- Scope Name: Name the multicast scope with a unique identifier for easy identification.
- Network Address: Enter the base network address for the multicast scope.
- Prefix: Enter the Prefix as /24 even if the drop down displays a list of options.
- Subnet Description: Give a brief description or notes about the multicast subnet. Useful for documentation purposes.
- DHCP Server: Select the DHCP server that manages this scope.
- State: Indicates whether the multicast scope is active or inactive. Toggle switch to enable or disable the scope.
- Lease Duration: Define the length of time a multicast address is leased to a client.
- Range: The range of multicast addresses that can be assigned to clients. Specify a range within the limit (224.0.0.0 to 239.255.255.255).
- Exclusion range: Addresses within the defined range that should not be assigned to clients.
- TTL: Time to Live (TTL) for the multicast packets. It determines the number of hops the packets can make before being discarded.
- Lifetime: Specifies the duration for which the multicast address is valid.
Options include:
- Infinite: The address does not expire.
- Set expiry: Specify the expiry date and time.
- Click Save to finalize the configuration.
- Once the details are complete, clicking the "Save" button will create the new multicast subnet with the specified configuration.
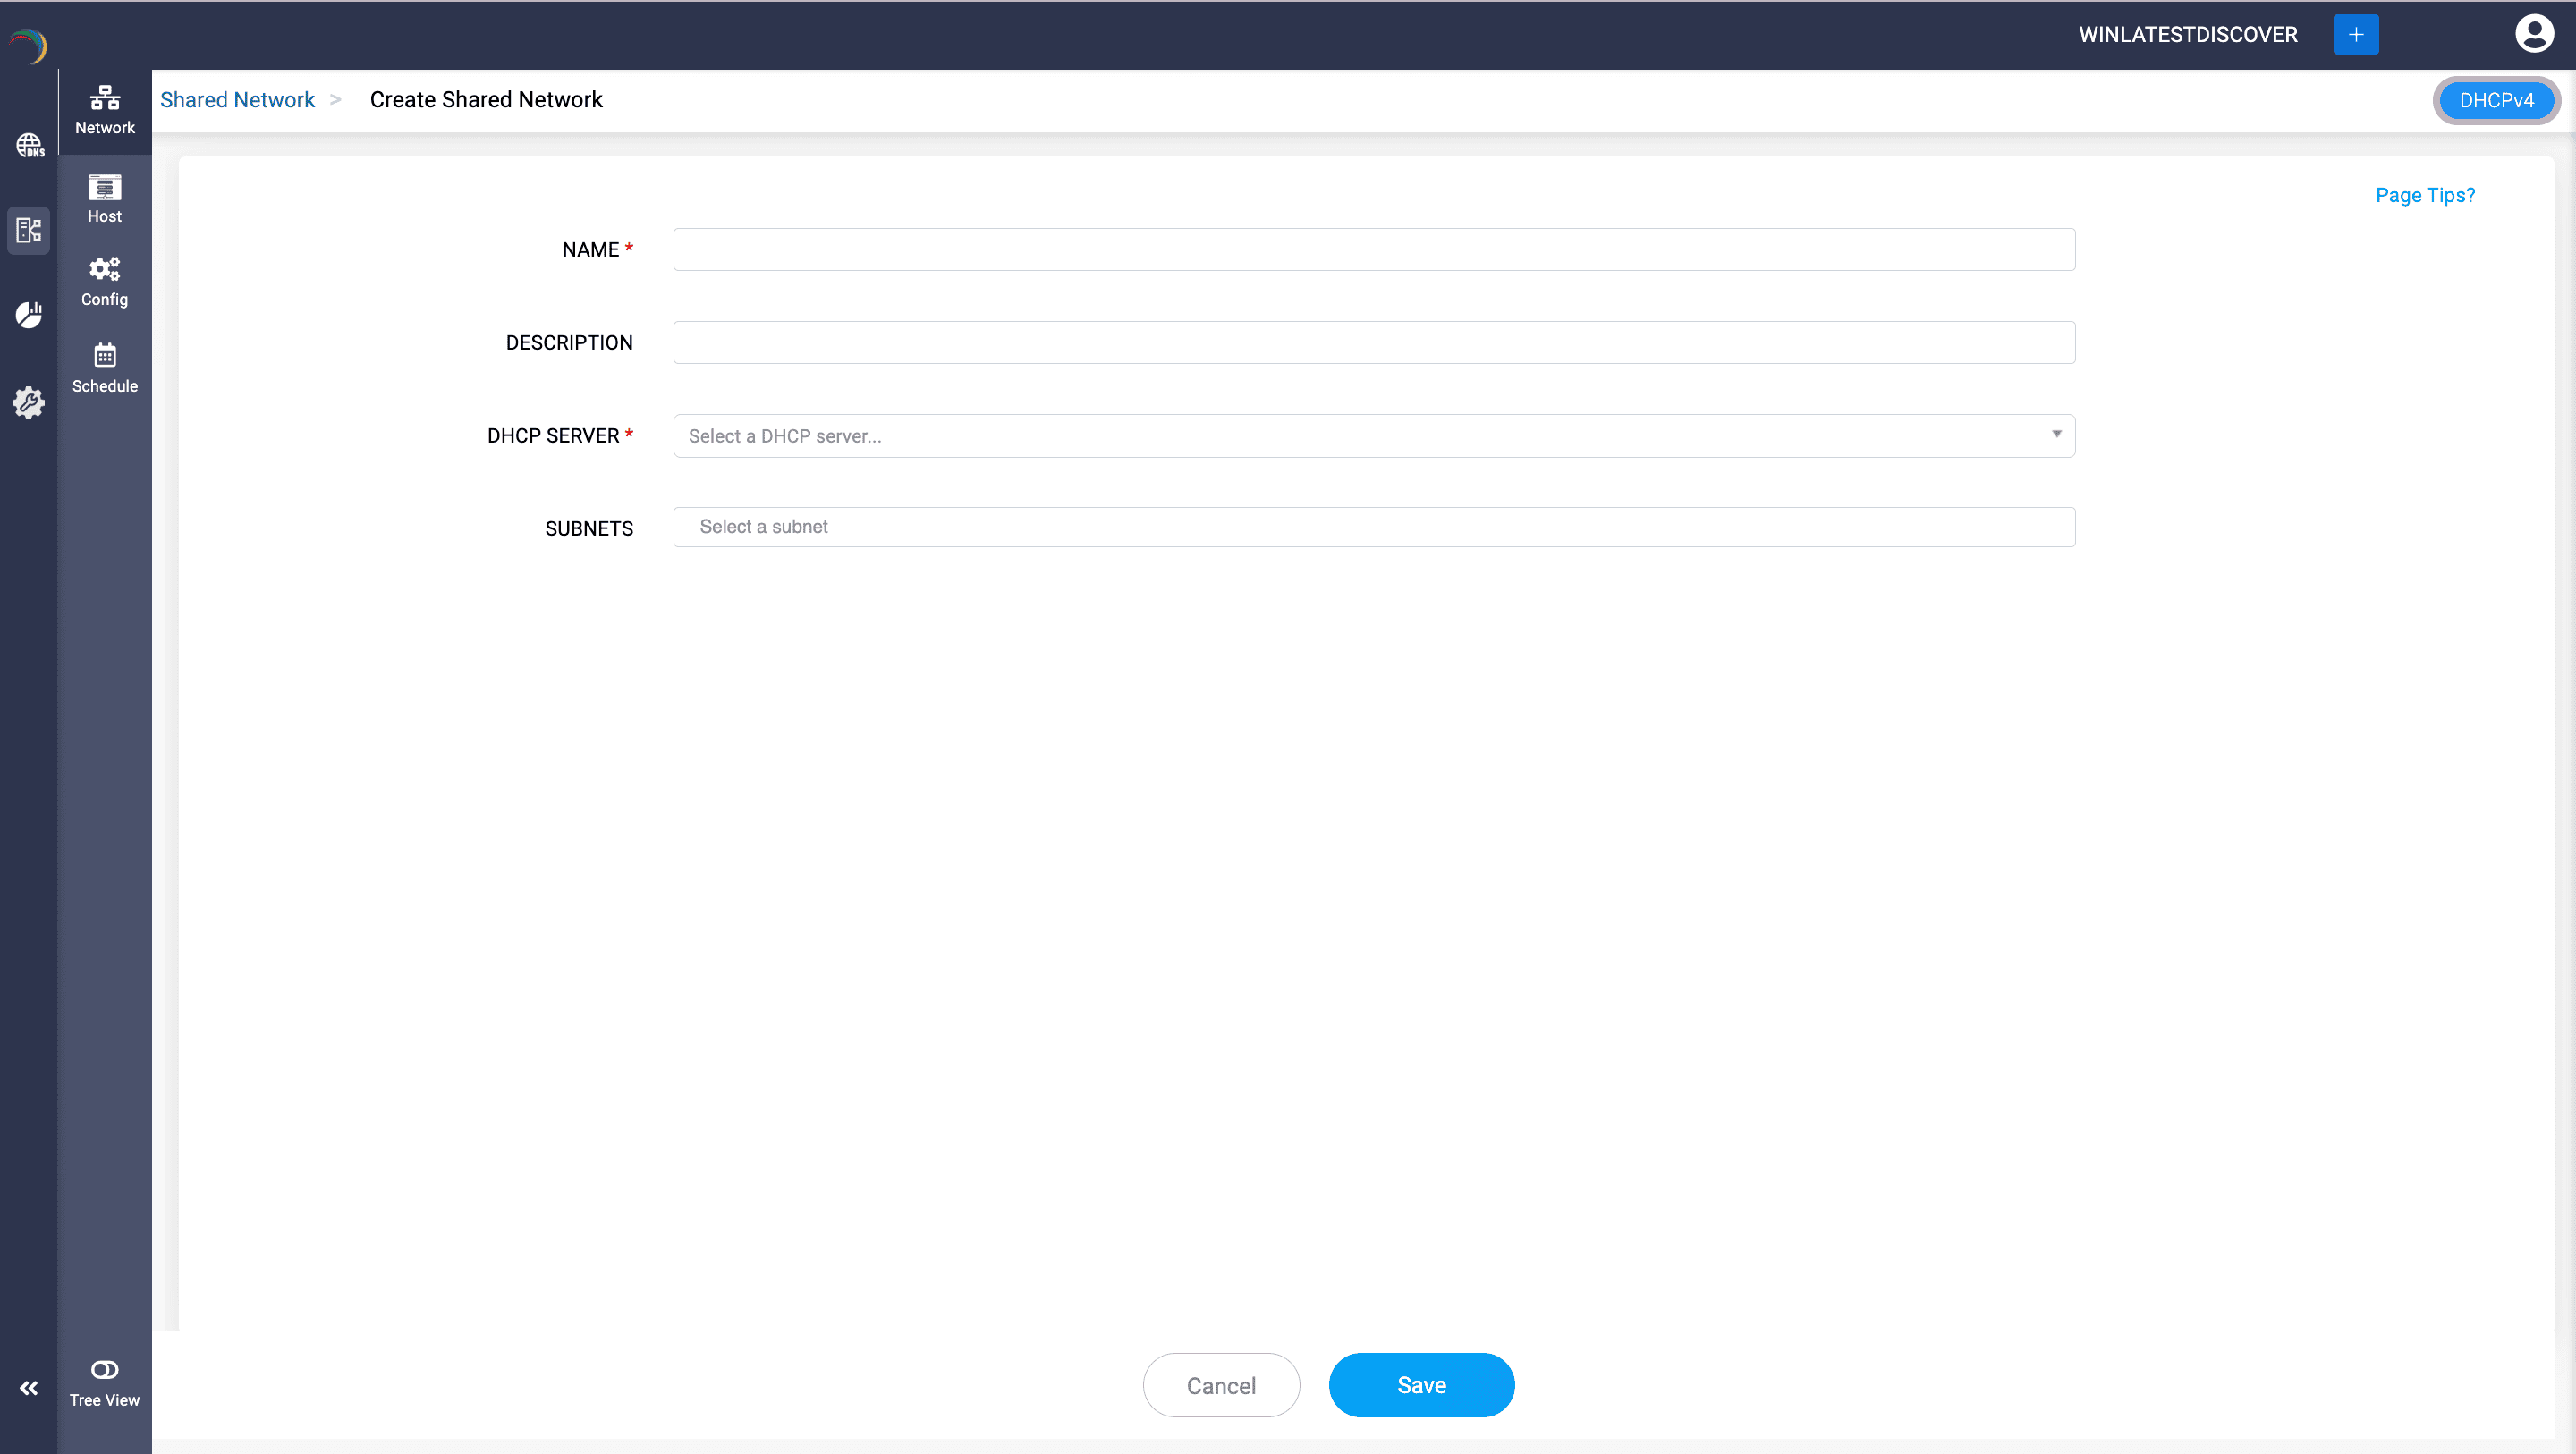
- A shared-network in DDI Central (aka) Superscopes in Microsoft Windows DHCP is used when multiple logical IP networks (subnets) share the same physical network segment.
- Shared networks allow DHCP to serve multiple subnets on a single physical network, providing different IP configurations to clients based on their network segment.
- To create a new shared network, go to DHCP-> Network-> Shared Network.
- Assign a unique name and description for the shared network.
- Just add the required subnets. and Click Save.
- A host or DHCP Reservation in Microsoft Windows specifies exclusive IP address assignment settings for individual clients based on their hardware (MAC) addresses.
- This is used for assigning fixed IP addresses or specific configurations to particular clients, ensuring that a specific client always receives the same IP address and network settings.
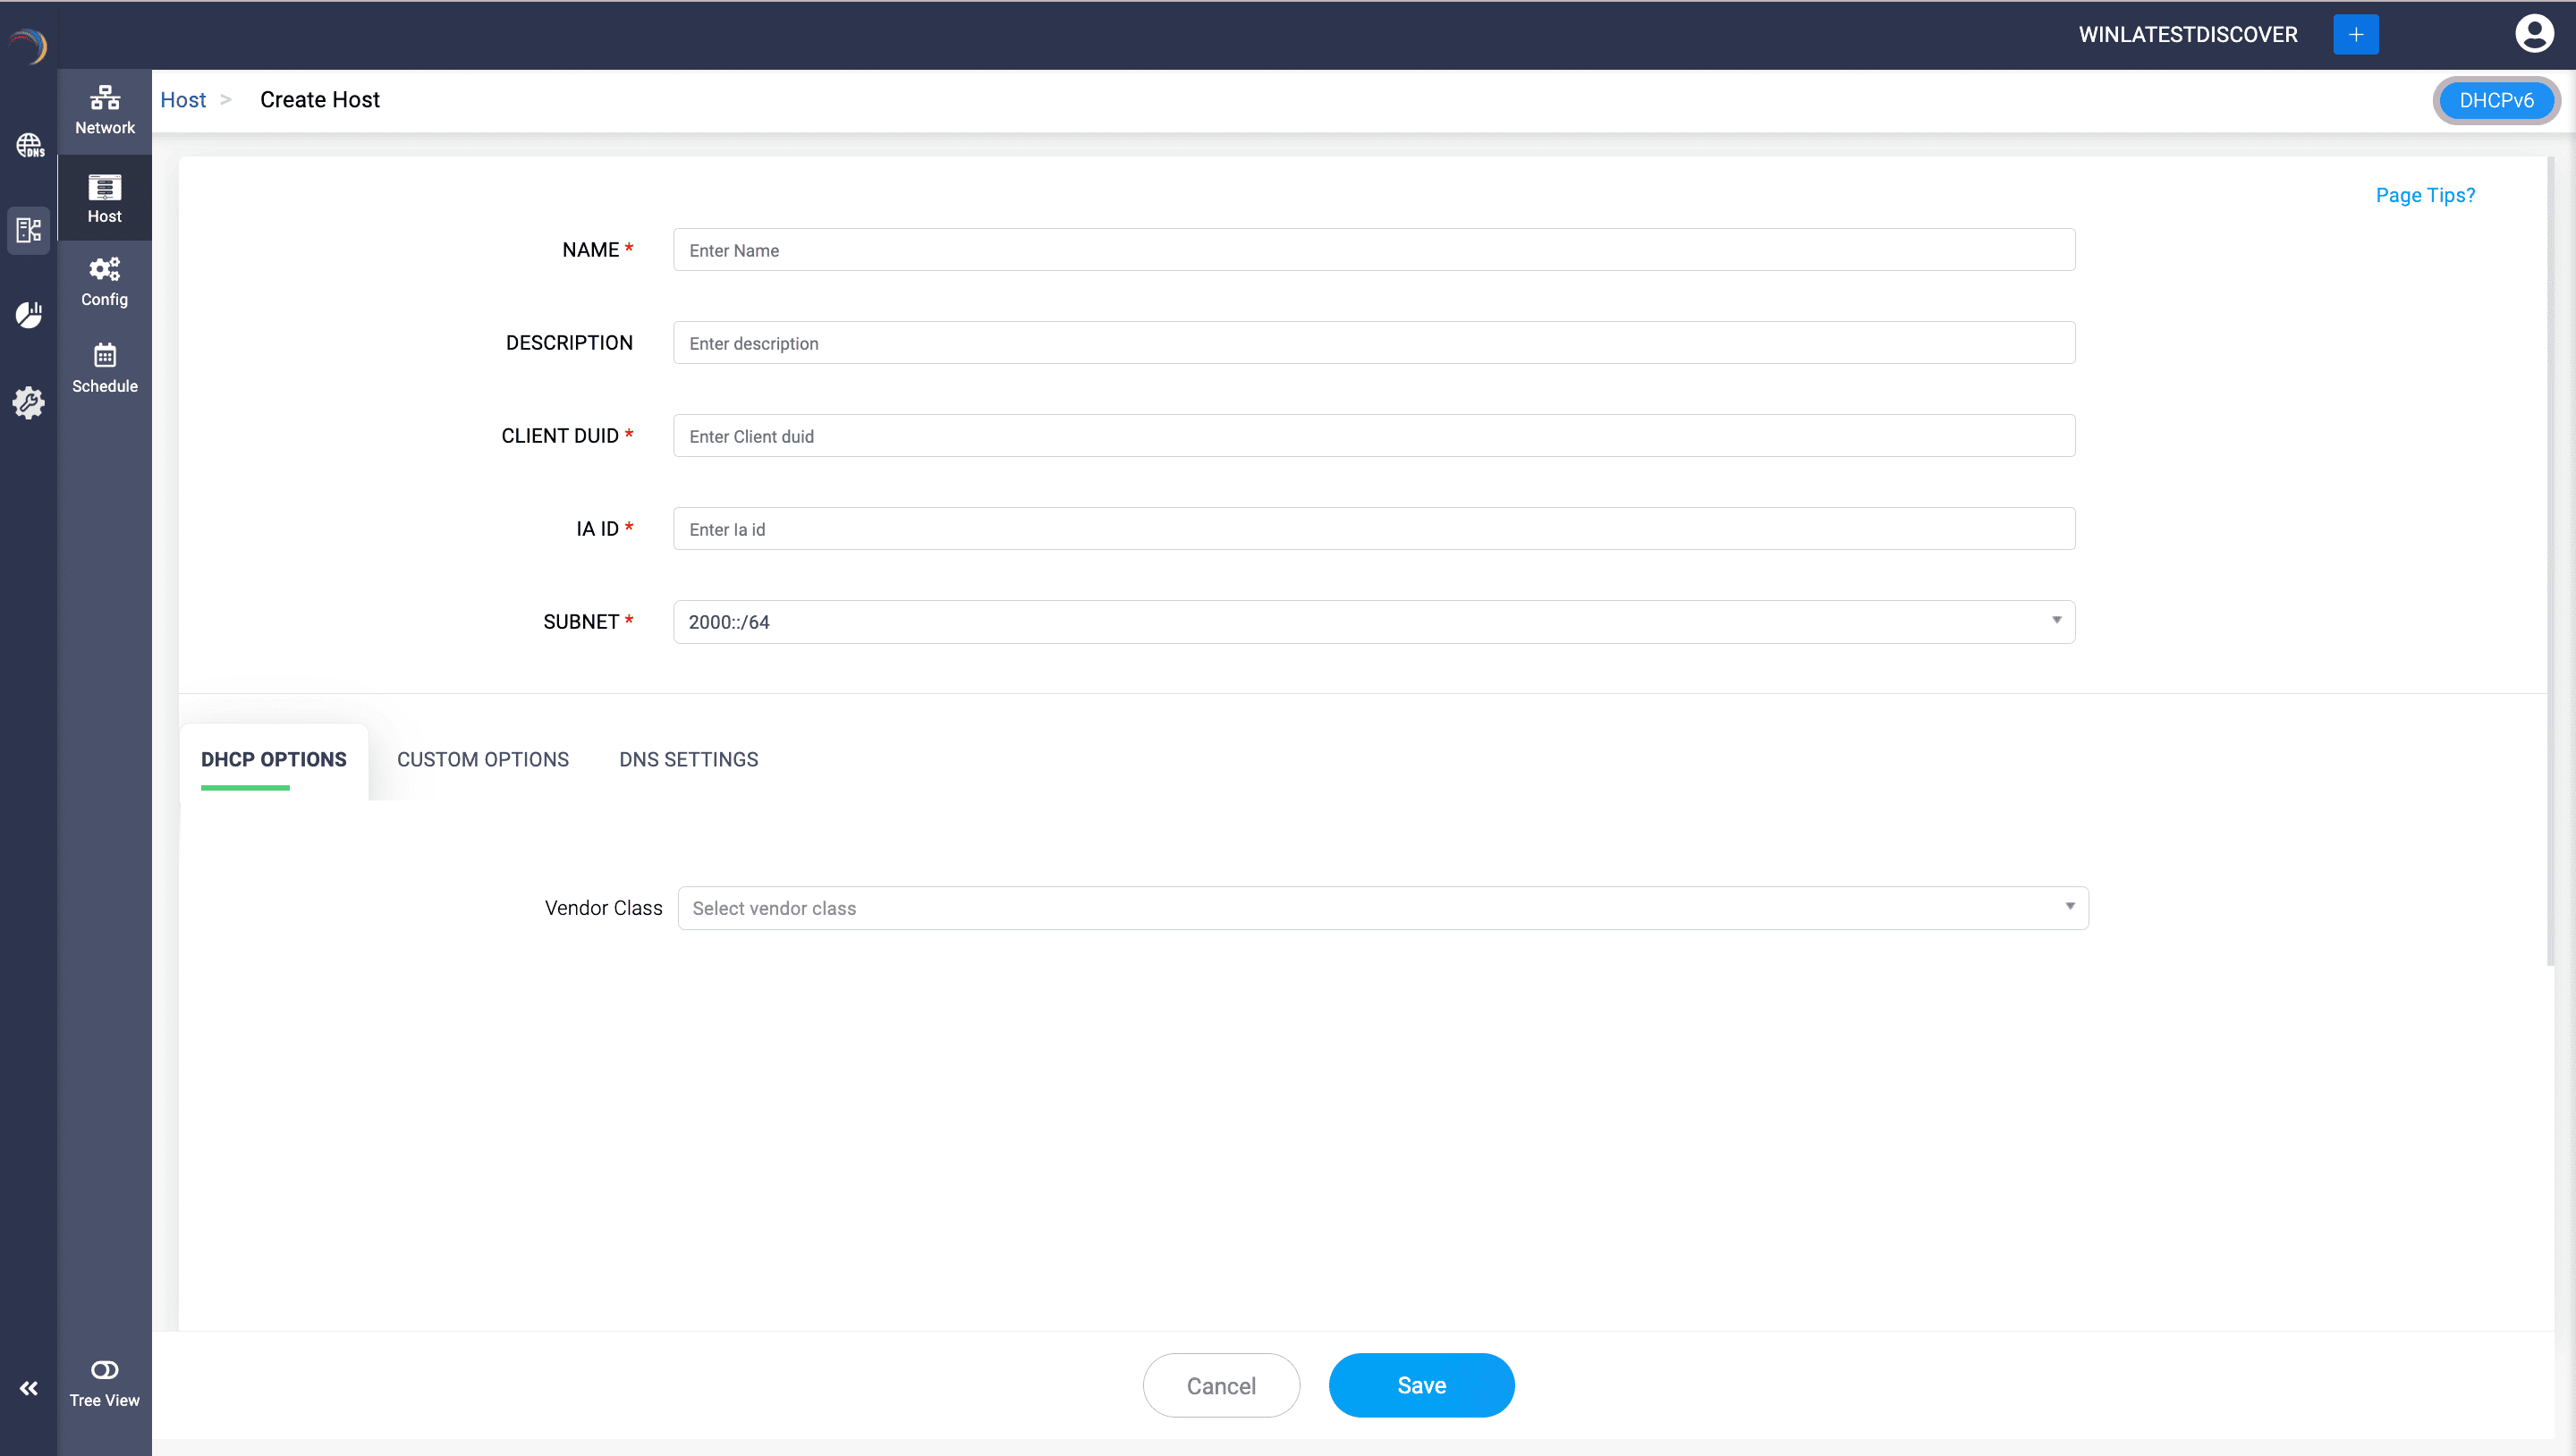
- To create a DHCPv4 based Host with a fixed address, go to DHCP-> Network-> Host.
- On the Host page, provide a unique name and description for the host, the mac address of the host.
- Specify the Subnet under which the DHCP reservation would be located.
- Assign the relevant Windows DHCP options or the relevant custom option already defined by selecting the appropriate vendor class.
- Apply the necessary DNS settings if required and Click Save to finalize the configuration.
- Client DUID: DUID stands for "DHCP Unique Identifier." This field uniquely identifies a DHCP client, and it is used by DHCPv6 servers to recognize clients and assign the appropriate IP addresses and configurations.
- The DUID is usually represented in a hexadecimal format and is used by DHCP servers to uniquely identify clients. It can be a combination of various elements such as link-layer addresses, timestamps, and vendor-specific information.
- IA ID: IA ID stands for "Identity Association Identifier." This field is used in DHCPv6 to identify the set of IP addresses associated with a particular DHCP client. Each IA ID corresponds to a set of addresses or configuration parameters that the server assigns to the client.
- The IA ID is an unsigned integer used to identify a particular set of configuration parameters or IP addresses assigned to a DHCPv6 client.
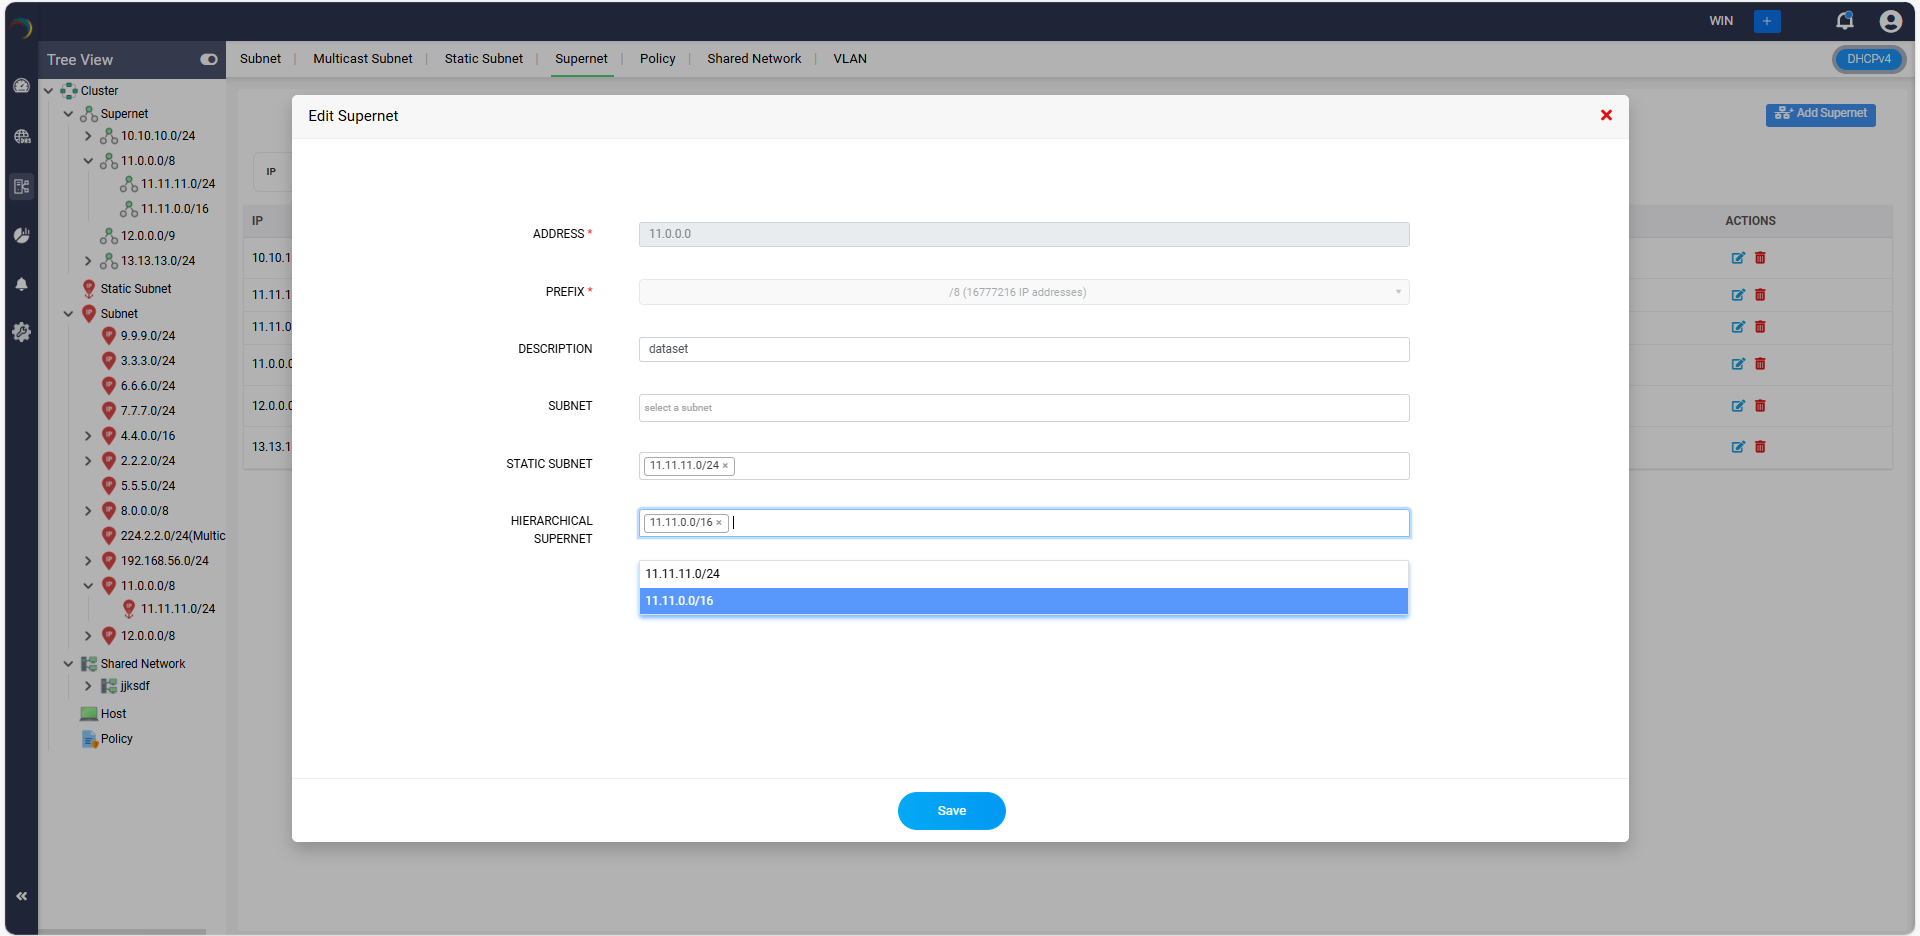
- Go to DHCP-> Network>Supernet.
- Click on the Add Supernet button in the top right corner.
- On the Add Supernet page that appears, enter the values for the following fields.
- Address: Enter the base network address of the supernet.
- Prefix: Select the the subnet mask in terms of the number of bits that constitute the network portion of the address. It essentially indicates the size of the supernet.
- Description: Add a brief description or notes about the supernet. This is useful for documentation and understanding the purpose or details of the supernet.
- Subnet: Assign the list of appropriate Child Subnets to the Supernet.
- Static Subnet: Assign the list of appropriate Child Static subnets to the Supernet.
- In the Hierarchical Supernet field, choose a sub-level supernet (e.g., 11.11.0.0/16) that is going to be a part of the bigger supernet.
- After filling in the necessary details, you can save the configuration by clicking the Save,/strong> button at the bottom.
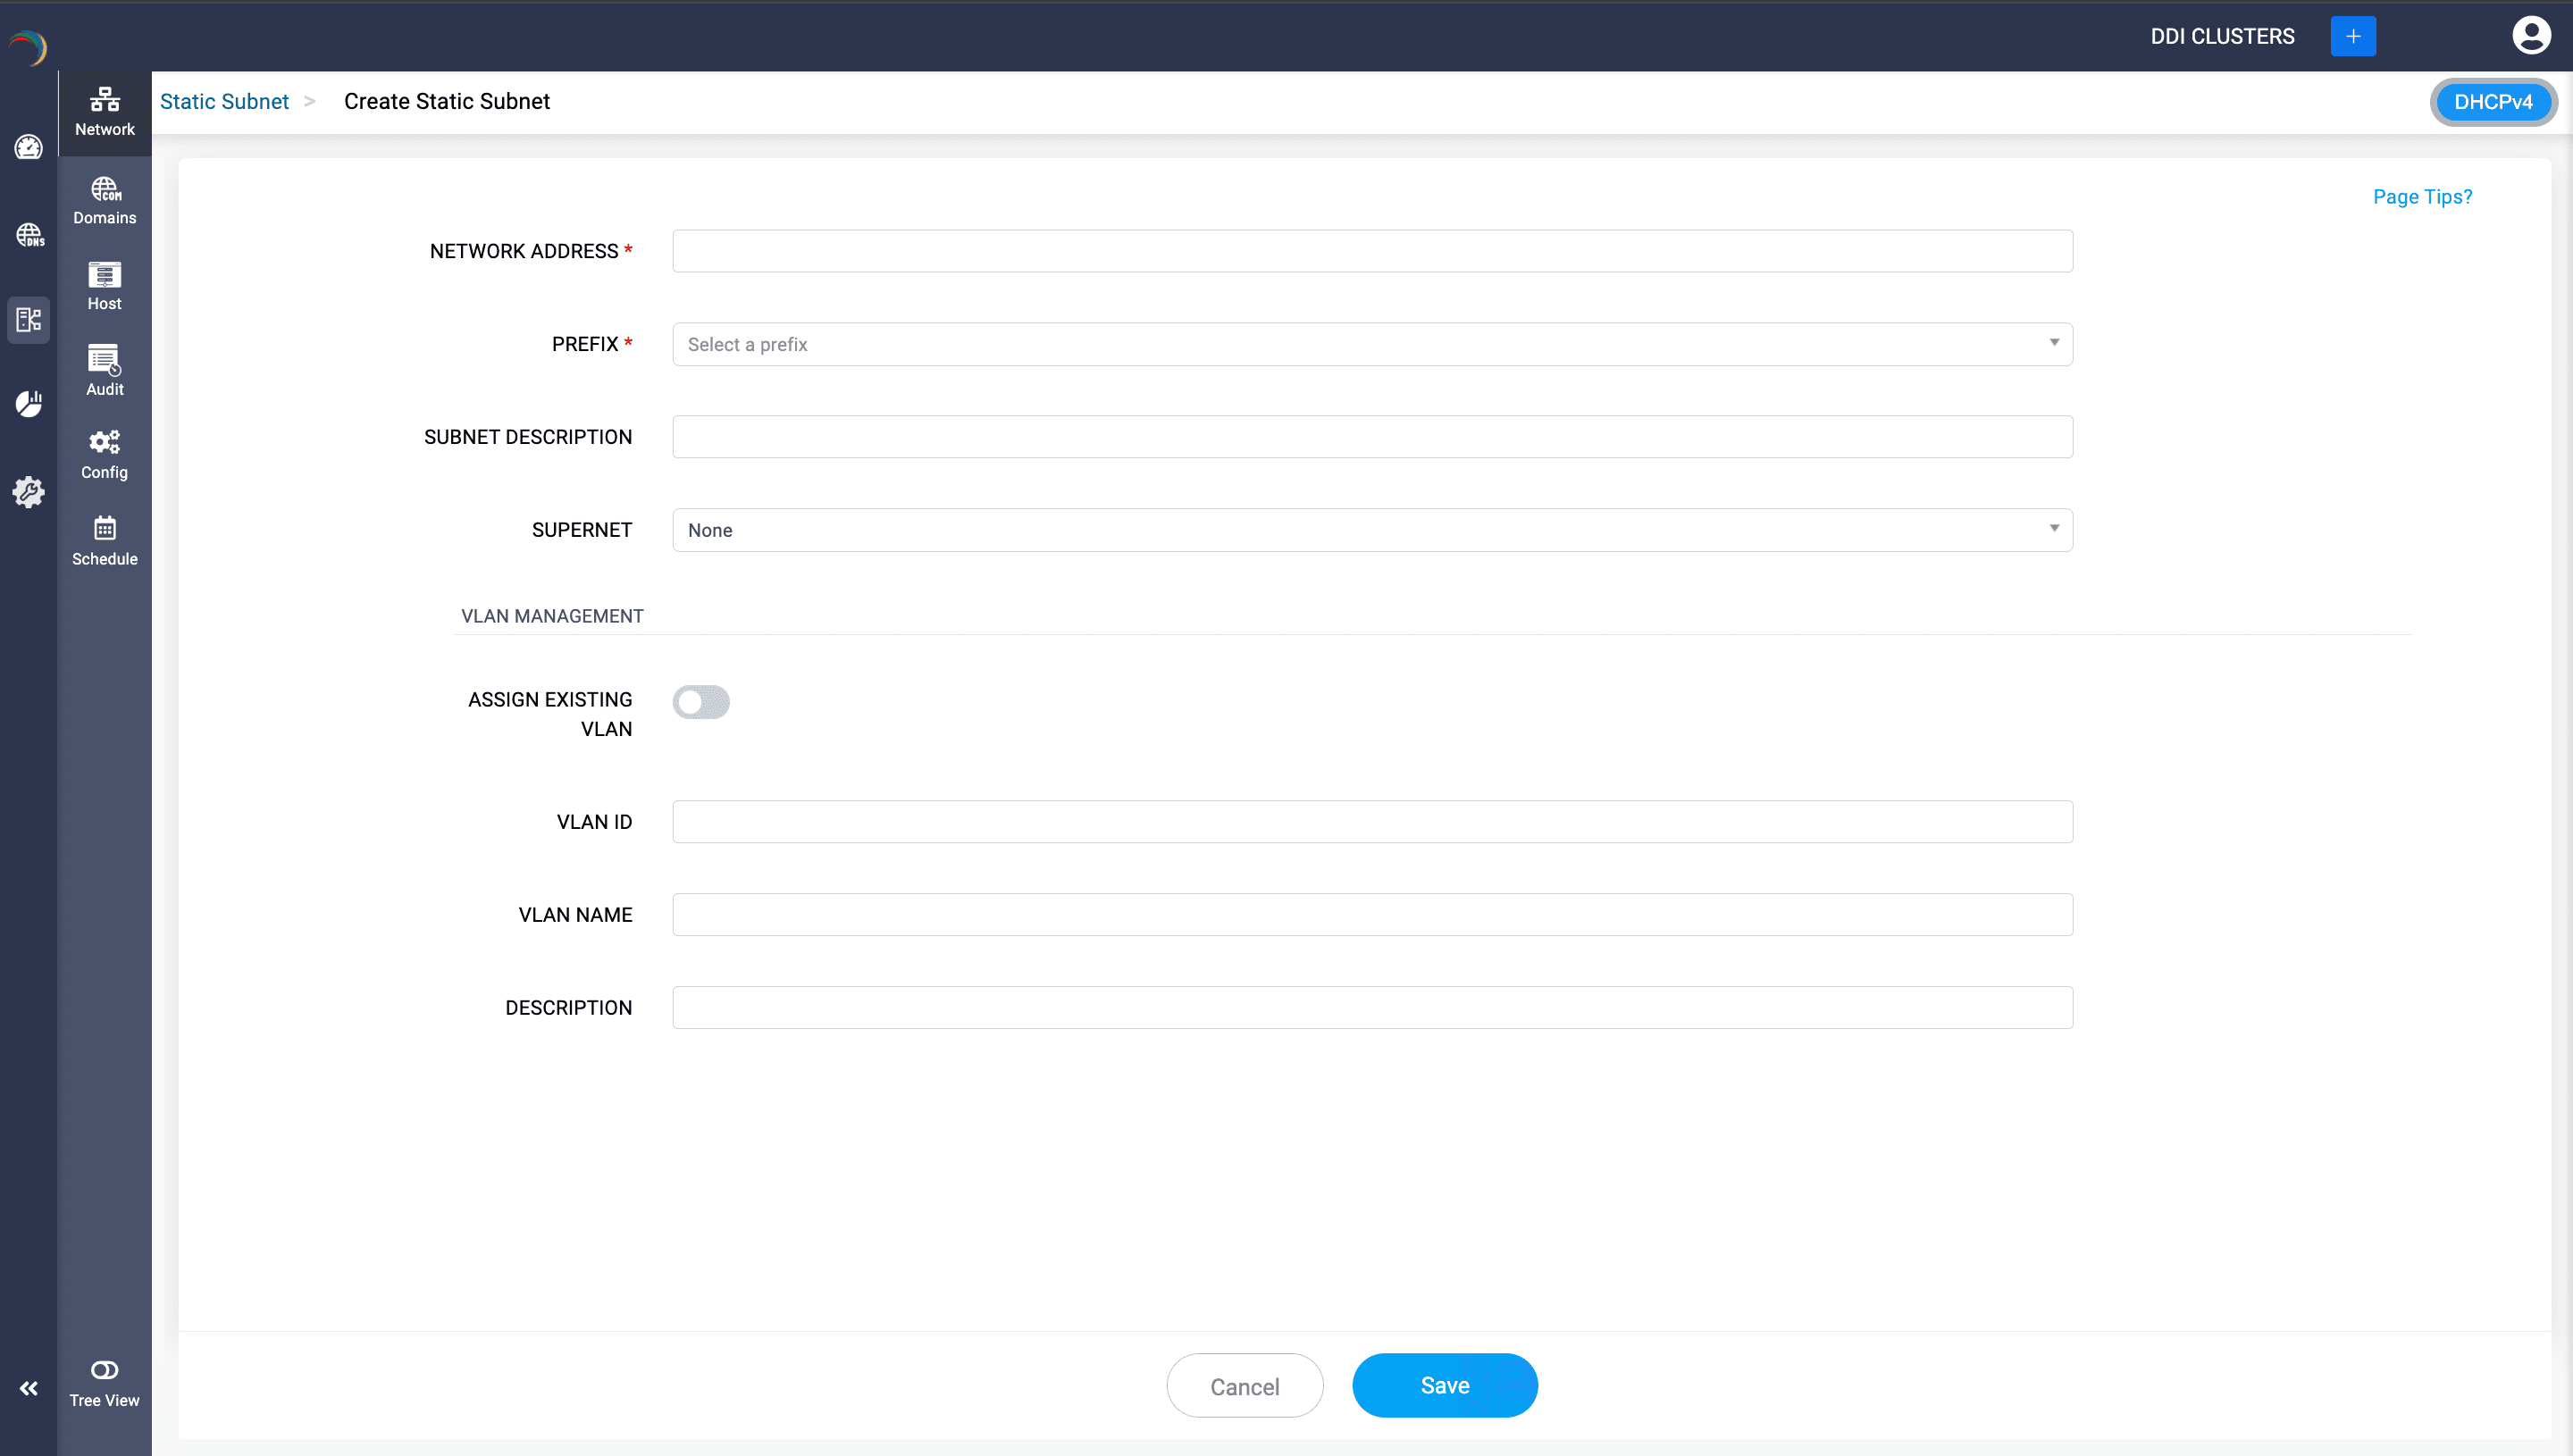
- Select DHCP-> Network. On the Network page, navigate to the Static Subnet tab. You can either click the Add Static Subnet button in the top right corner of the page or click the Import button to import the spreadsheet you use to maintain the static subnet leases.
- On clicking the Add Static Subnet button, the Create Static Subnet page appears, prompting you to enter the essential details for the static subnet, like the Network Address and network prefix of the static subnet, a suitable description to identify the static subnet and you can also map the Static subnet to a Supernet to position it hierarchically in the tree view of your cluster's IP address plan. You can also specify if this subnet is associated with a VLAN by entering the targeted VLAN details and then click Save to finalize the configurations for the Static Subnet.
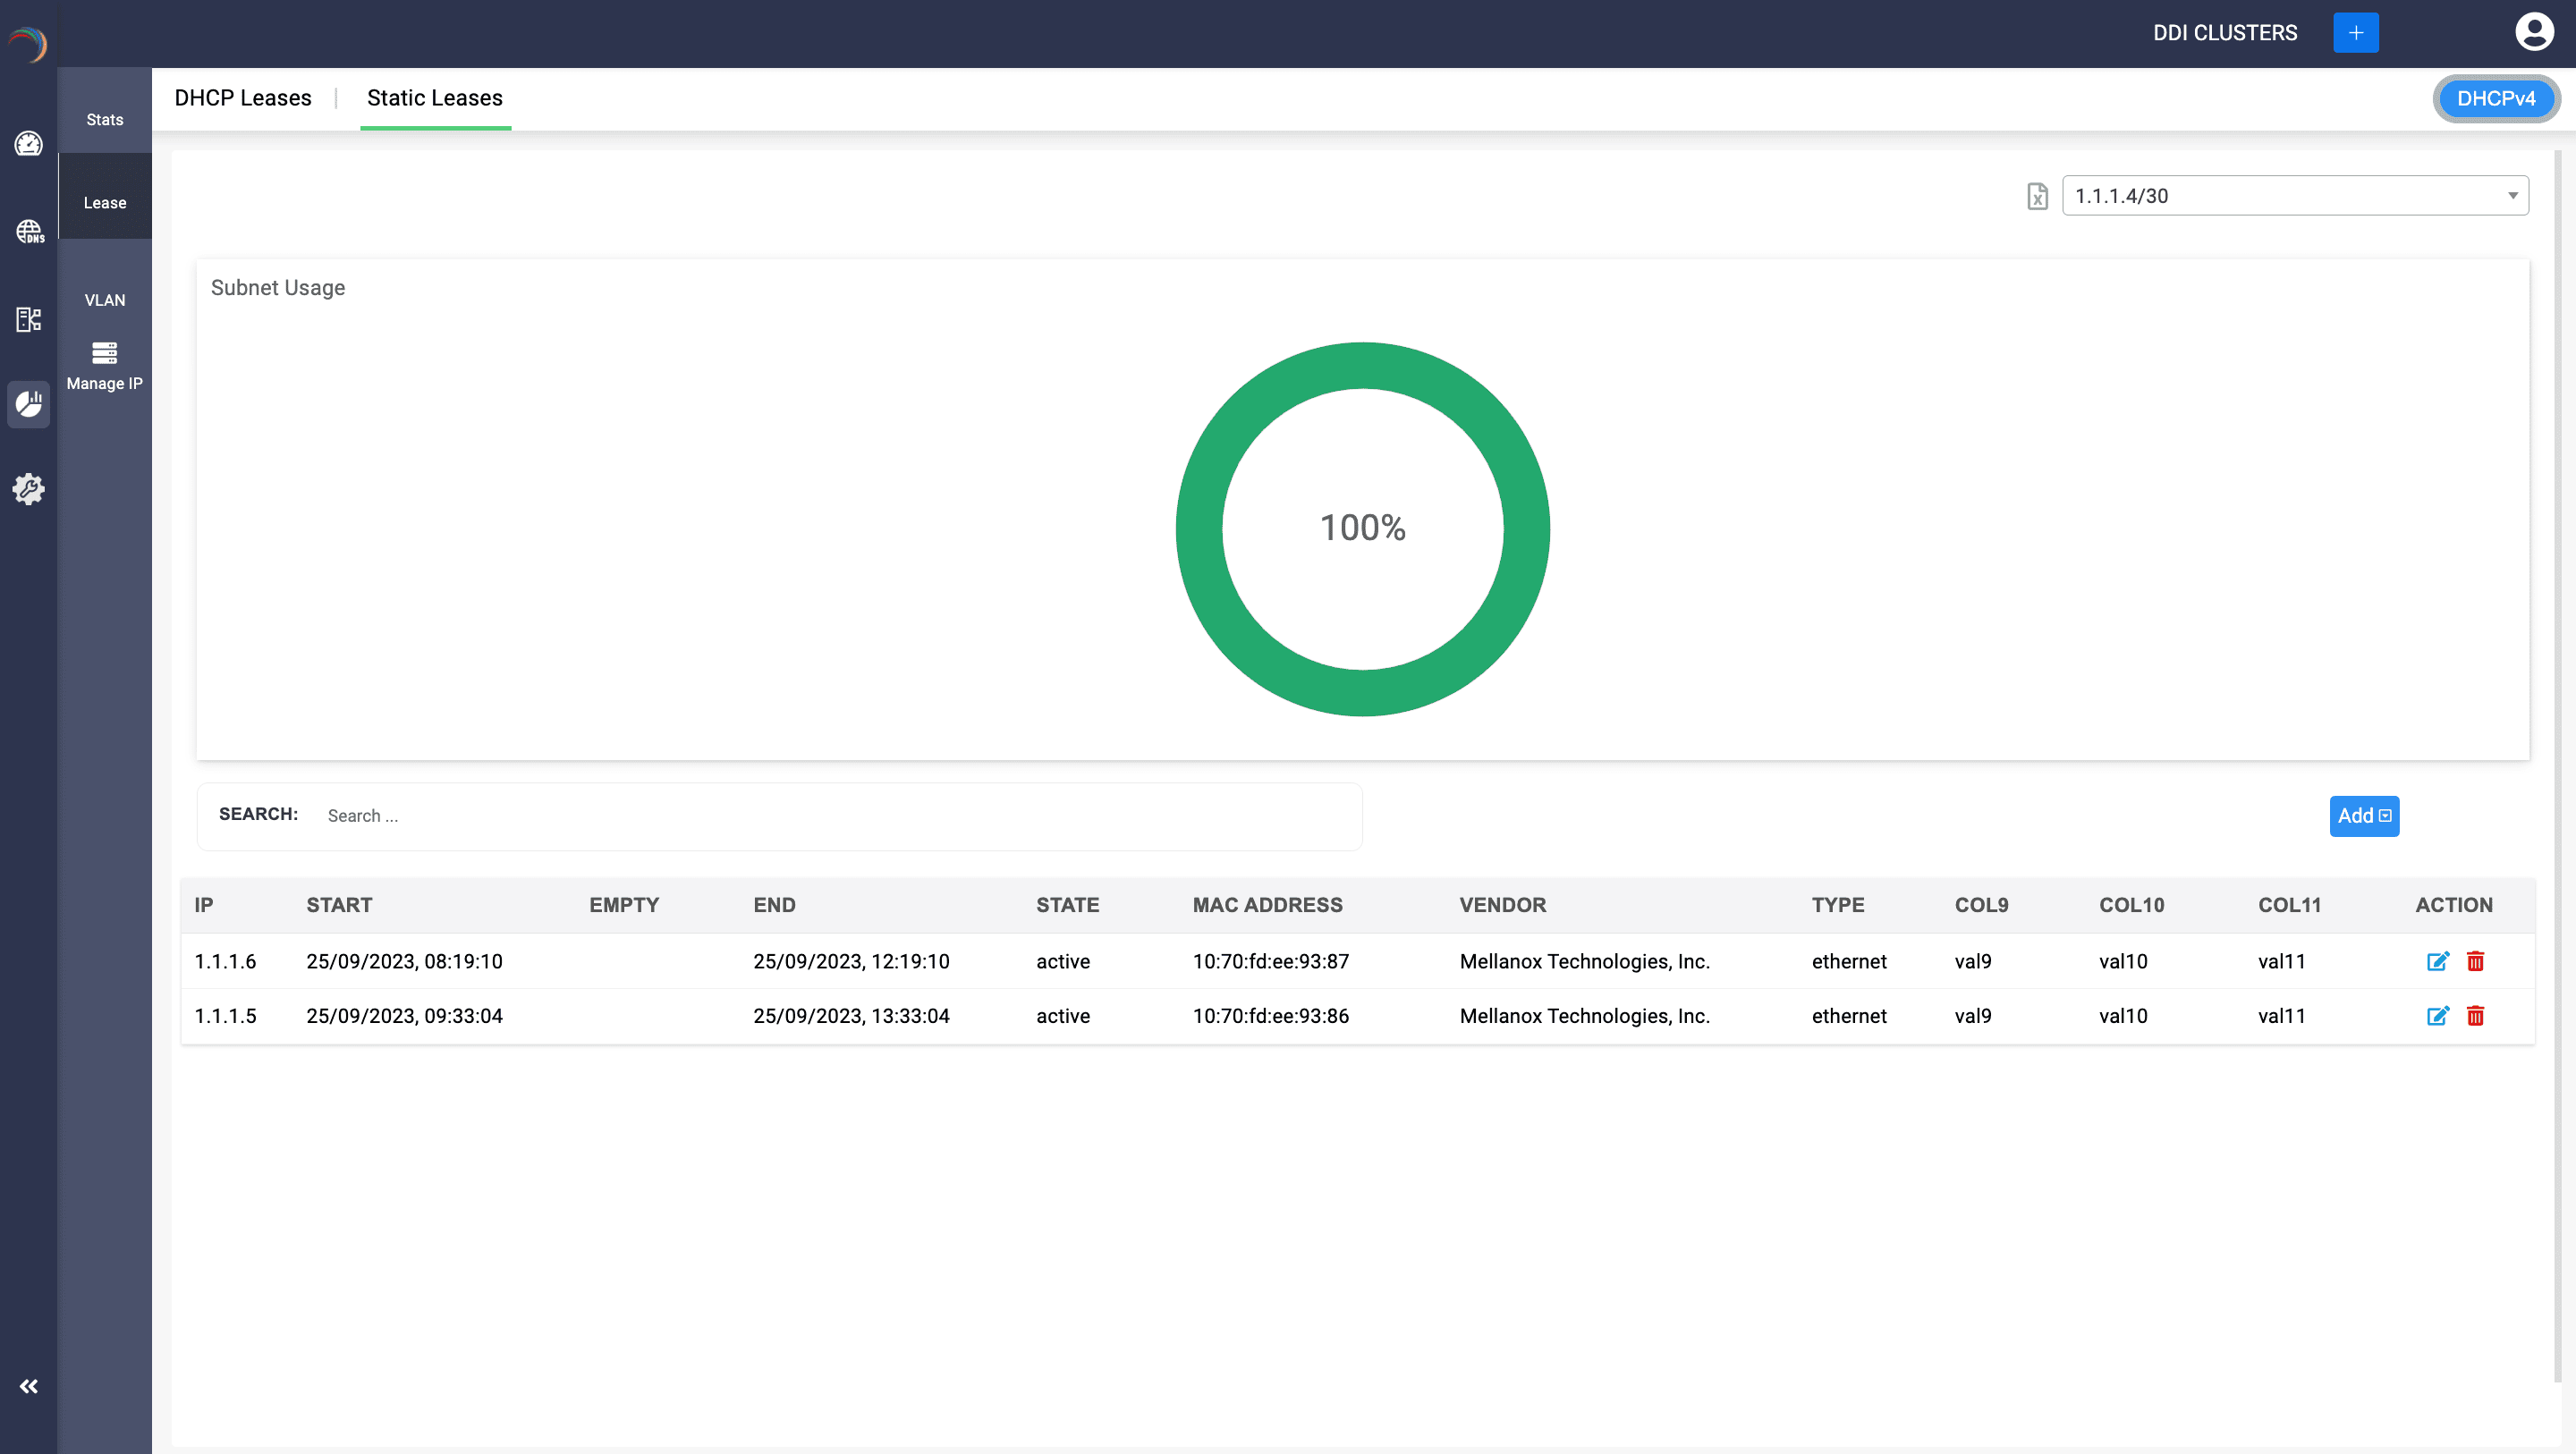
- Once you create and define the IP address space for a static subnet, the entry you just created will be displayed under the static Subnet tab in the Network page. Here you can click on the Import button available in the top right corner to import the static subnet's lease details you maintain in a spreadsheet. More on Static Leases here.
- Once the Static Leases are successfully imported, the capacity and other details of the Static Subnet are reflected under the Static Subnet tab on the Network page. On clicking through the targeted static subnet entry on this page, will immediately redirect you to the IPAM->Lease->Static Leases page, where you will see the leases pertaining to the specific Static Subnet you clicked on.
- Click on the Import button located at the top of the respective section.
- The Import button is positioned next to Add Subnet, Add Multicast Subnet, and Add Host buttons respectively.
- Upload the CSV file containing the required data.
- The CSV file size must not exceed 50 MB. Any file beyond this size limit will not be processed by DDI Central.
- Ensure that the columns in the CSV file follow the format specified in the sample files for each DHCP scope:
What is a Scope in Microsoft Windows DHCP servers?
A DHCP scope is a pool of IP addresses that a DHCP server can dynamically assign to clients that match the policy criteria for a particular subnet. Each scope represents a range of IP addresses that are available for lease to client devices, as well as configuration options associated with those IP addresses.
ManageEngine DDI Central supports the following IP topological elements that shape your Microsoft network infrastructure. Once these scopes are created you can edit or delete them easily using the DDI Central user interface.
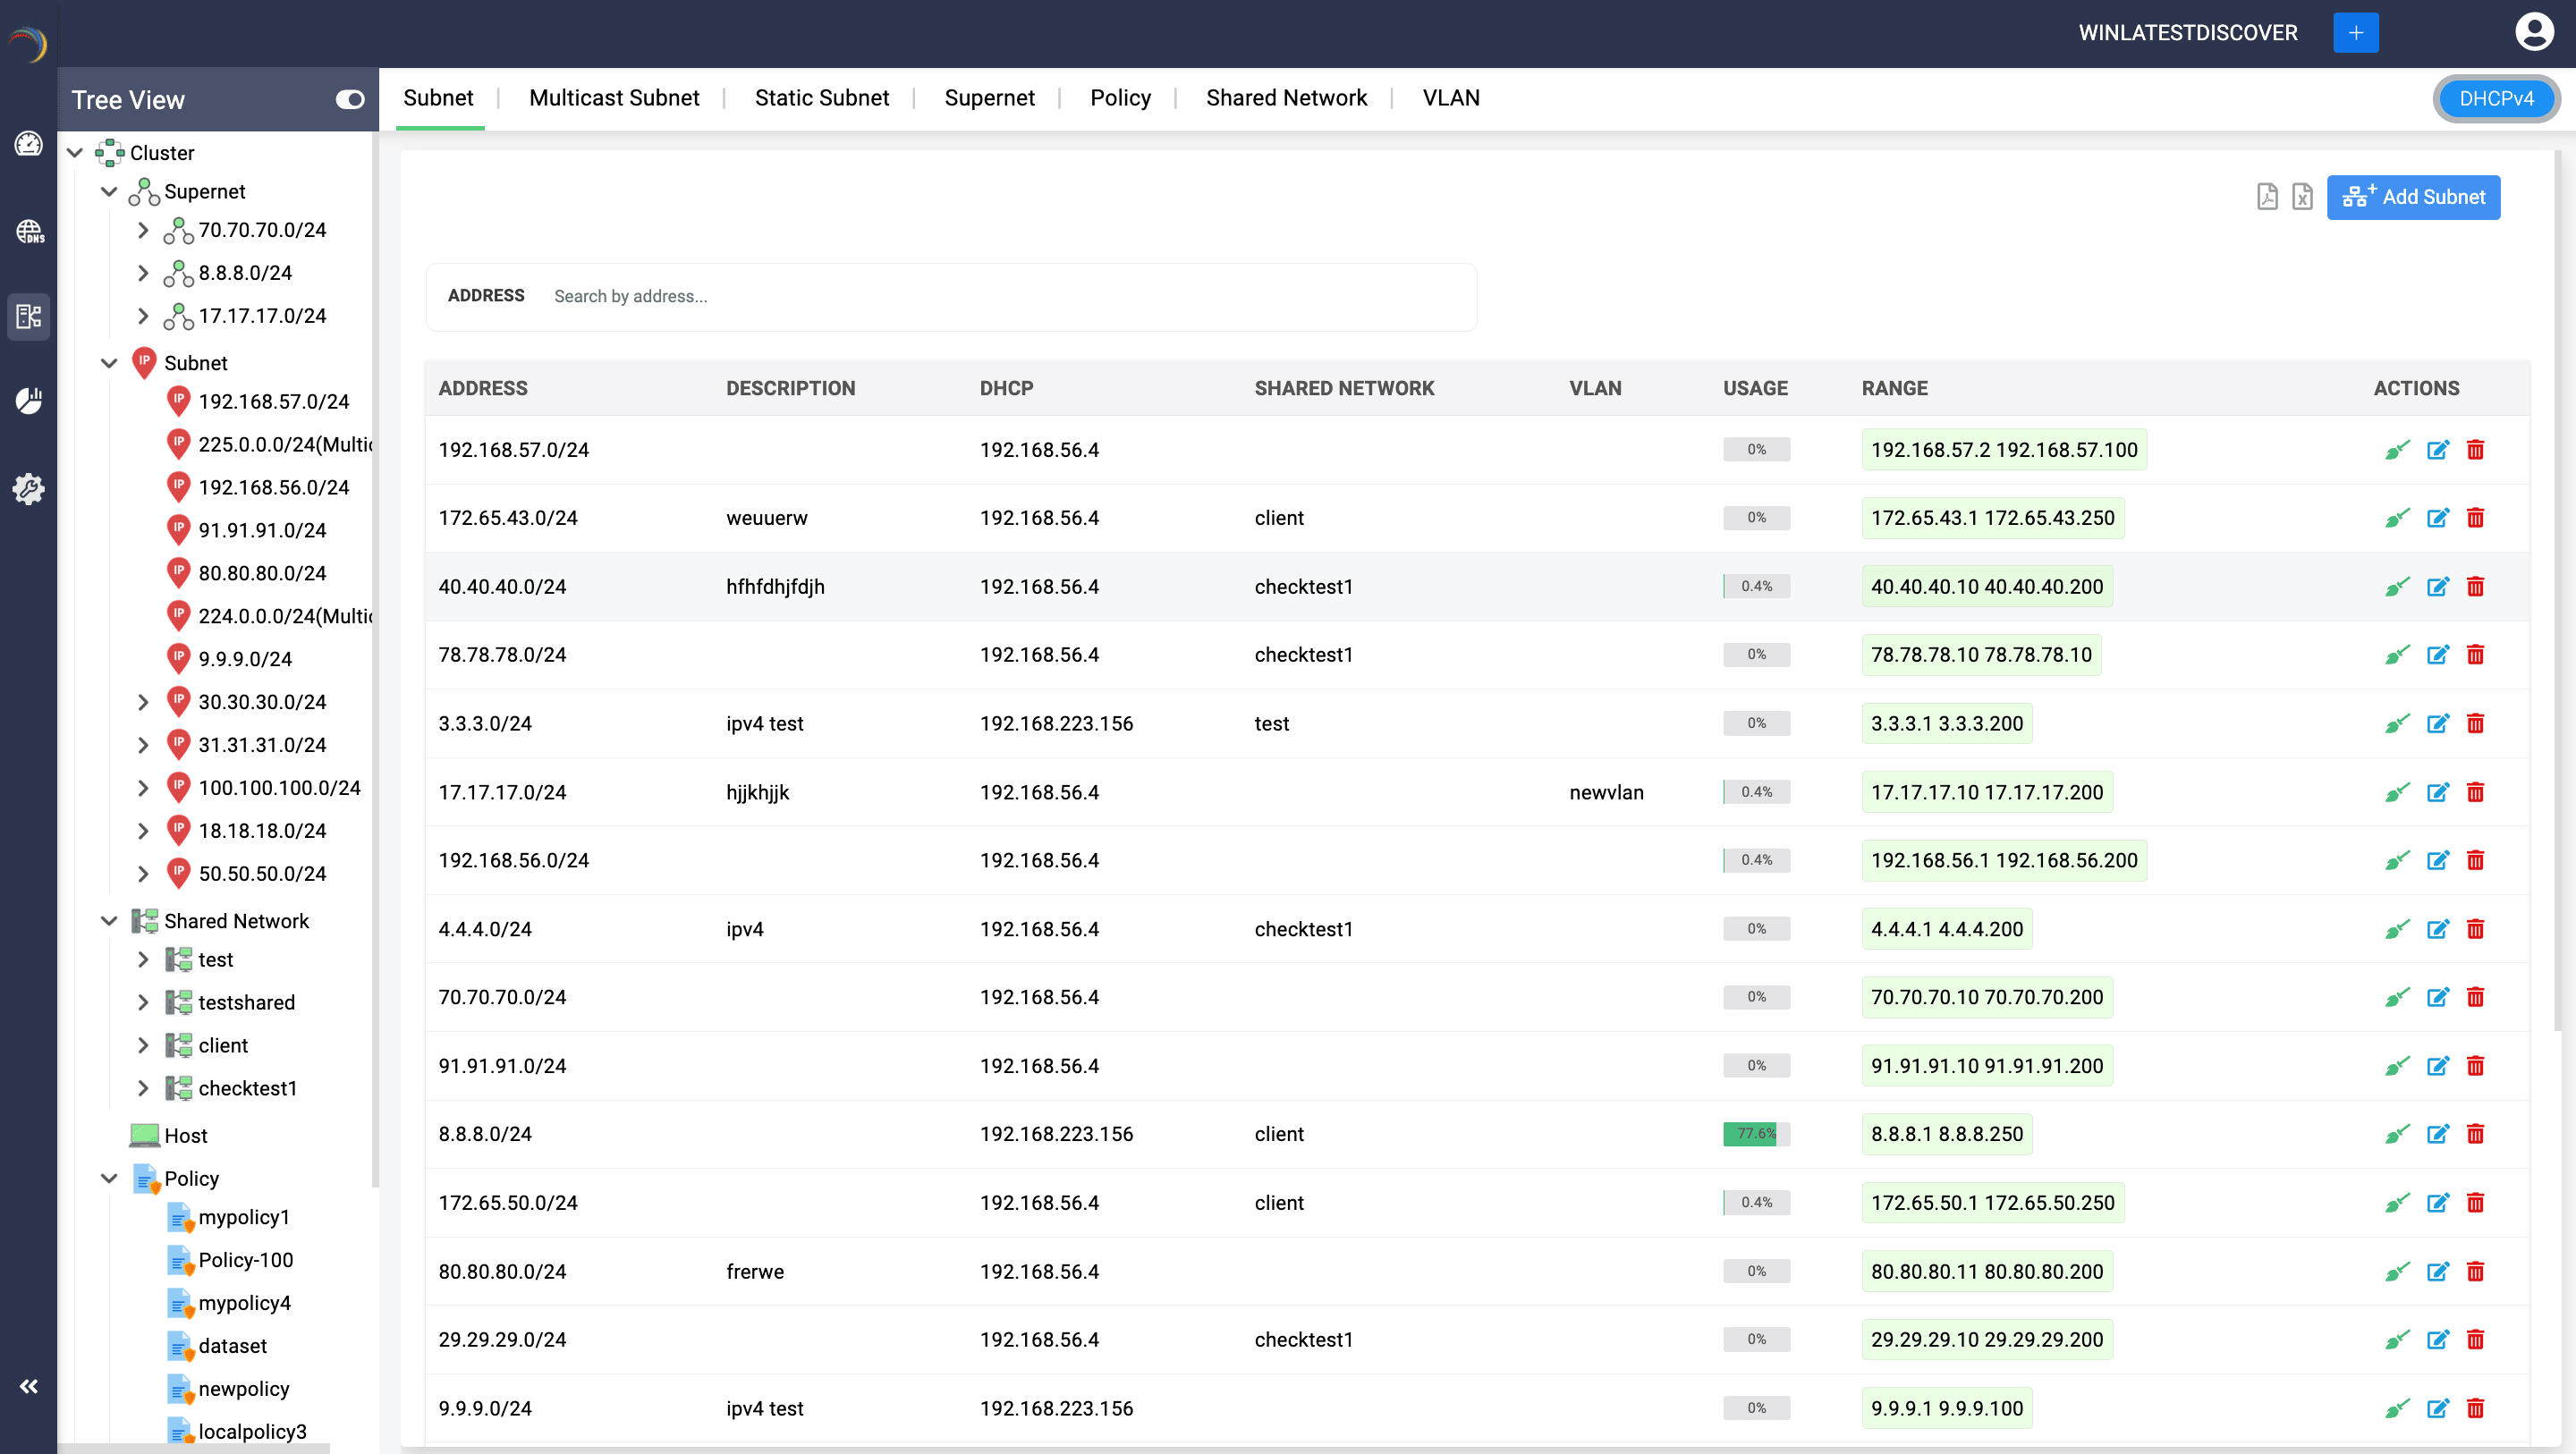
Subnets (DHCPv4 and DHCPv6 Subnets)
A subnet represents a basic segment of IP addresses (IPv4 or IPv6) within a network.
Each subnet is defined by a range of IP addresses and a subnet mask, determining the network's address range.
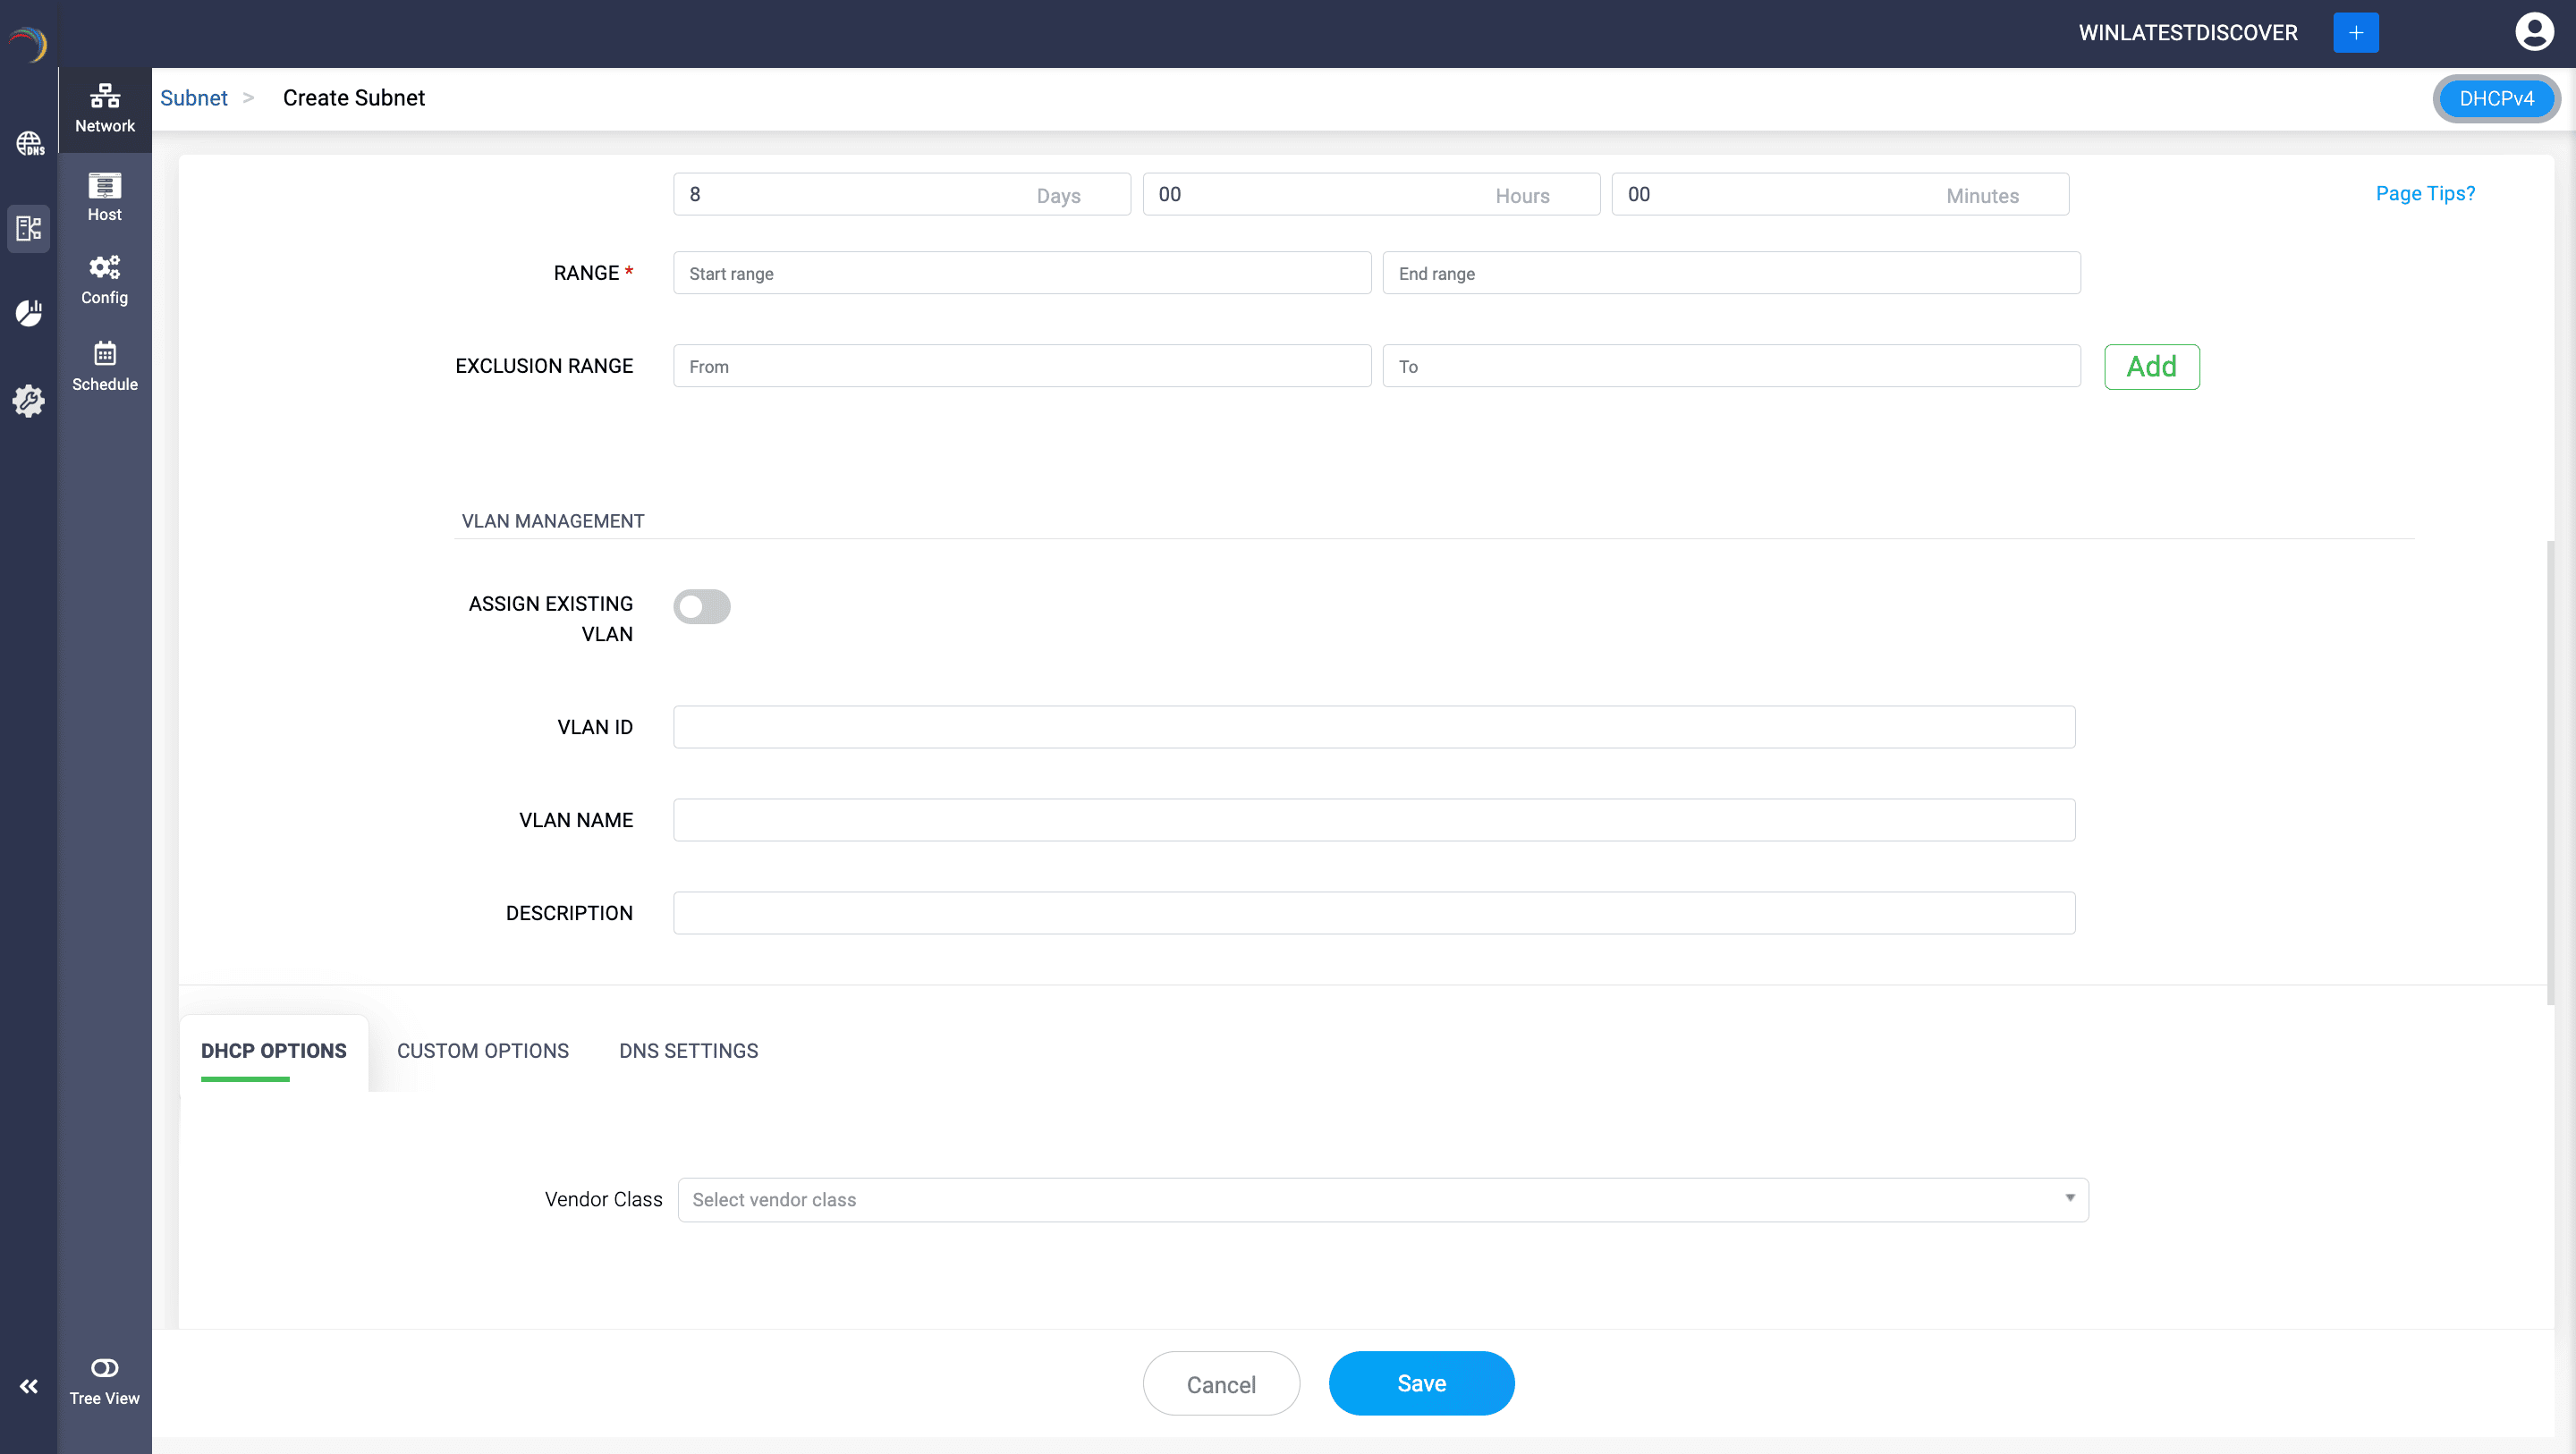
To create an IPv4 subnet, go to DHCP-> Network-> Subnet. Click Add Subnet button in the top right corner. Make sure DHCPv4 is selected from the toggle in the top right corner.
Define a new subnet by providing values for various attributes of the subnet like:
Options include:
If you require a new VLAN to be configured atop this particular subnet, provide additional details like VLAN ID, VLAN Description and Name to create a new VLAN while creating the subnet. Or you can enable the option Assign Existing VLAN to map an existing VLAN to the subnet you are about to create.
Moving down further, you can assign the necessary DHCP options, Custom options from a preferred Vendor Class and assign advanced DNS settings that control dynamic updates.
Once the details are complete, clicking the Save button will create the new subnet with the specified configuration.

Special case for IPv6 based subnet
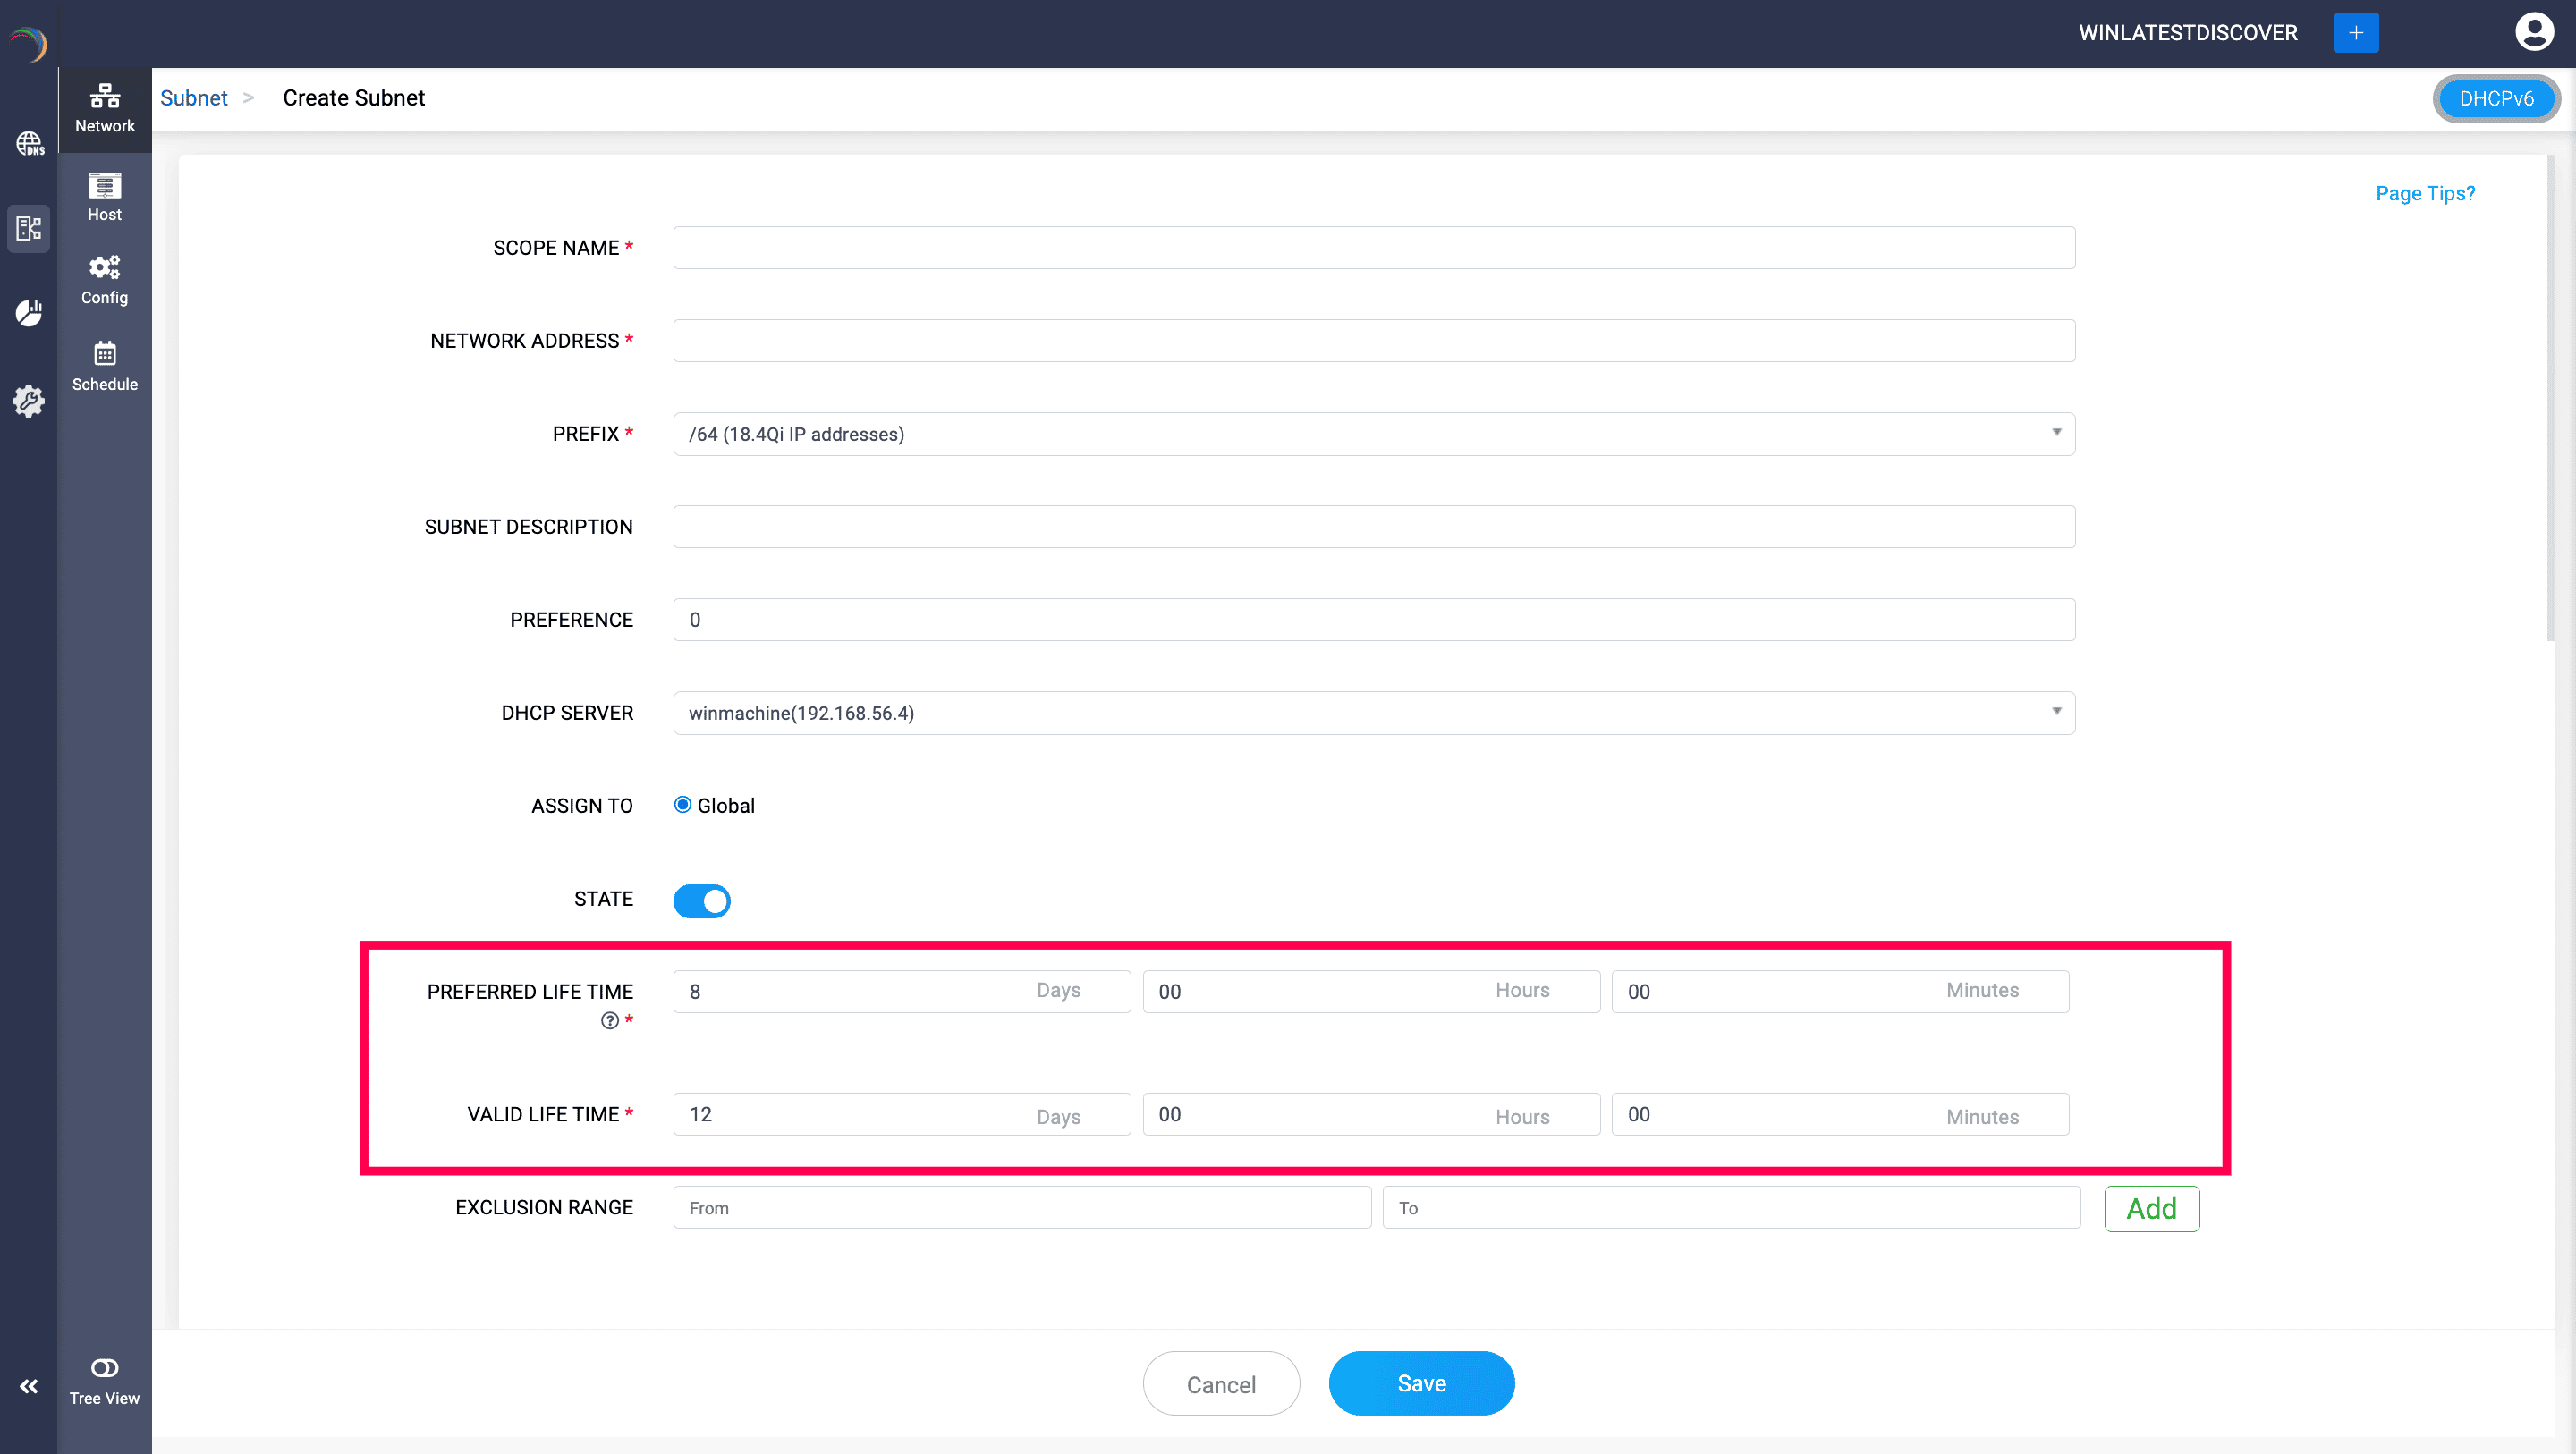
For the DHCPv6 version of Subnet DDI Central requires you to specify the values for two additional fields. They are,
Preferred Life Time: Specify the duration for which an IPv6 address is preferred. During this time, the address is considered the primary address for communication and is actively used by the device. After the preferred lifetime expires, the address becomes deprecated, meaning it should no longer be used for new connections, although existing connections can continue to use it.
For instance, setting it to 8 days means the address is actively used and preferred only for 8 days.
Valid Life Time: Specify the total duration for which an IPv6 address is valid. This includes the preferred lifetime period plus additional time during which the address is still valid or functional but deprecated. After the valid lifetime expires, the address is no longer valid for any communication and should not be used by the client.
For instance, setting it to 12 days means the address remains valid (though deprecated after the preferred lifetime) for 12 days.
These fields help in managing the lifecycle of IP addresses in DHCPv6, ensuring an efficient use of IP address space and proper address management within the network.
Multicast subnets
Multicast subnets in Windows DHCP are specialized network segments designed to support multicast IP traffic, which allows a single data stream to be delivered to multiple recipients simultaneously. Multicast IP addresses are part of the Class D address range (224.0.0.0 to 239.255.255.255). These addresses are used to send data to multiple destinations simultaneously, making them ideal for streaming media, conferencing, and other applications that require efficient bandwidth usage.Windows DHCP servers can be configured to manage multicast scopes, which are essentially pools of multicast IP addresses. This enables the DHCP server to dynamically assign multicast addresses to clients.
DDI Central enables you to easily configure multicast subnets to manage and allocate multicast IP addresses within your network. This ensures that multicast traffic is efficiently routed and that IP address conflicts are avoided.
To configure multicast subnets in DDI Central,
Shared Networks or Superscopes
Hosts or DHCP Reservations

To create a DHCPv6 based host, just specify additional details like:
Supernet
Supernets, or supernetting, refers to aggregating multiple networks into a larger network. In the context of DDI Central's DHCP, this is not a direct feature but rather a concept incorporated to simplify scope management.
Supernetting is used in IP routing more than in DHCP configurations. It's about combining smaller subnets into a larger address space for routing purposes and helps in hierarchically organizing your subnets in your network infrastructure.
DDI Central supports hierarchical supernet configurations, enabling administrators to efficiently structure and manage their network address space in a hierarchical manner. This feature enables the logical grouping of supernets and subnets, making it easier to navigate complex IP allocations while maintaining clear parent-child relationships.
To Configure Supernets for Windows DHCP servers:
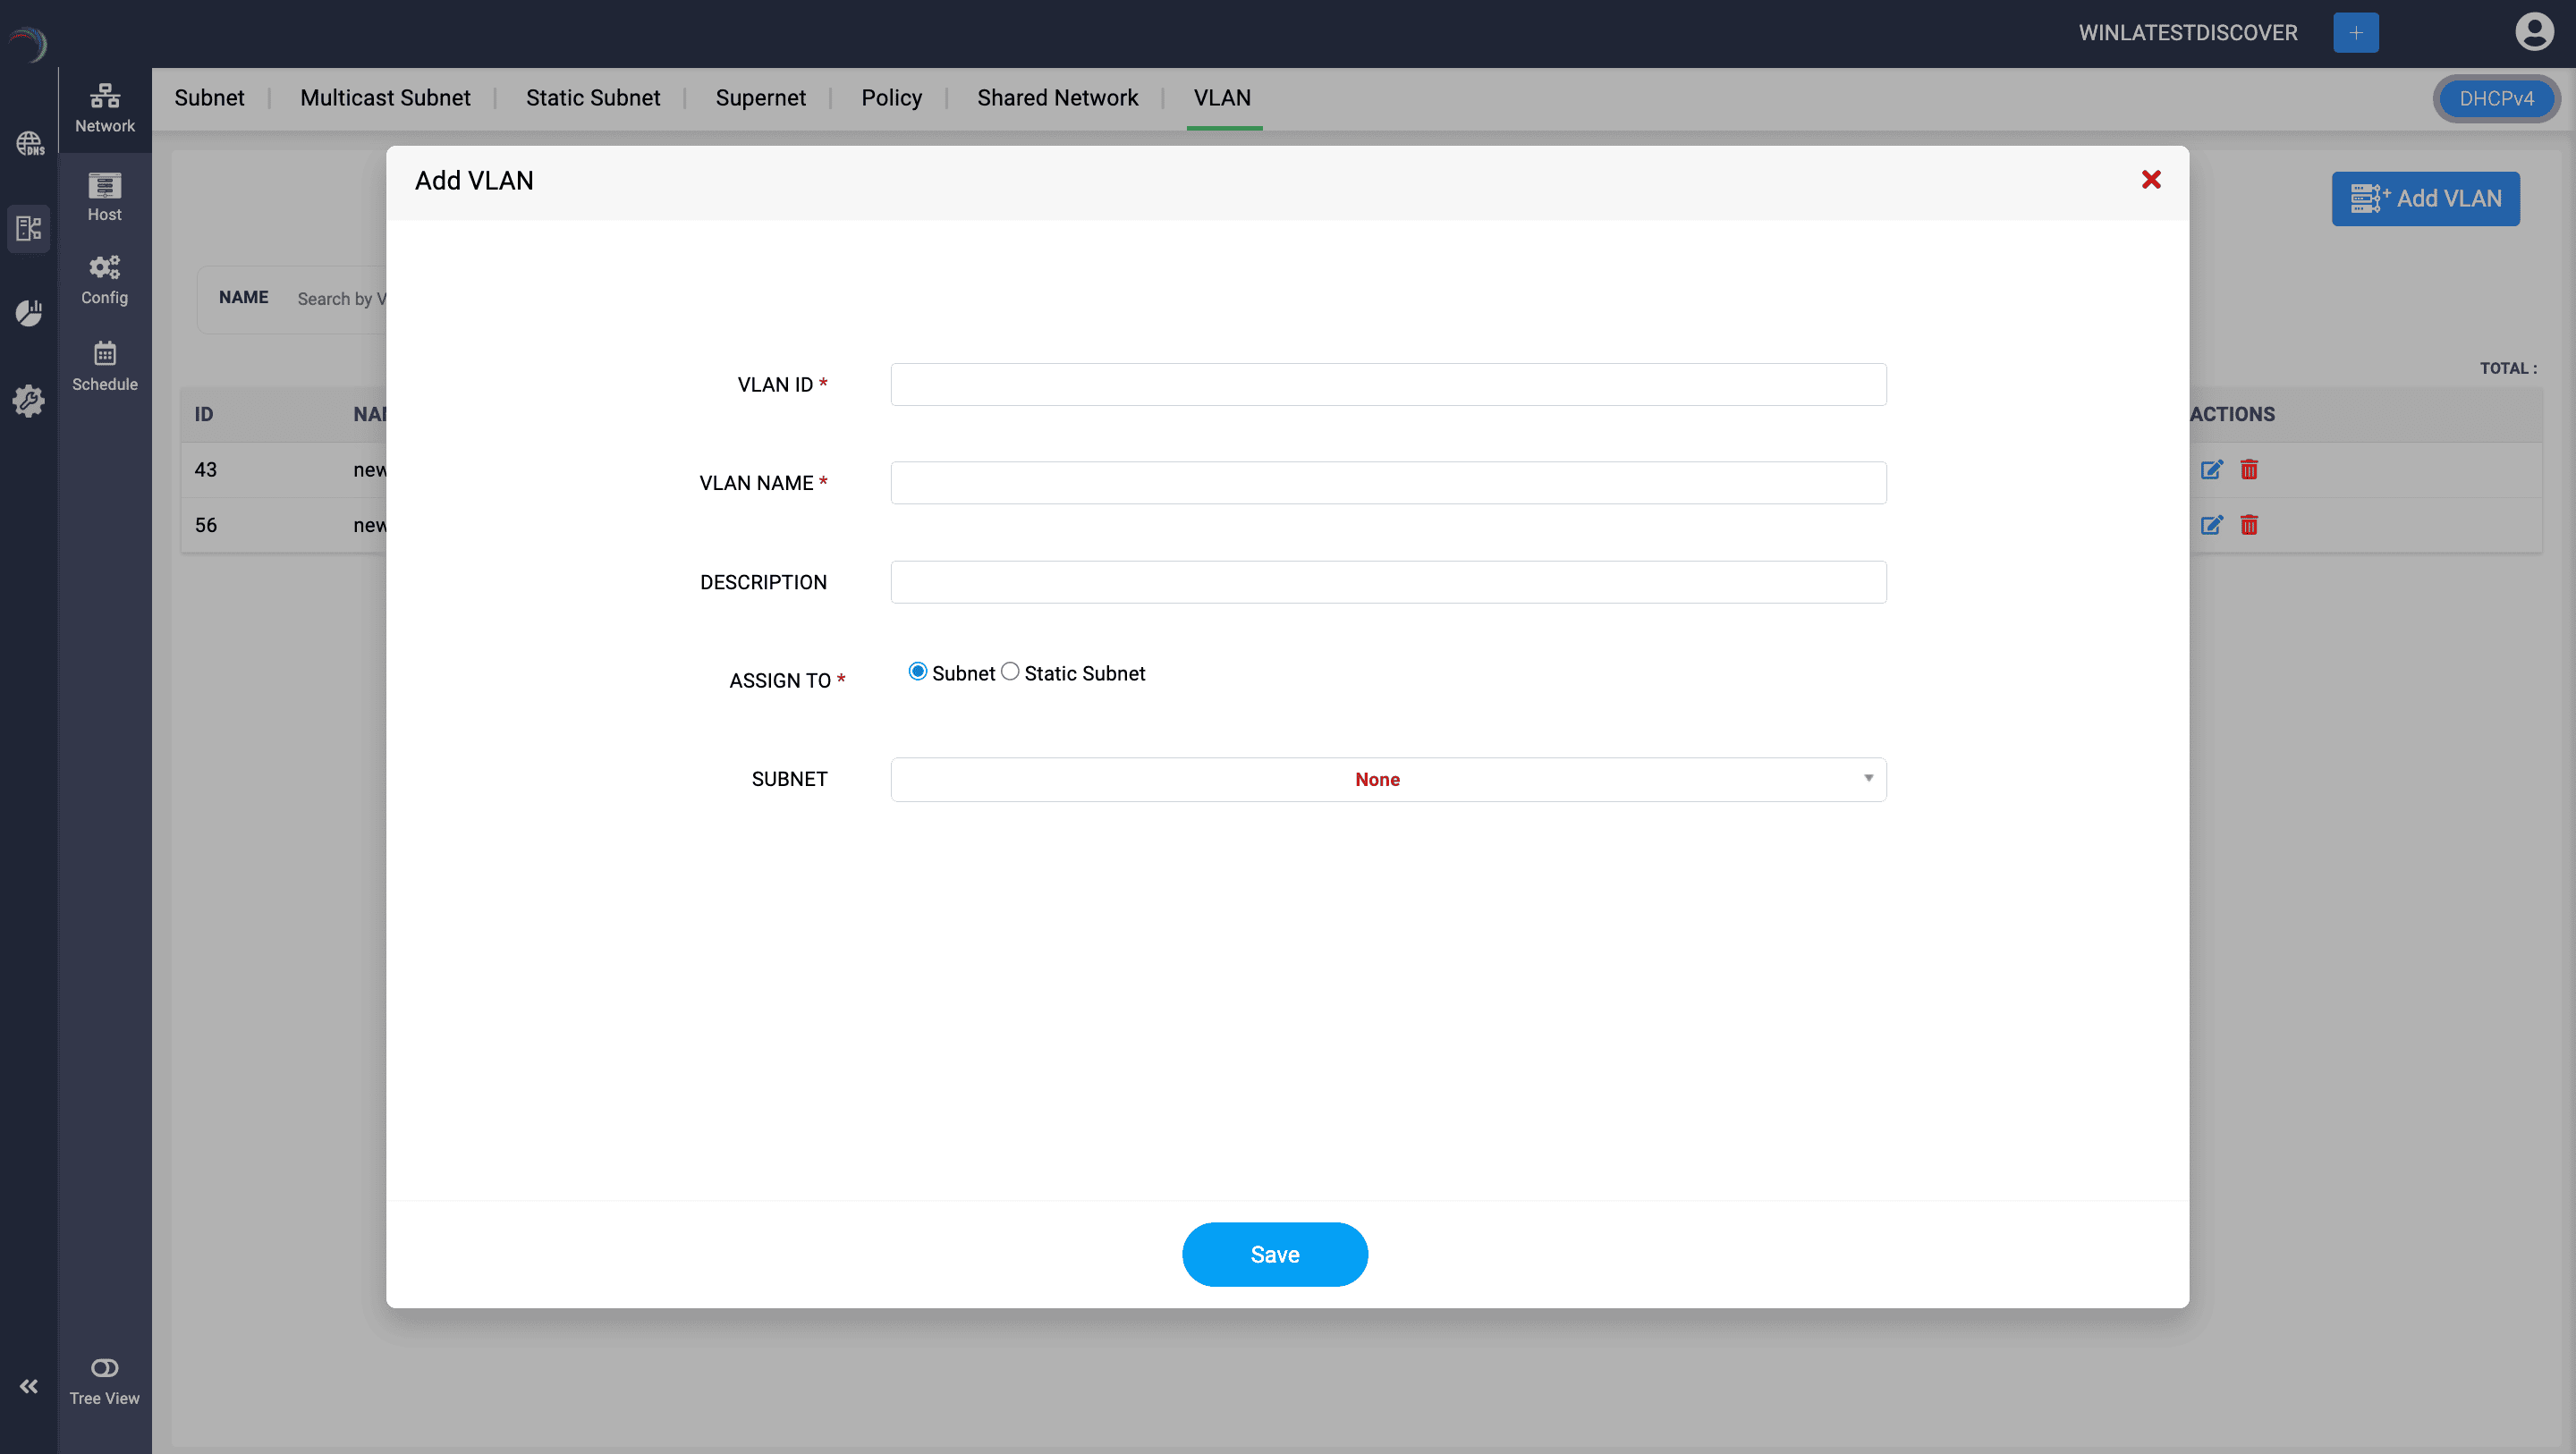
VLANs (Virtual LANs)
VLANs are a network configuration that segments a physical network into multiple logical networks at the data link layer (Layer 2).
DDI Central enables DHCP servers to serve different VLANs as distinct subnets.
Each VLAN you create within a subnet functions as a separate network, which improves performance by reducing broadcast traffic, enhances security by isolating sensitive data, and simplifies management by grouping devices according to function, department, or project.You can also associate an already existing VLAN to the subnet.
Name the VLAN and provide a suitable description to quickly identify the new VLAN. Also assign a suitable VLAN ID.
Assign to: Select one of the two options here. This will allow you to assign the VLAN to either a Subnet or a Static Subnet.
Based on your choice in the Assign to field you can choose the relevant Subnet or Static subnet from the drop down list and Click Save to create the VLAN.
VLANs can also be created while creating a new Windows subnet. All you need to do is just enter the relevant VLAN details for the Subnet you are creating using the Create Subnet page.
Also, when discovering your current configurations from your network infrastructure using DDI Central discovery tools, it's crucial to note that VLANs and Supernets configured in your network will not be discovered. Therefore, ensure that you configure them separately in DDI Central for comprehensive and accurate network management.
Static subnets
Static subnets refer to segments of a network that have fixed IP addresses assigned to them. Unlike dynamic subnets, where IP addresses can be assigned on-the-fly by a DHCP server, static subnets have pre-defined IP ranges and the IP addresses are usually assigned manually to devices.
To define a static subnet in DDI Central:
DHCP scope tree visualization
DDI Central also lets you organize and manage the scopes in a hierarchical manner by providing hierarchical tree-view that show how different scopes relate to one another within the network. The DHCP scope tree view enables admins to quickly locate and access specific scopes, subnets, to manage configurations and troubleshooting tasks for a specific scope.
DDI Central provides flexible and powerful ways to manage IP address assignment and network configurations. Understanding these elements is crucial for network administrators to effectively design and manage their network's IP addressing scheme.
Bulk Import of IPv4/IPv6 Subnets, Multicast Subnets, and Hosts/DHCP Reservations in DDI Central
DDI Central enables administrators to import IPv4/IPv6 subnets, multicast subnets, and hosts/DHCP reservations in bulk using CSV files. This feature simplifies large-scale network configuration and reduces manual entry errors.
To perform a bulk import:
Guidelines for Importing DHCP Scopes Using CSV Files
Following these guidelines will ensure a smooth and error-free import process.

New to ADSelfService Plus?
Related Articles
DDI Central for Microsoft DNS DHCP
About ManageEngine DDI Central DDI Central is a comprehensive network management solution that unifies DNS, DHCP, and IP Address Management (IPAM) to enhance operational efficiency and network stability. It is deployed as an overlay on your existing ...Microsoft Pre-requisites
Agentless management of Microsoft DNS and DHCP servers Agentless management of Microsoft DNS and DHCP management refers to managing and monitoring these services without installing additional software (agents) on the servers themselves. This approach ...FAQs for Windows Microsoft DNS and DHCP servers
FAQ for the Microsoft Windows DNS and DHCP servers Which versions of the Windows Server OS are supported? You can onboard your DNS and DHCP servers running on Windows Server OS 2016, 2019, and 2022 in DDI Central. DDI Central also provides seamless ...Agentless management of Microsoft DNS and DHCP servers(NEW)
Agentless management of Microsoft DNS and DHCP servers Agentless management of Microsoft DNS and DHCP management refers to managing and monitoring these services without installing additional software (agents) on the servers themselves. This approach ...Managing Dynamic domains using DDNS
Managing dynamic domains in Microsoft Windows infrastructure Dynamic DNS (DDNS) is a method that allows the automatic updating of a domain name system (DNS) in real-time, with the active DNS configuration of its configured hostnames, addresses, or ...