How to configure AD Authentication in OpManager
Add an AD Domain
You can create Domains in OpManager and users manually in OpManager with the AD Authentication and User Management features.
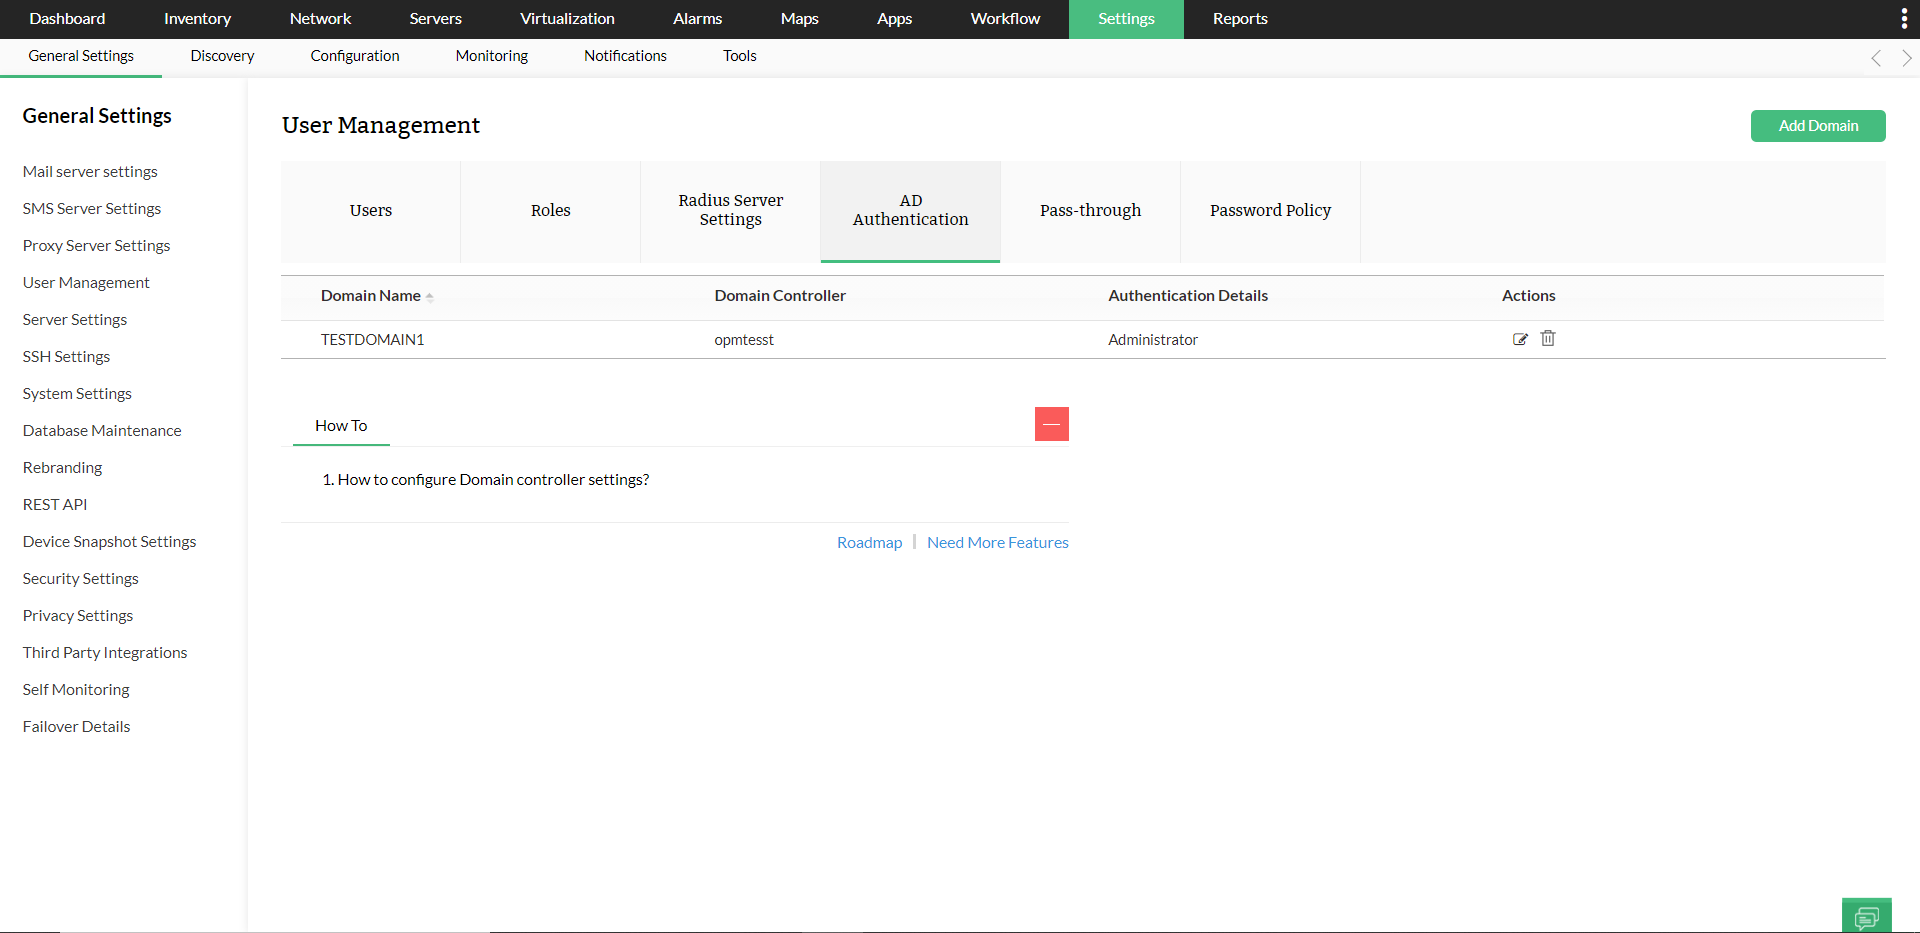
- Go to Settings → General Settings → Authentication → AD Authentication → Add Domain.
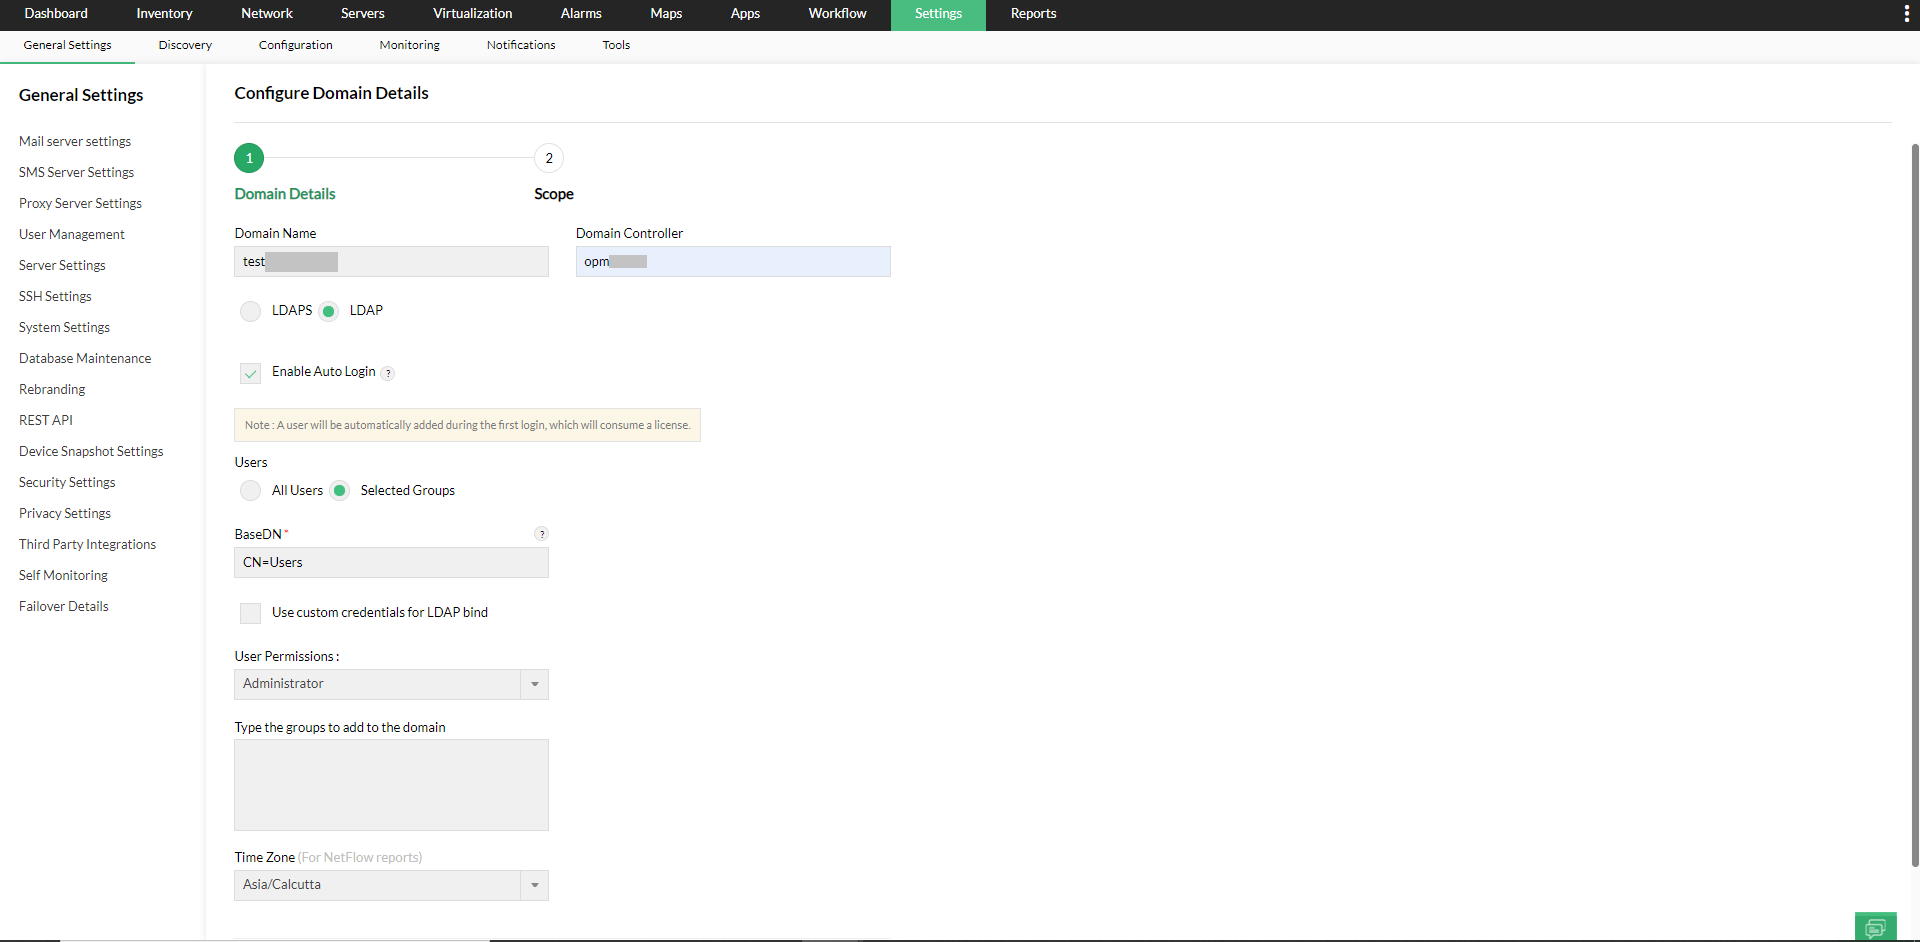
- Enter the Domain Name and the Domain Controller name in the respective fields.
- LDAPS is supported from version 125111, to ensure secure communication with the domain controllers. Simply click on the 'Import Certificate' button and select your domain controller's certificate to add it to OpManager.
- Auto Login* is disabled by default.
- Save the Settings.
- Once the domain is added, you can manually add users in the Users tab.

To know more on how to export a certificate from your domain controller, check out these articles:
Configure Auto-login
The auto-login feature allows you to add all/individual users or selected AD groups to any domain, and assign user permissions to them.
- Select Add/Edit under Actions for the domain you want to configure.
- Select the Enable Auto Login check box.
After enabling auto login, clickNext to configure the scope for the users in the selected domain. The scope will be auto-assigned to users logging-in for the first time. If Auto-login is not enabled, then the users must be added manually. - To configure Auto-login
- For all users
To enable Auto-login for all users, select All Users under Users. The auto login will be enabled to all the users logging into that domain. - FOr selected AD groups
To enable Auto-login for selected AD groups, select Selected groups under Users and type the names of the AD groups as comma separated values. The auto login will be enabled to the AD groups you specify. - OpManager searches for the user's presence, under the BaseDN you enter. Under BaseDN field enter the container path to the top-level OU, under which the group's users are present in the AD. It should not point to the DN(path) of the group.
- For example:
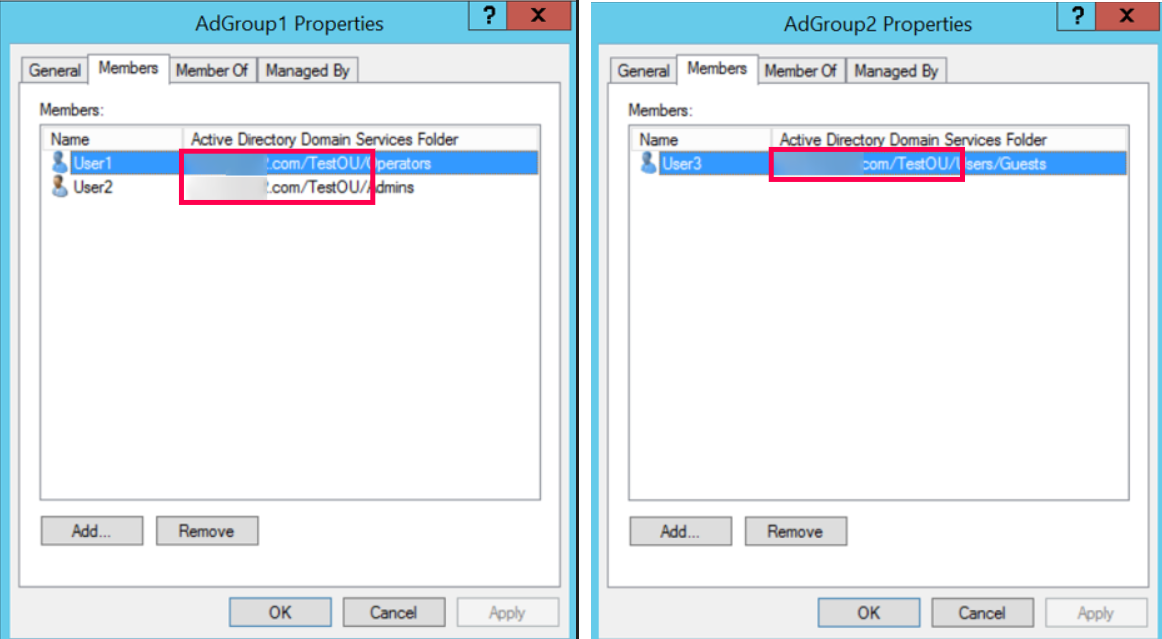
- Say there are two groups to be configured, 'AdGroup1' and 'AdGroup2'. The users of these groups are present in multiple OUs
- CN=user1,OU=Admins,OU=TestOU,DC=local,DC=com
- CN=user2,OU=Operators,OU=TestOU,DC=local,DC=com
- CN=user3,OU=Guests,OU=Users,OU=TestOU,DC=local,DC=com
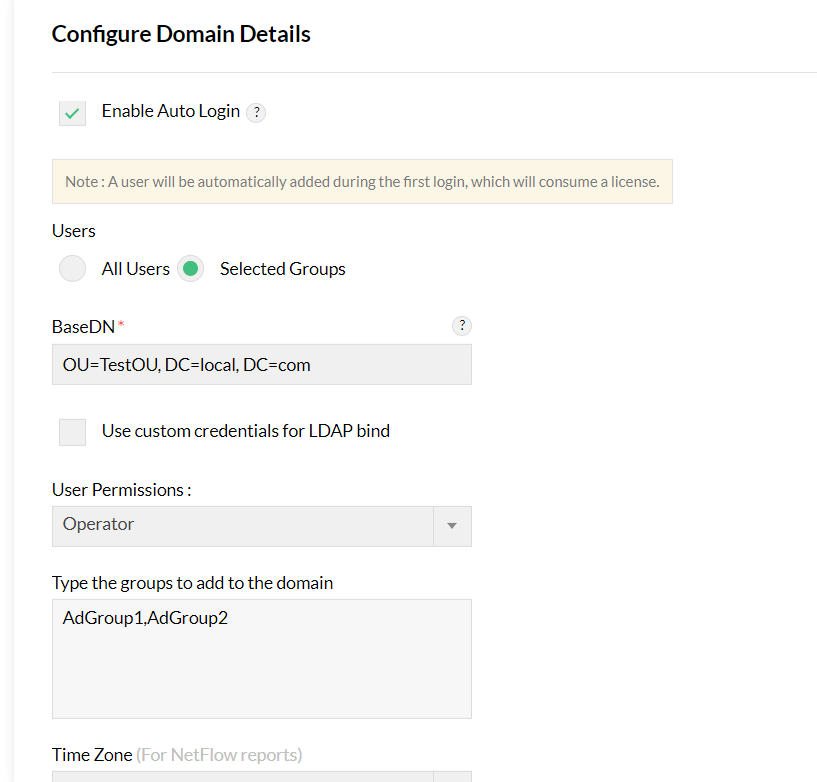
- You should enter 'OU=TestOU, DC=local, DC=com' in the BaseDN field (The common path in their hierarchy). The path must have at least one OU/CN, and the group names you configure under domain settings are case-sensitive.
- Sample query to get baseDN (Container path) for user:
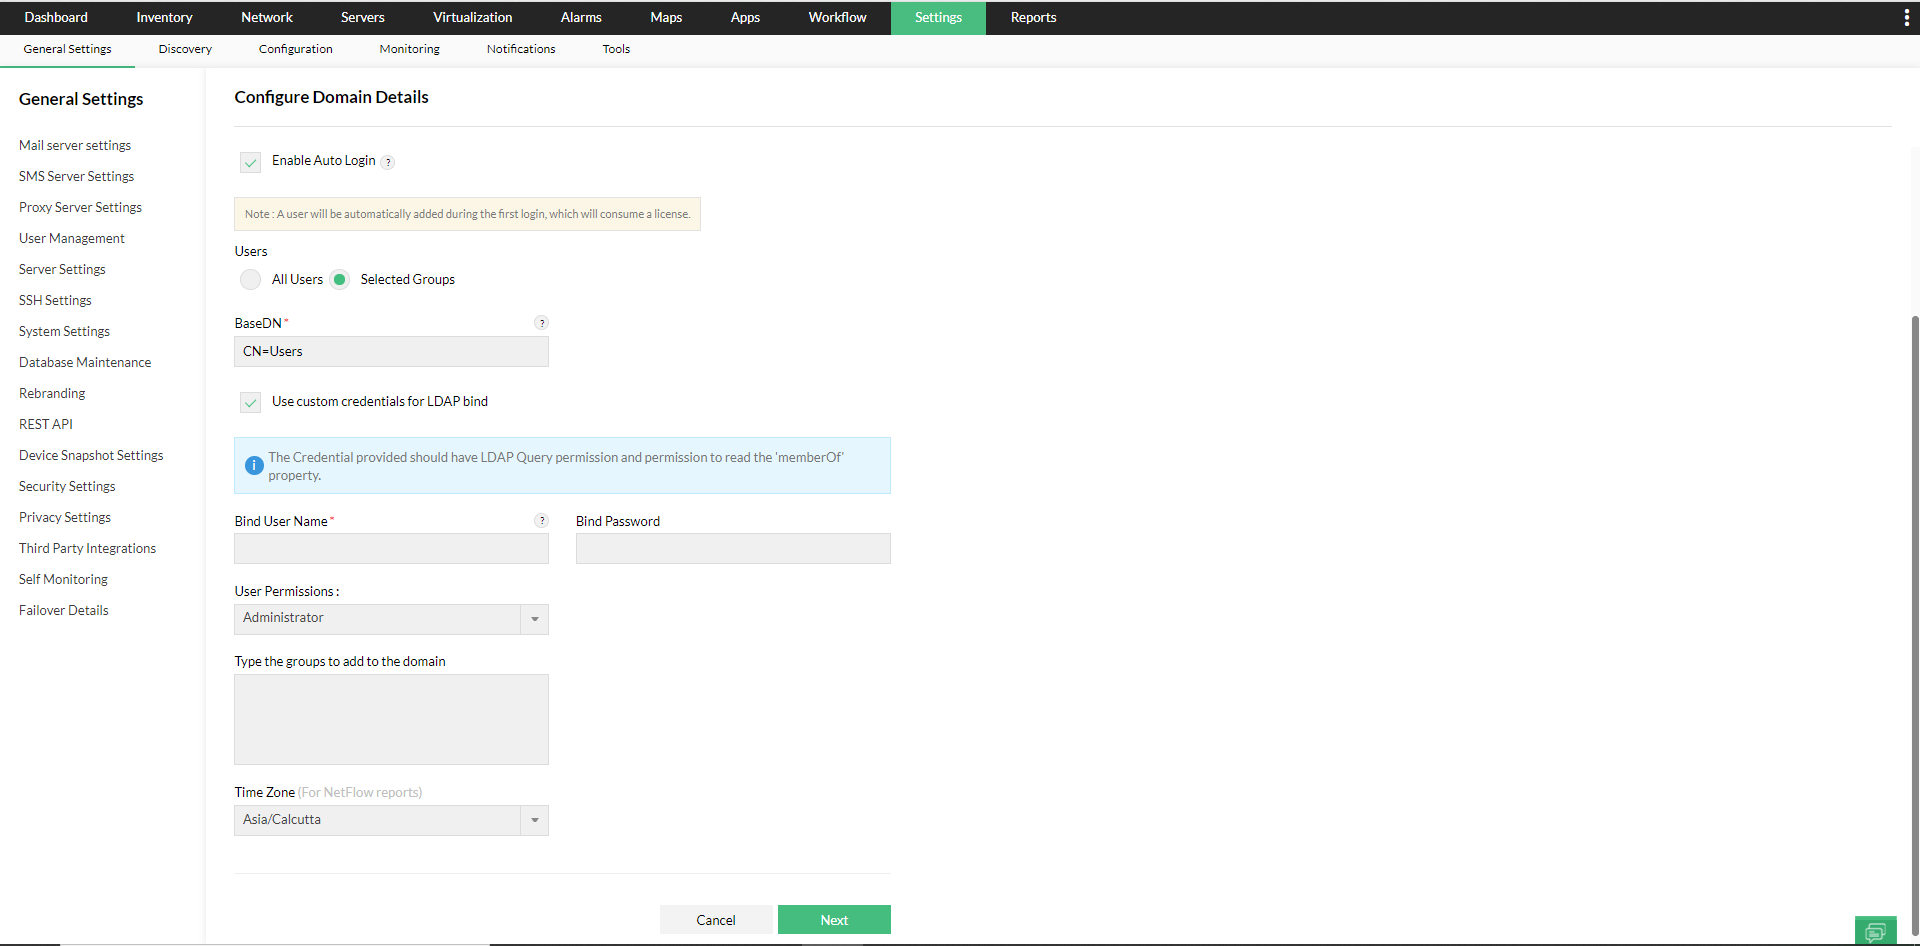
- If LDAP access is not available for all users in your domain, you can configure custom credentials with the 'Use custom credentials for LDAP bind' option. These credentials will be used to execute LDAP queries.
- Enter the user account (with the required permissions) in the active directory to execute LDAP Queries in the domain, under 'Bind User Name' and the corresponding 'Bind Password'.
- This is how the configuration details should look like for the example mentioned above,

- For all users
- Multiple AD Group names can be mentioned as comma seperated values. If a new group with a different scope to be added, make use of the '+' icon.
- The credential provided should have LDAP Query permission and permission to read the 'memberOf' property.
- Once you enable Auto-login, select the Users and User Permissions for the domain, edit the Time zone if required, and click Next. During autologin, the selected modules and scope can be assigned for the AD user.
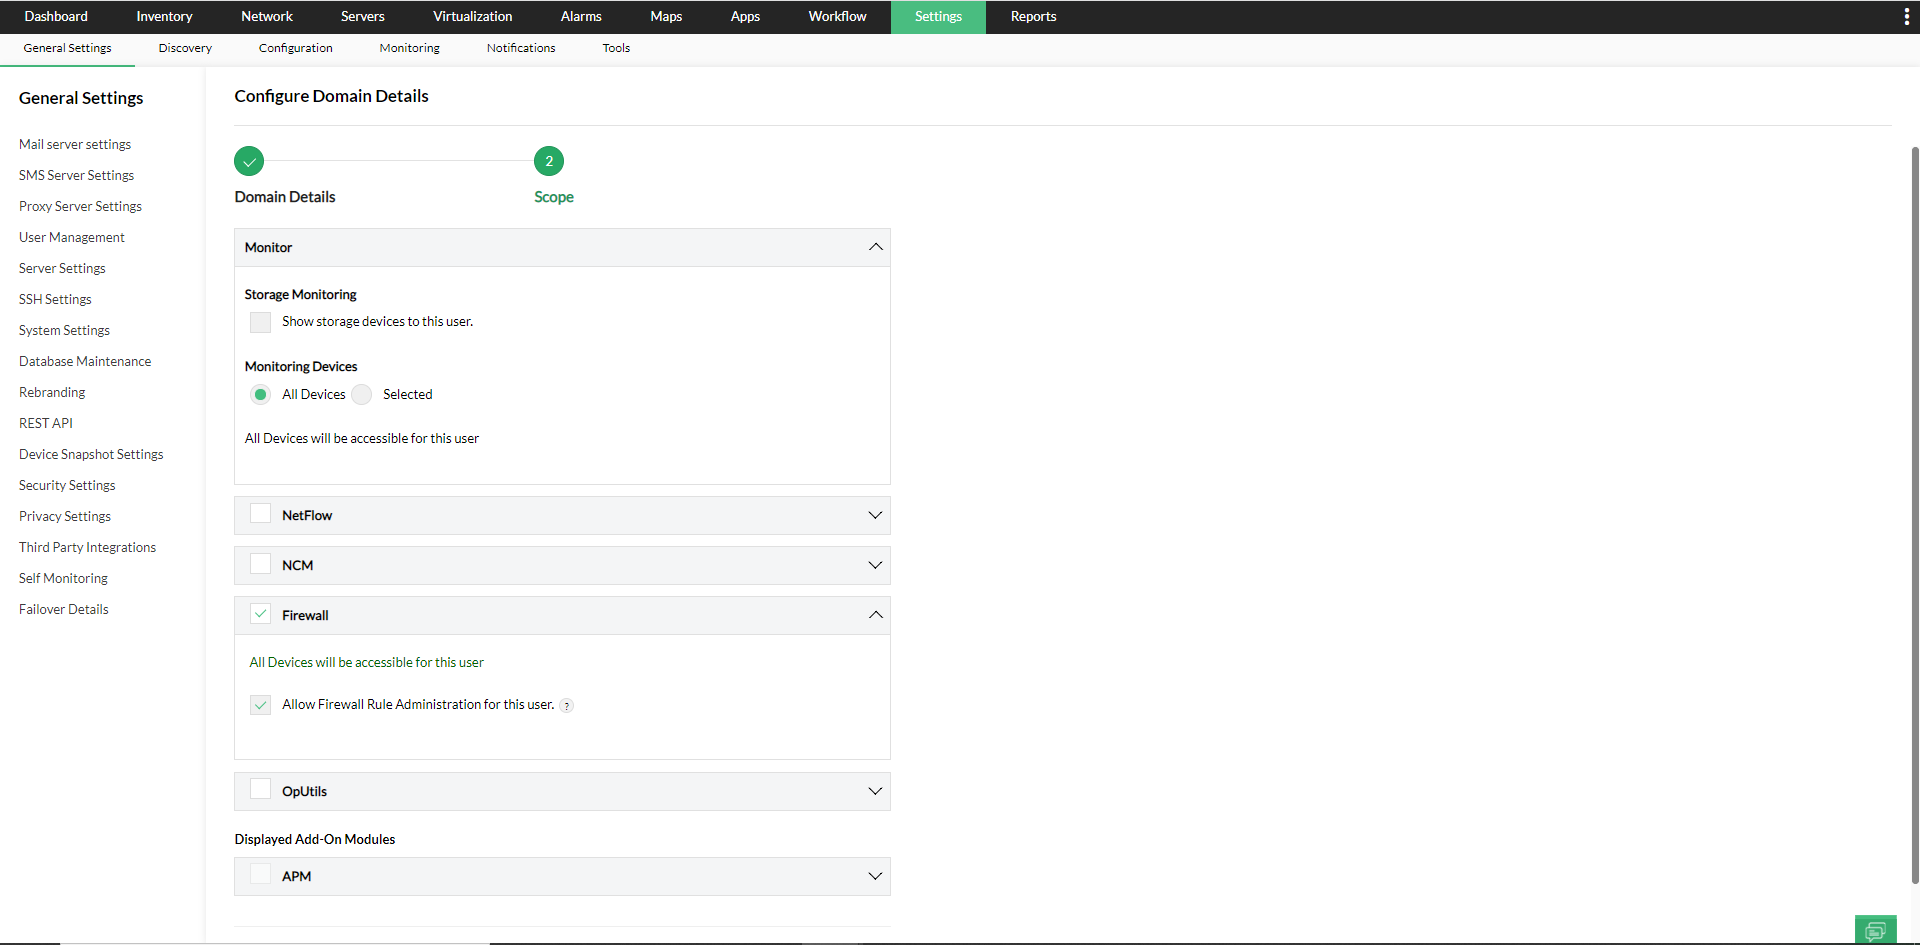
- To configure Scope,
Modules - You can select the add-on modules that you want the user to have access for. Monitor - You can provide this user access to either All Devices, or only Selected Business Views. If All Devices is selected, the user will have access to all the devices in OpManager module. If Selected Business Views is selected, you can give the access to all business views with "Select All" option and business views without title with Untitled option. - Save the settings.

Edit Domain Settings
Once you create a domain and assign users, you can edit the configurations as required any time. You can add or delete AD users/groups, edit the user permissions, and also edit the scope settings.
Click on the 'Plus' icon next to the domain of your choice to add new AD groups to it.
Select Edit under Actions for the domain you want to edit, change the timezone as per your requirement, and click 'Save'.
- Click on the arrow mark next to the name of your domain to display all AD groups under it.
- Click on the 'Edit' icon next to the group you wish to edit, select the Users and User Permissions for the domain, and click Next.
- To edit a particular user/group in a domain, select Edit under Actions for the domain you want to edit.
- User Permissions for the AD groups can be edited by selecting either Read Only (Operator User), Full Control (Administrator User) or selecting a Custom User Role with the chosen level of access.
- To configure Scope,
- Modules - You can select the add-on modules that you want the user to have access for.
- Monitor - You can provide this user access to either All Devices, or only Selected Business Views. If All Devices is selected, the user will have access to all the devices of NetFlow, NCM, and Firewall. If Selected Business Views is selected, you can give the access to all business views with Select All option and business views without title with Untitled option.
- Save the settings.
- To delete a group, just click on the 'Delete' icon next to it.
For AD Authentication, we support on-premise AD with LDAP query access to the domain controller in the network.

New to ADSelfService Plus?
Related Articles
Configure SAML authentication settings in OpManager for Microsoft AD FS?
Listed below are the steps to configure SAML authentication in OpManager (SP) for Microsoft AD FS (IdP) with Single Sign-On. Open AD FS management and click on Add Relying Party Trust. Now, go to OpManager and navigate to Settings -> General Settings ...Configuring OAuth authentication in OpManager with Microsoft
OAuth is a secure authentication method that uses an authentication token instead of a password to connect your application to your user account. Using OAuth, resource owners can configure permissions separately for each client requesting access to ...Configuring SAML authentication settings in OpManager for Azure
Listed below are the steps to configure SAML authentication in OpManager (SP) for Azure (IdP) with Single Sign-On. Login to your Azure account. Expand the menu on the left hand side, and select Azure Active Directory. Click on Enterprise ...Configuring SAML in OpManager
There are two ways to configure SAML in OpManager. You can either do it manually by providing the necessary credentials or you can upload the metadata file directly, if available. Service provider details If you opt to configure SAML manually, you ...Two Factor Authentication in OpManager
Two Factor Authentication (TFA) provides an additional level of authentication and improves security by requiring the user to provide a unique time-based one time password (TOTP) generated through Authenticator Apps, or as a one time password (OTP) ...