Configuring SAML in DDI Central
Configuring SAML in DDI Central
What is SAML?
SAML (Security Assertion Markup Language) is an open standard for exchanging authentication and authorization data between parties, specifically between an identity provider (IDP) and a service provider (SP), in this context DDI Central. It is primarily used for single sign-on (SSO) to provide users with seamless access to multiple applications and services with just one set of credentials.
Key Components of SAML
- Identity Provider (IDP): The entity that authenticates the user and issues SAML assertions (e.g., Okta, Microsoft Azure AD, Auth0, OneLogin and more).
- Service Provider (SP): The application or service like DDI Central that consumes the SAML assertions to grant the user access.
- SAML Assertion: The XML document containing user authentication and authorization information, issued by the IDP and consumed by the SP.
How SAML Works with DDI Central
- User Requests Access: The user tries to access the DDI Central service(SP).
- Redirect to IDP: DDI Central redirects the user to the IDP for authentication.
- Authentication at IDP: The user authenticates with the IDP.
- SAML Assertion: The IDP generates a SAML assertion containing the user's authentication status and attributes.
- Redirect back to SP: The user is redirected back to DDI Central with the SAML assertion.
- Access Granted: DDI Central processes the SAML assertion and grants the user access.
Pre-requisites for configuring SAML in DDI Central
DDI Central has a system dependency on a native Python library named xmlsec ( XML Security Library)
Depending on your Linux distribution you can run the commands below to install the library on the system that you are going to use SAML for logging into DDI Central via single-sign-on.
Requirements
- libxml2 >= 2.9.1
- libxmlsec1 >= 1.2.33
Install
xmlsec is available on PyPI:
Depending on your OS, you may need to install the required native libraries first:
Linux (Debian)
Linux (CentOS)
Linux (Fedora)
Steps to setup DDI Central as SP in different IDPs
Follow the steps below to integrate DDI Central as the Service provider with the following Identity Providers.
Microsoft Azure
- Login to Microsoft Azure portal with your credentials.
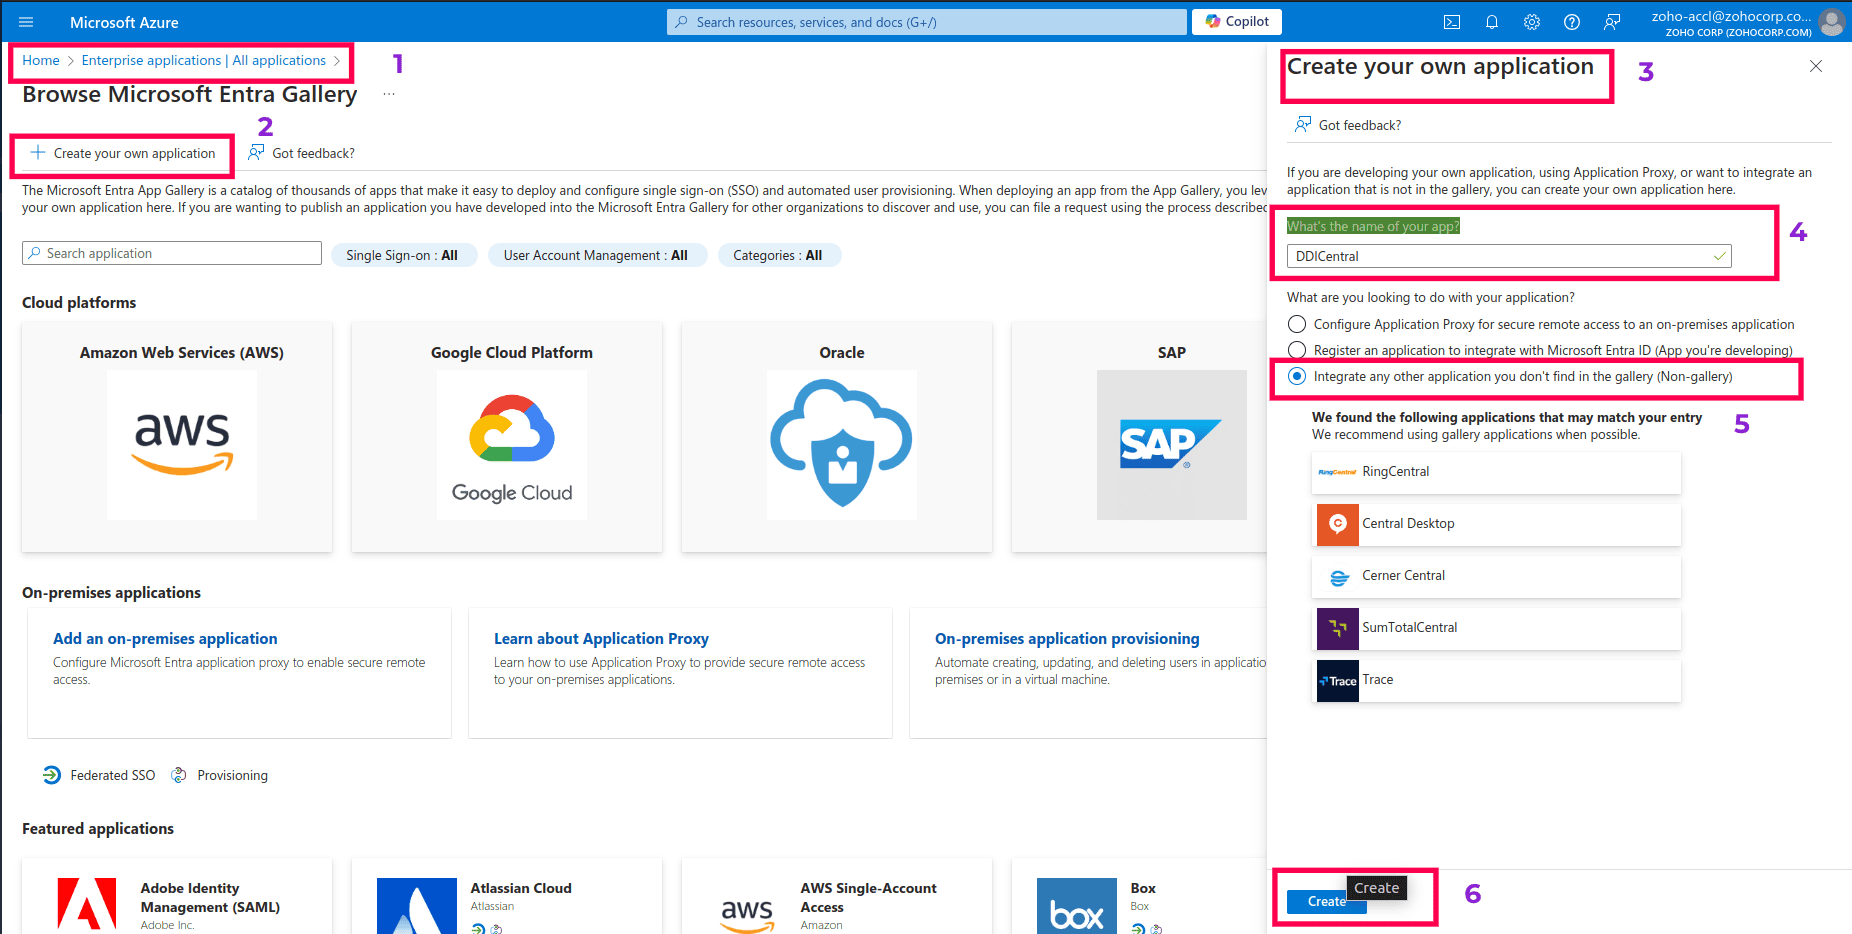
- From the homepage, navigate to Enterprise applications and click on All applications to browse the Microsoft Entra Gallery.
- Click on the Create your own application button to start the process of registering a new application.
- A new panel titled Create your own application will appear on the right-hand side.
- In the text box labeled What's the name of your app? enter the name of your application, as "DDICentral".
- Under the section What are you looking to do with your application?, choose the option Integrate any other application you don't find in the gallery (Non-gallery). This allows you to set up a custom application that isn’t pre-listed in the gallery.
- Once all the information is entered, click on the Create button at the bottom of the panel to create the DDICentral application.
- These steps will lead you to the next stages to configure the Single Sign-On and other settings required for integrating DDI Central with Microsoft Azure for SAML.
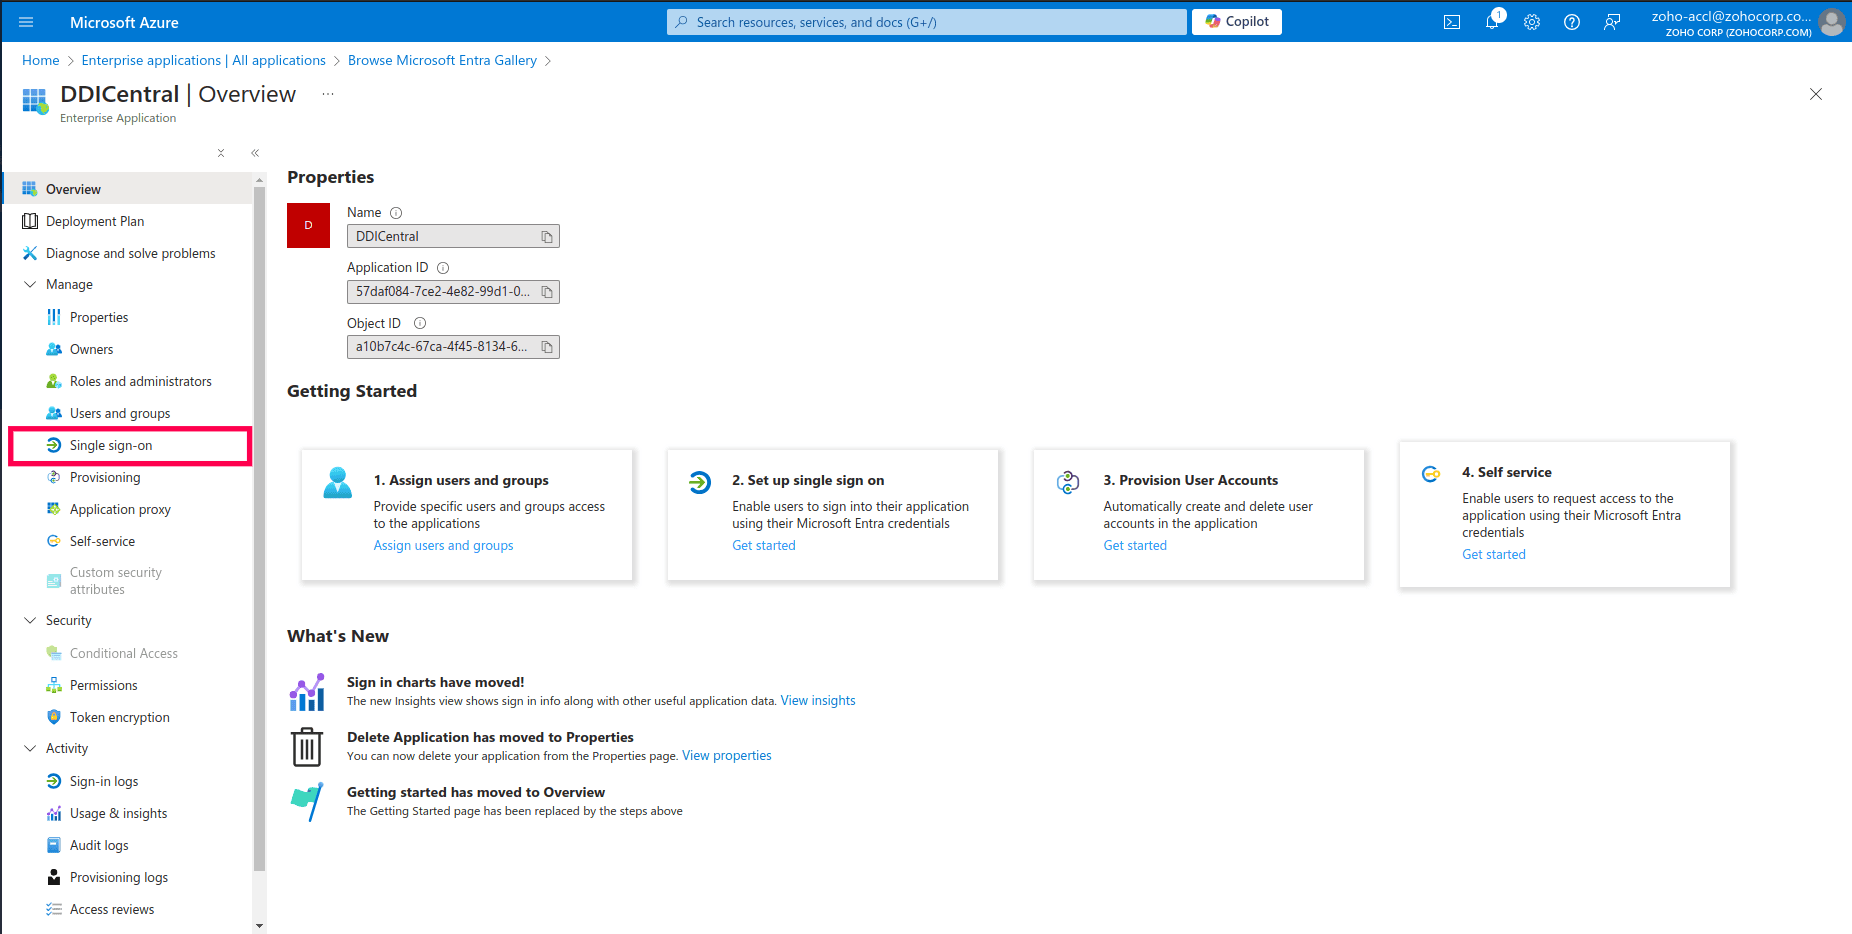
- Now navigate to the left-hand menu Manage on the DDICentral application page, locate and click on the sub-menu Single sign-on. This will take you to the Single Sign-On configuration page, where you can set up the method by which users will authenticate via SAML.
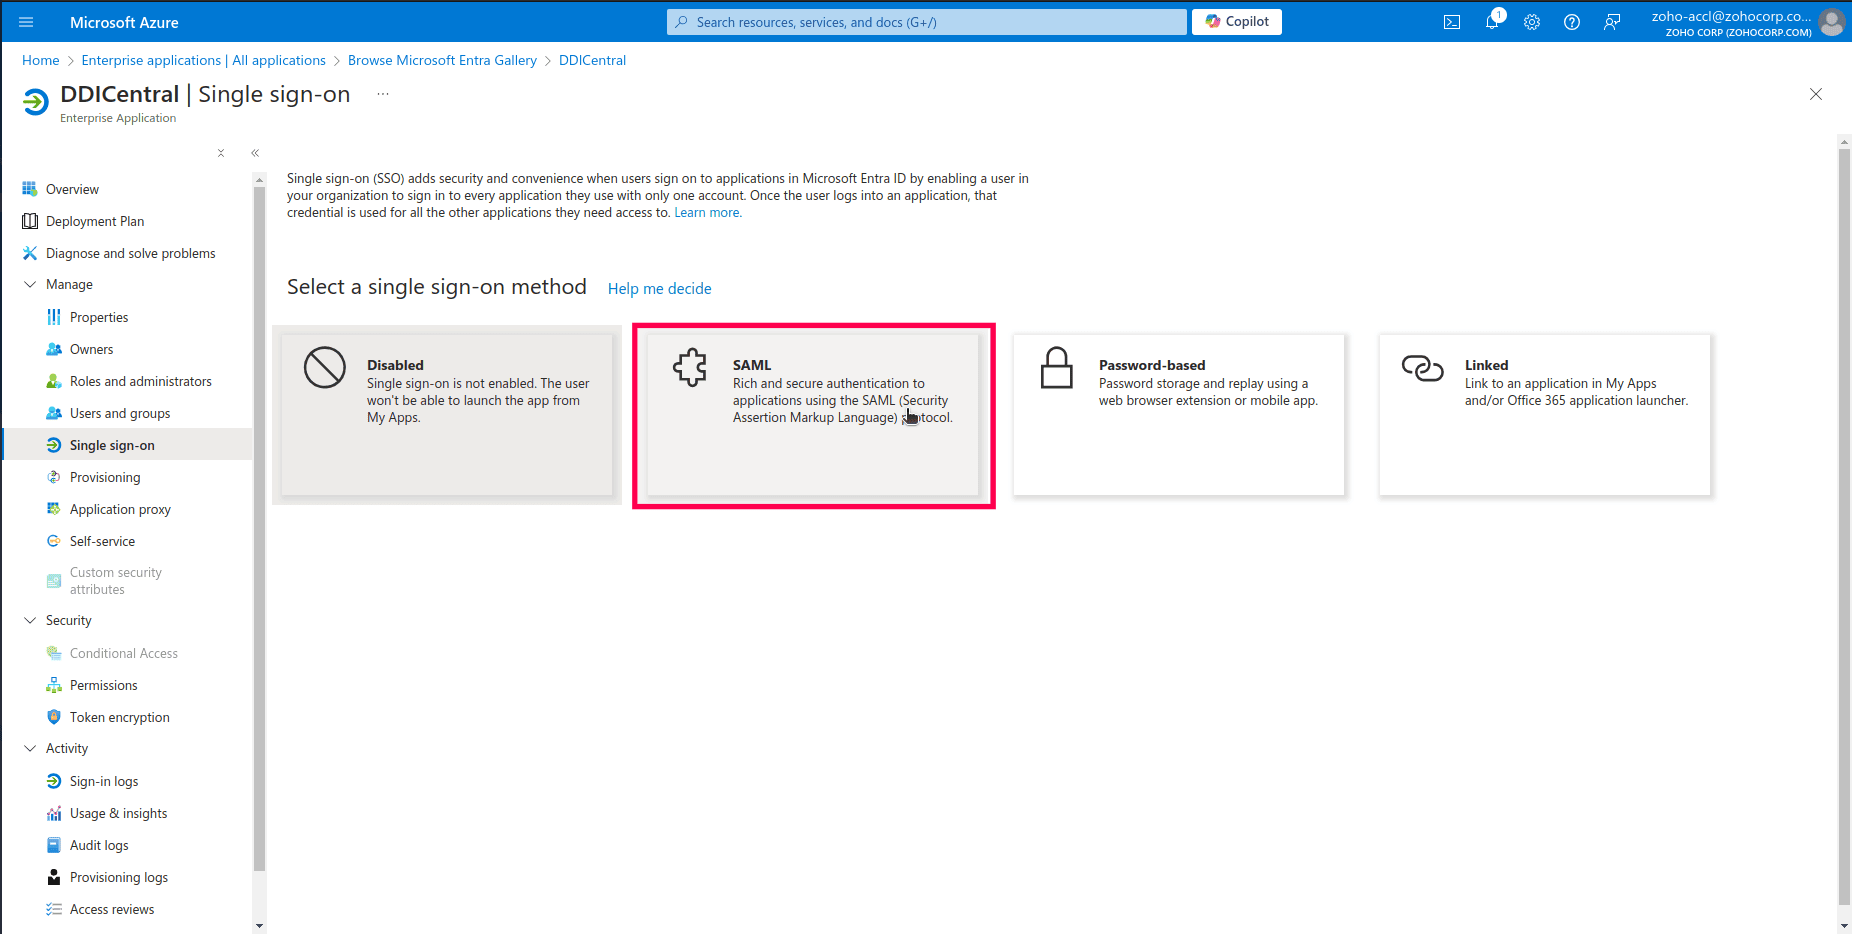
- On the Single sign-on page, you will see several options for configuring Single Sign-On methods. Click on the SAML option. This will direct you to the configuration page where you can set up the SAML-based authentication by entering specific details such as the Entity ID, Assertion Consumer Service (ACS) URL, and other necessary SAML attributes.
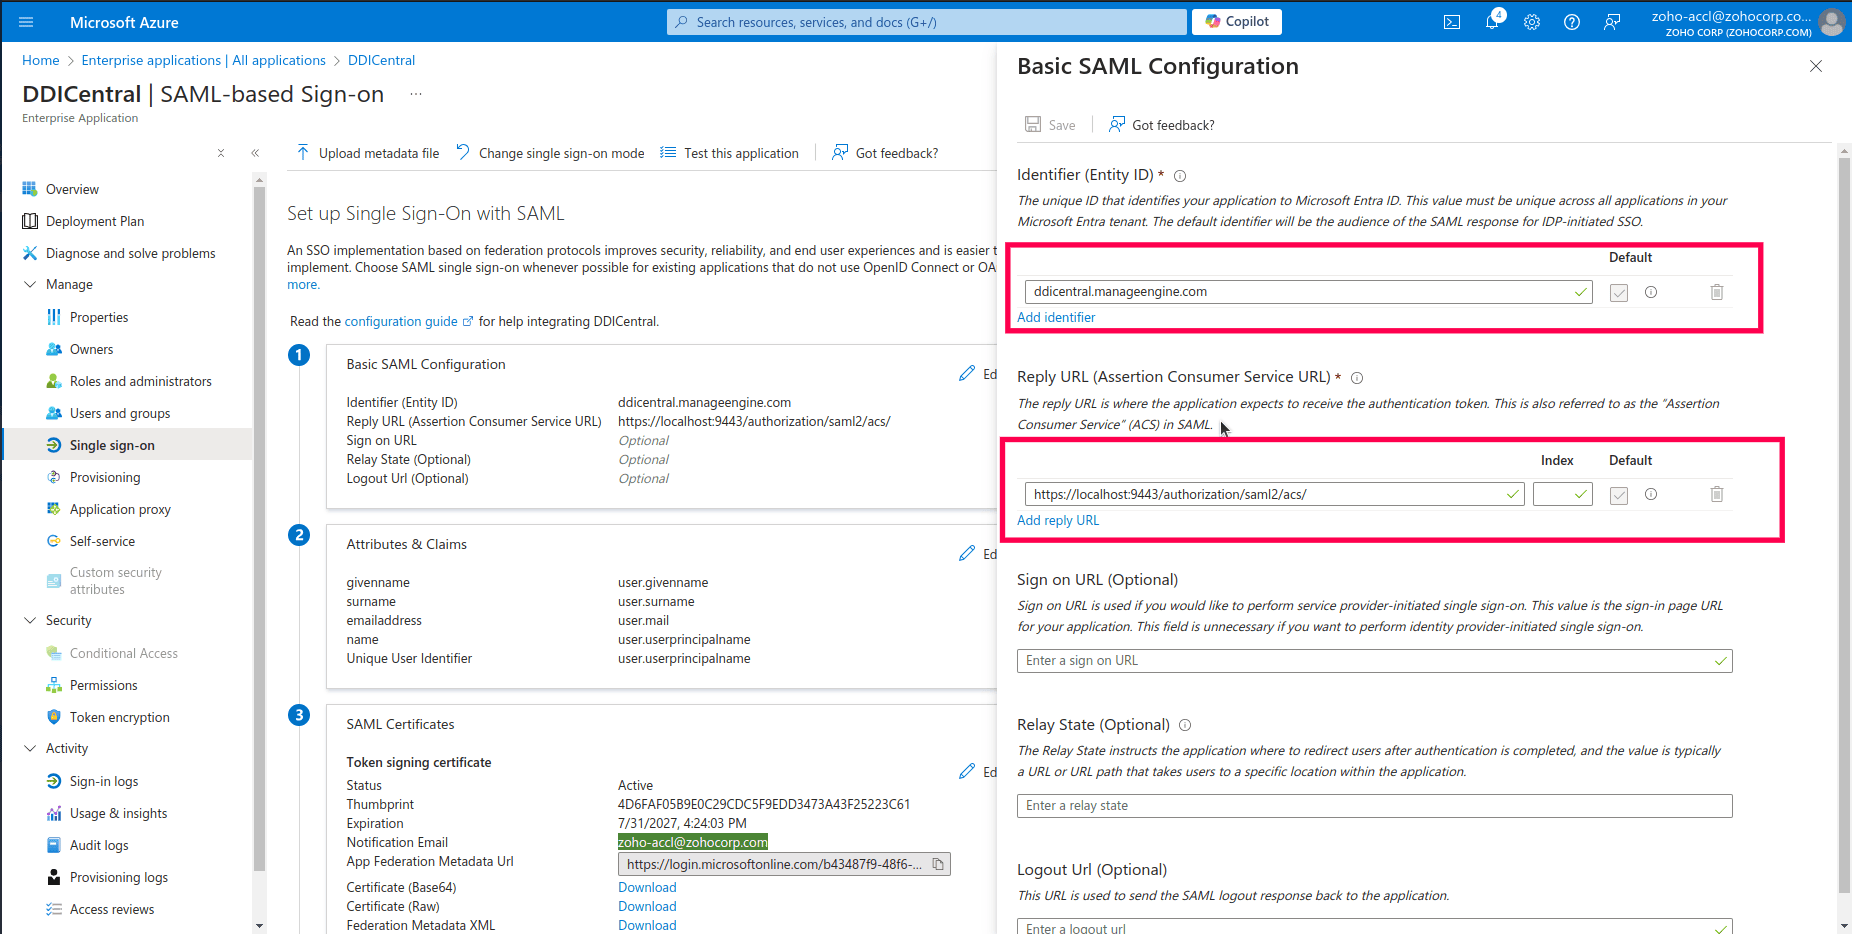
- On the SAML-based Sign-On configuration page that appears, locate the Basic SAML Configuration section. This section is crucial for setting up the necessary endpoints and identifiers for the SAML authentication process.
- Click on the Edit button within the Basic SAML Configuration section to input the required details.
-
Fill in required SAML details as follows:
Identifier (Entity ID): Enter the unique identifier for your application. This is usually the URL of DDI Central (the service provider): ddicentral.manageengine.com.
Reply URL (Assertion Consumer Service URL): Input the URL where DDI Central expects to receive the SAML assertion. This is typically in the format https://localhost:9443/authorization/saml2/acs/.
- Once all the necessary fields are filled in, click Save to apply the configuration.
- This completes the essential configuration for enabling SAML-based Single Sign-On for the DDI Central application in Microsoft Azure. You can now directly proceed to downloading the SAML certificate.
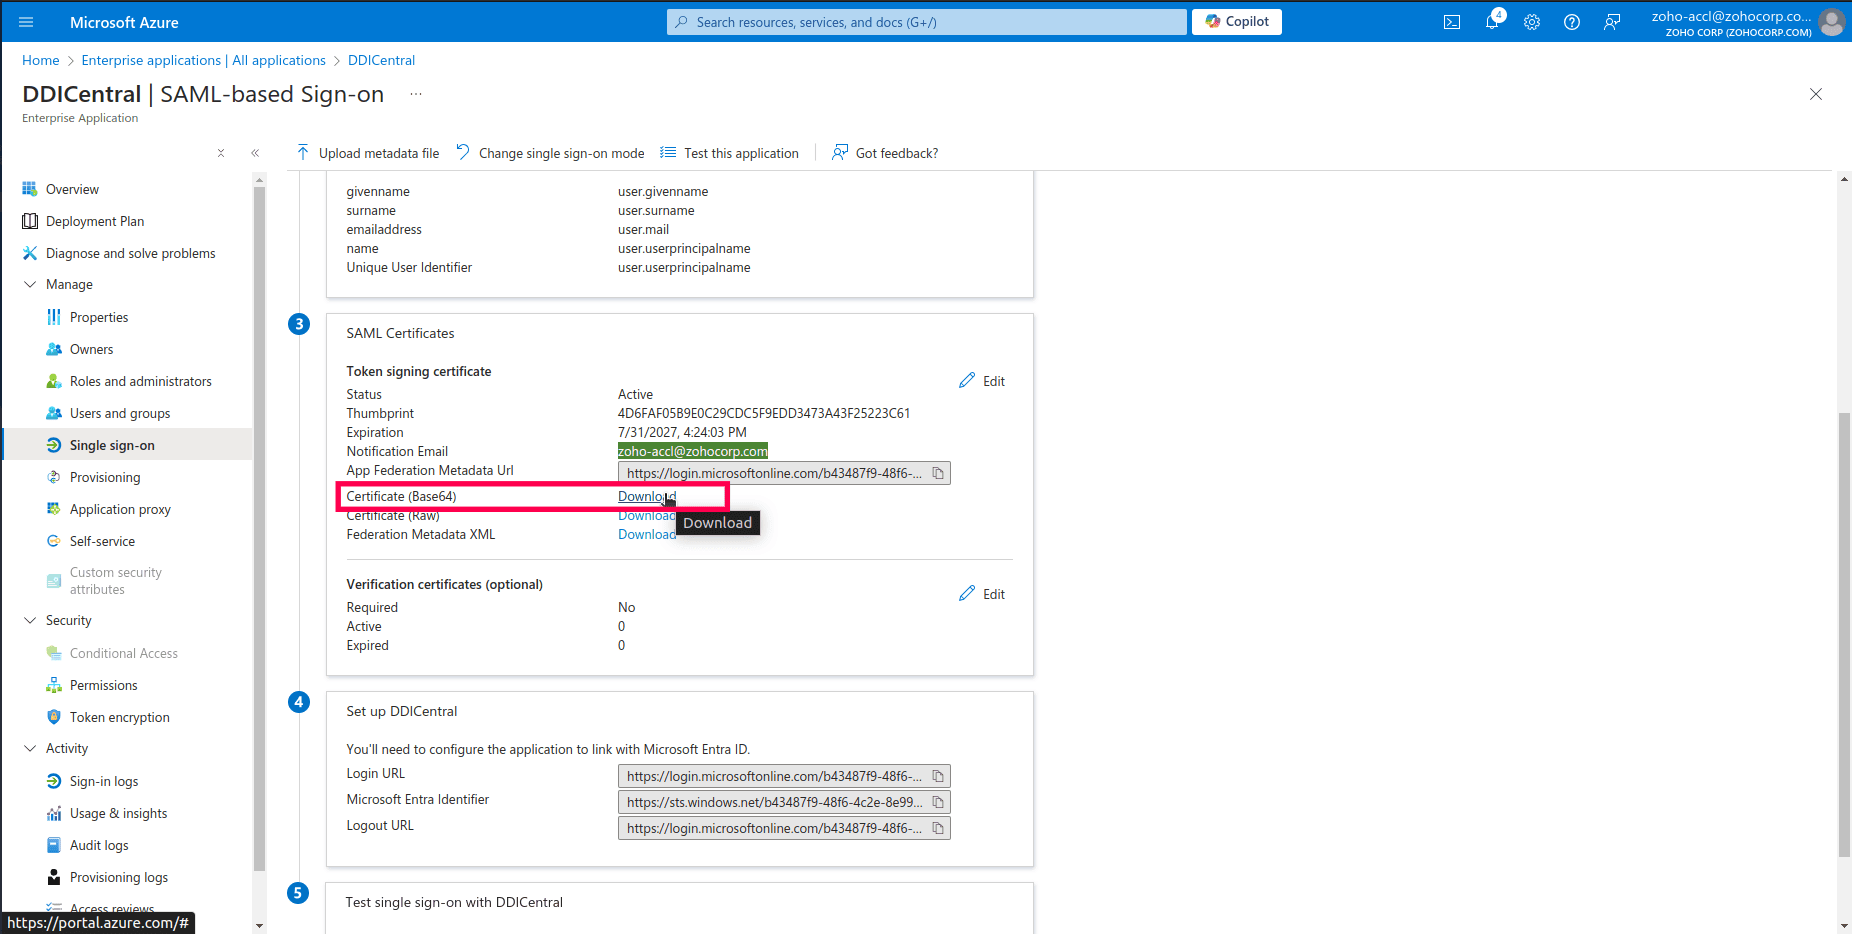
- Now navigate to the "SAML Certificates" section of the SAML-based Sign-On configuration page, you will find details about the token signing certificate. This certificate is essential for ensuring that the SAML assertions are securely signed and trusted by the service provider.
- Look for the Certificate (Base64) option under the Token signing certificate section. Click on the Download link next to Certificate (Base64) to download the certificate file. This file is required by DDI Central (the service provider) to verify the signatures on the SAML assertions.
- Important: The certificate will be downloaded as ddicentral.cer. DDI Central does not support the certificates with a .cer extension. Make sure to save your certificate as ddicentral.pem with a .pem extension.
- Save the downloaded certificate in a secure location. You will need to upload or configure this certificate on the service provider's side to complete the SAML setup.
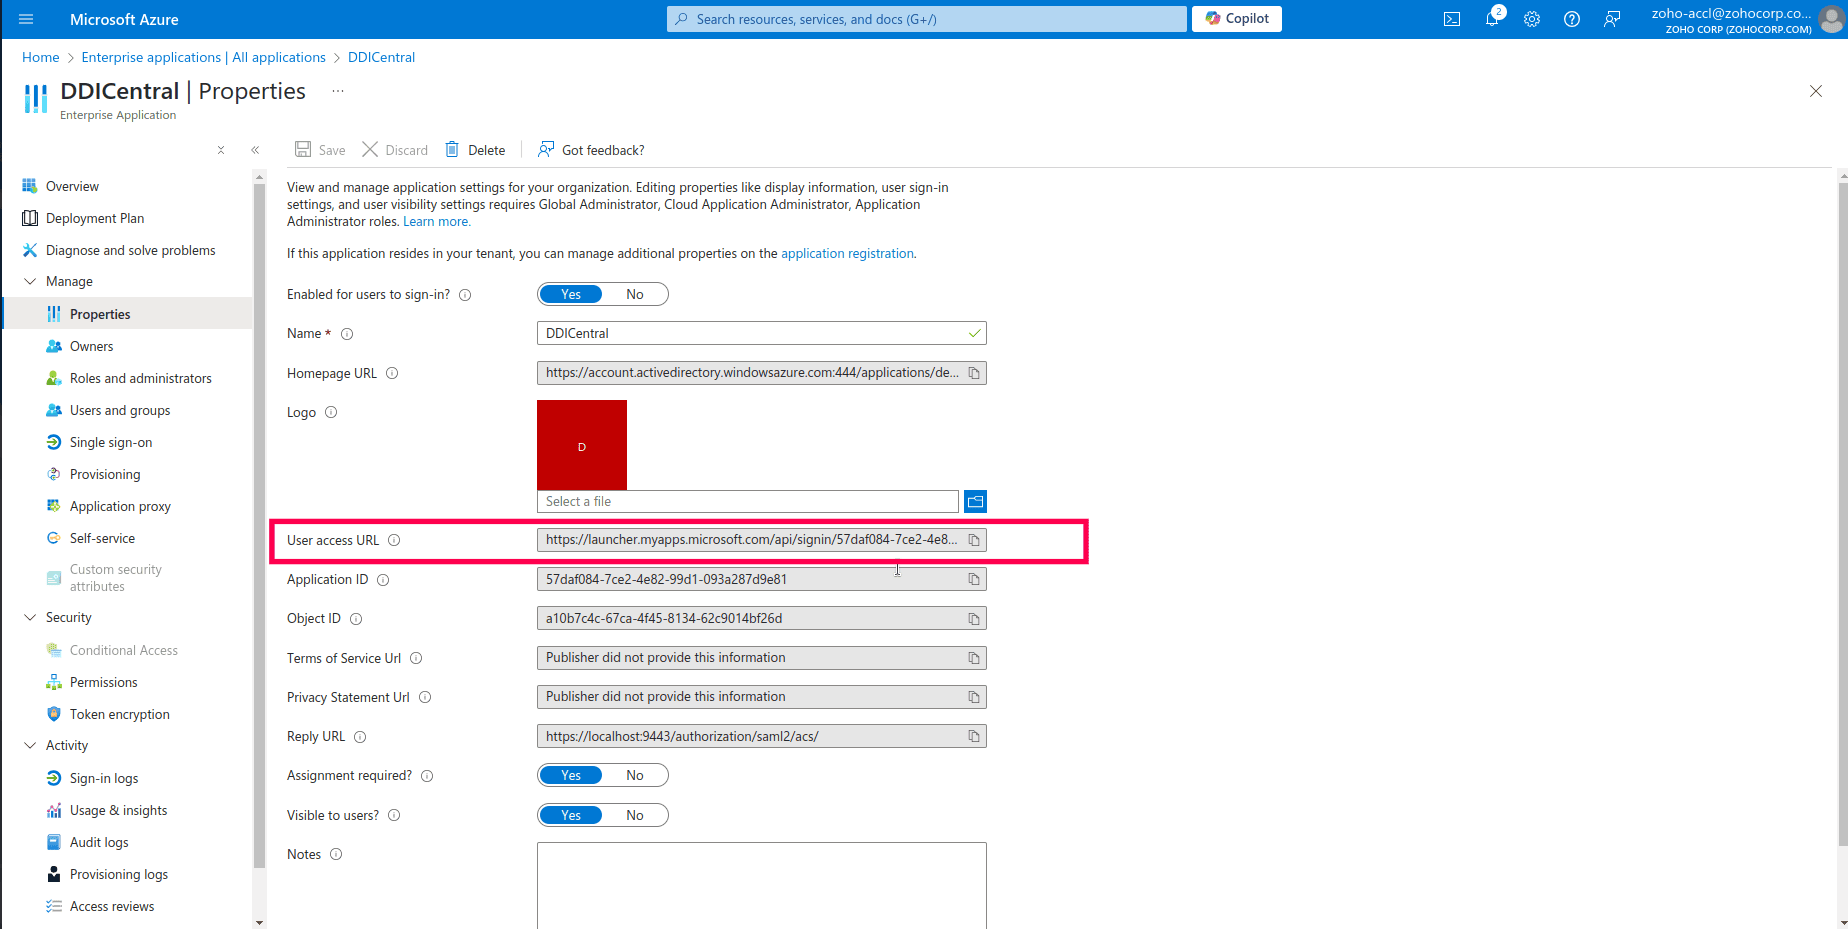
- Now navigate to the Manage menu on the left menu bar and select the sub-menu Properties to access DDICentral application properties. This section allows you to configure various settings related to the application’s appearance and behavior in Azure.
- Locate the User access URL field; just copy the auto-generated URL. This is the URL where the users will be redirected when they try to authenticate with DDI Central via their Azure portal.
- The User access URL generated under Enterprise Application -> Properties in Azure portal is the URL you should be entering in the SSO URL field in DDI Central user interface, while configuring SAML authentication.
- After verifying all the other settings and properties, click Save at the top of the Properties page to apply the configurations.

Okta
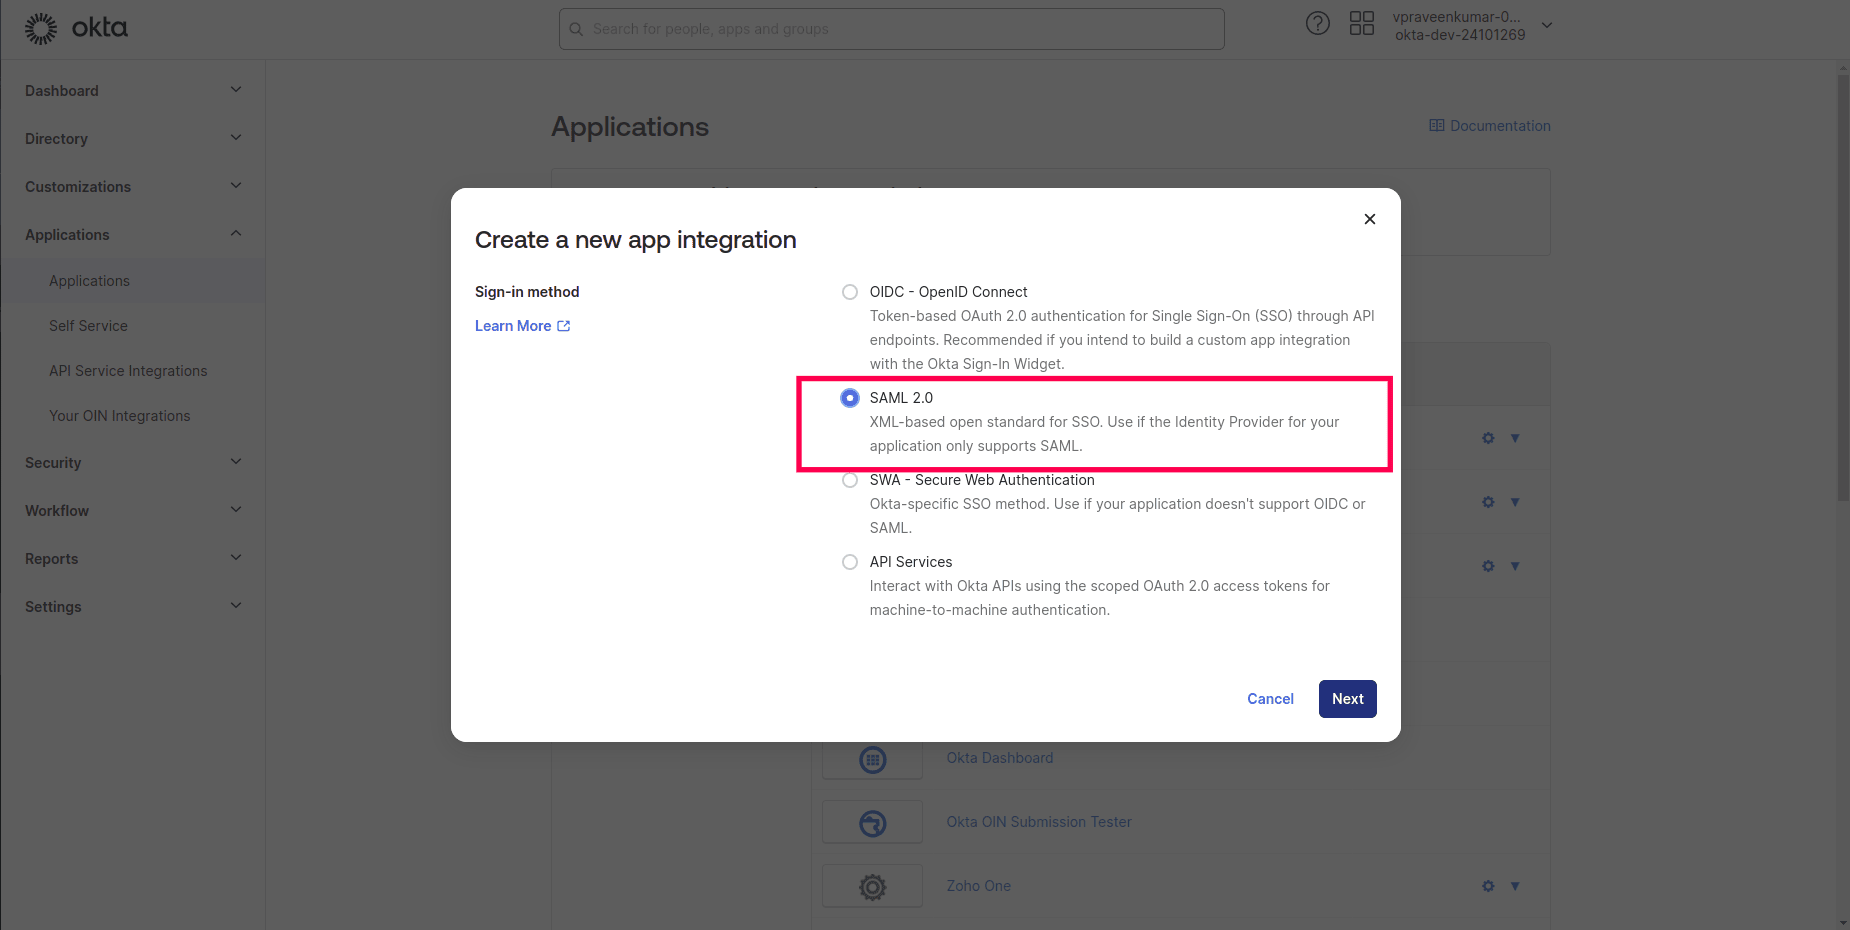
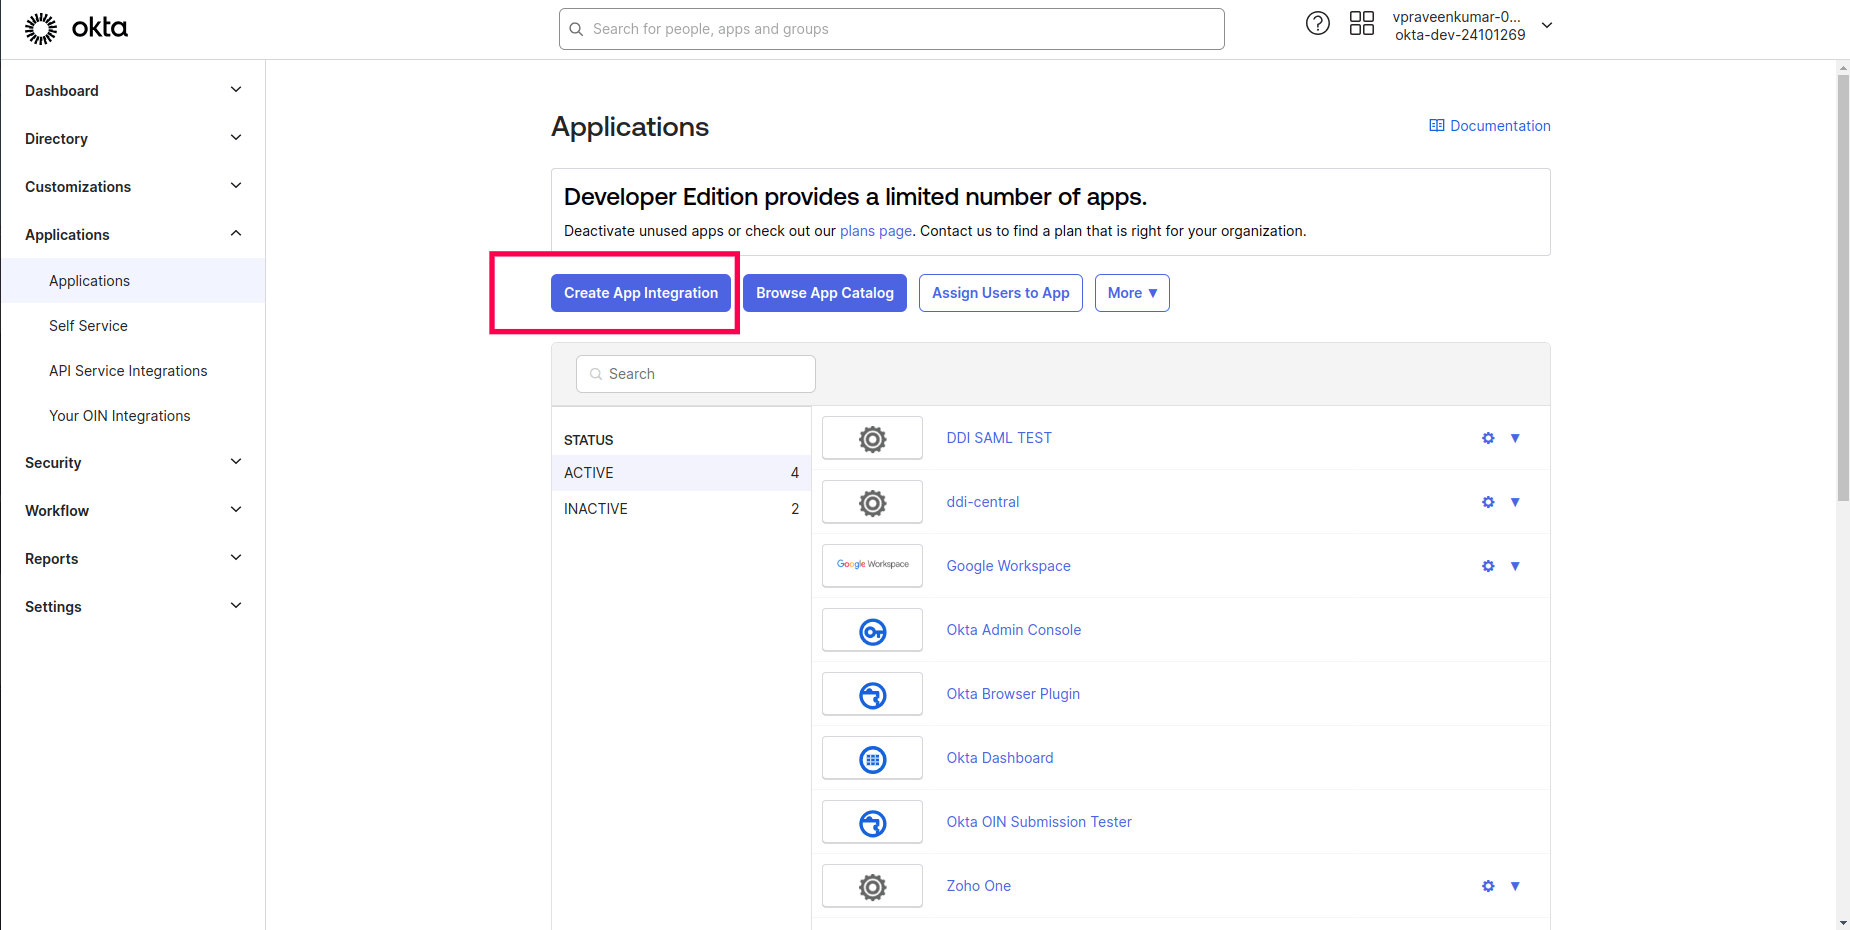
- Get into Okta IDP's configuration console. Select the Application menu and click on the Create App integration button on the Applications page.
- On the Create a new app integration wizard, select SAML 2.0 option and click Next.
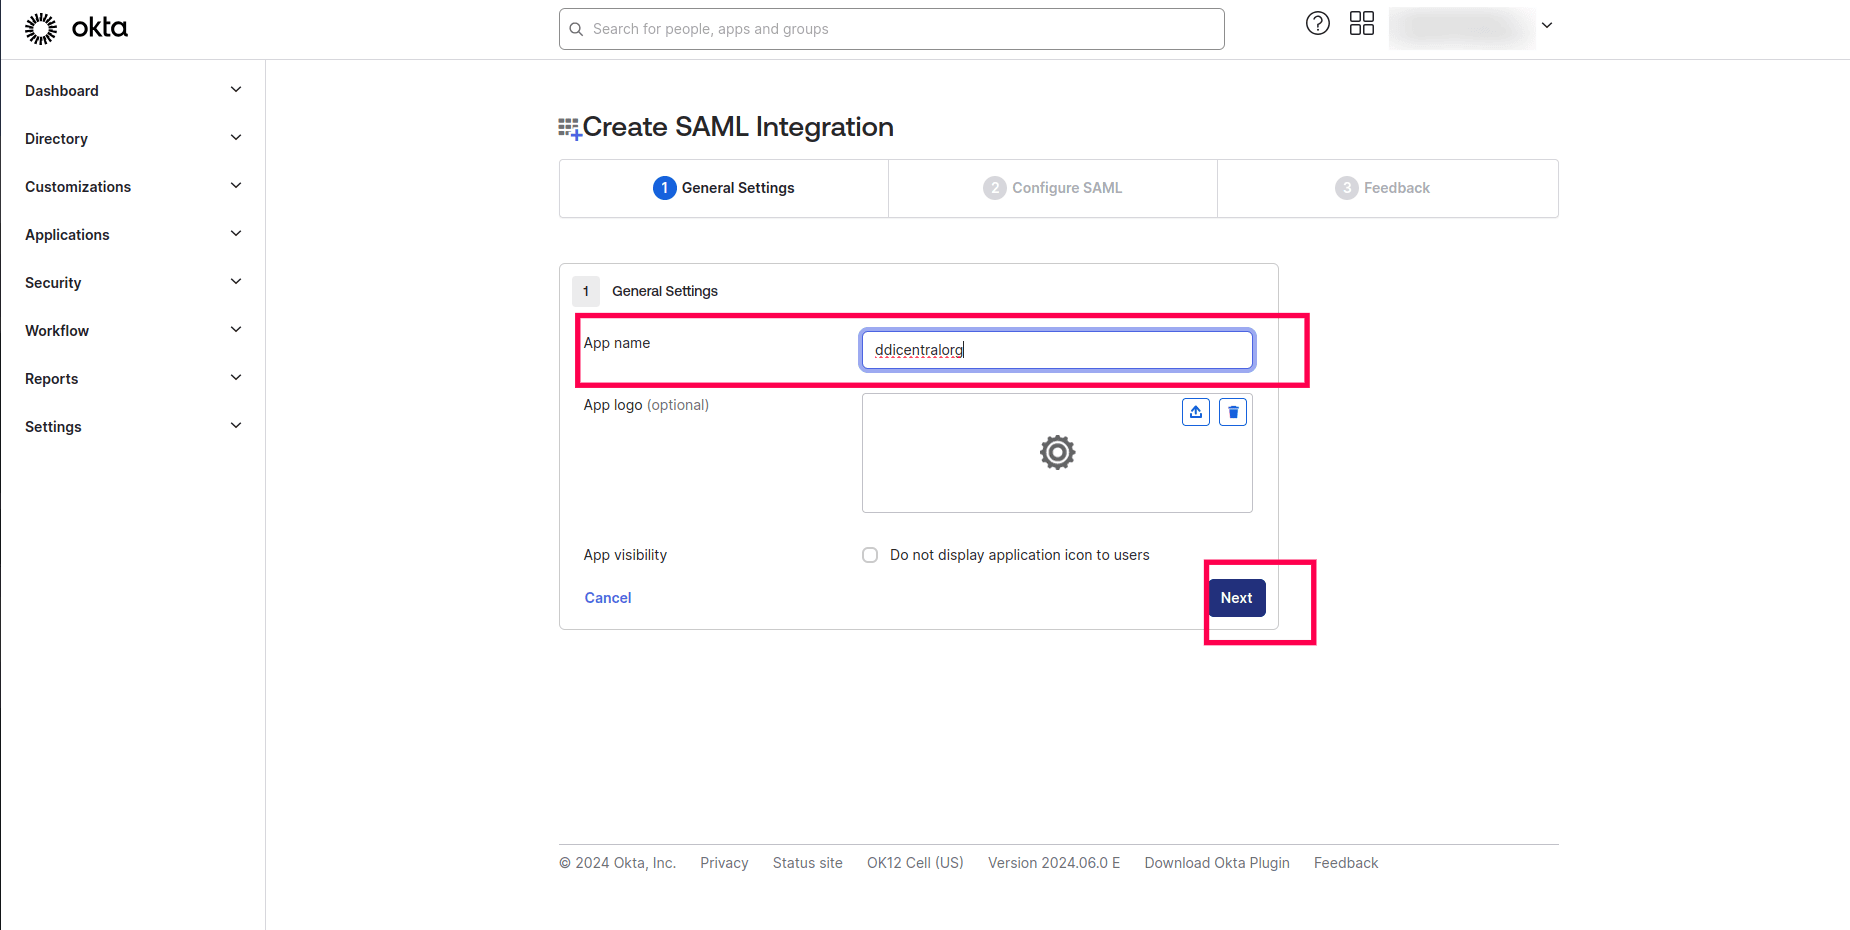
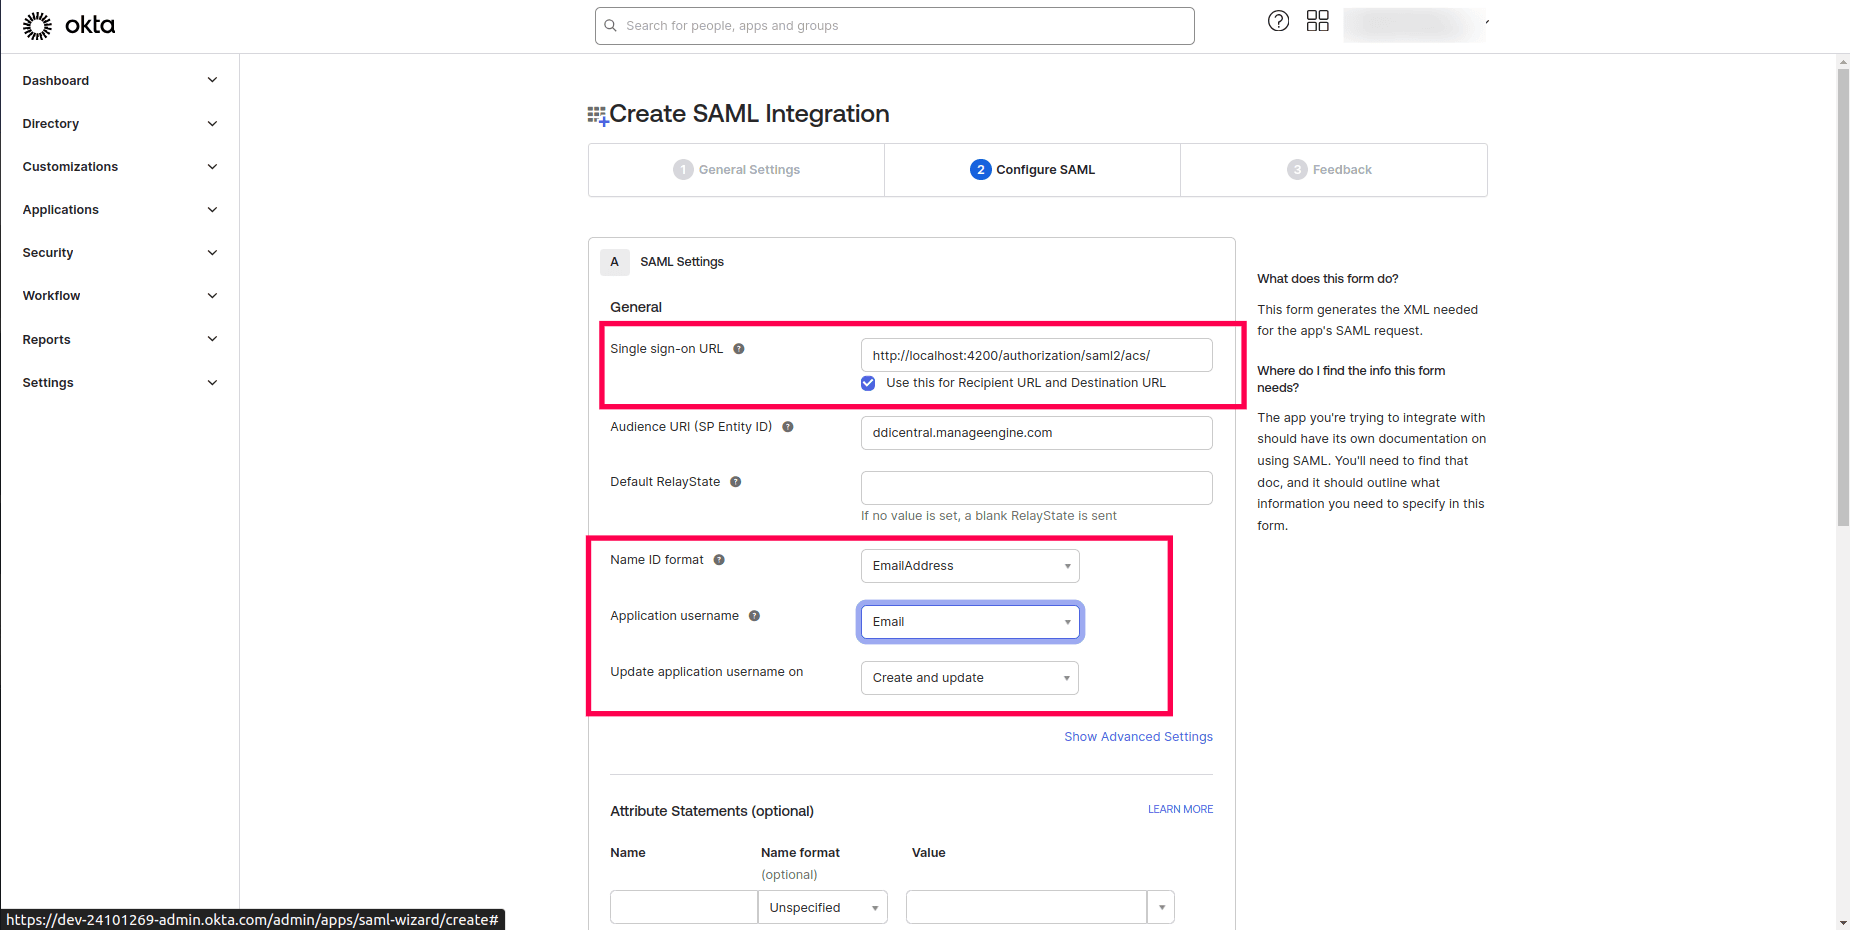
- On the Create SAML Integration section of the wizard, Give the App name as ddicentralorg. Click Next.
- Enter the ACS url generated by DDI Central once you enable SAML and enter the credentials without uploading the certificate. Check the Use this for Recipient URL and Destination URL checkbox below. Select the ID format as EmailAddress. Select the Application username as Email. Select the option Create and update for the Update application username on field.
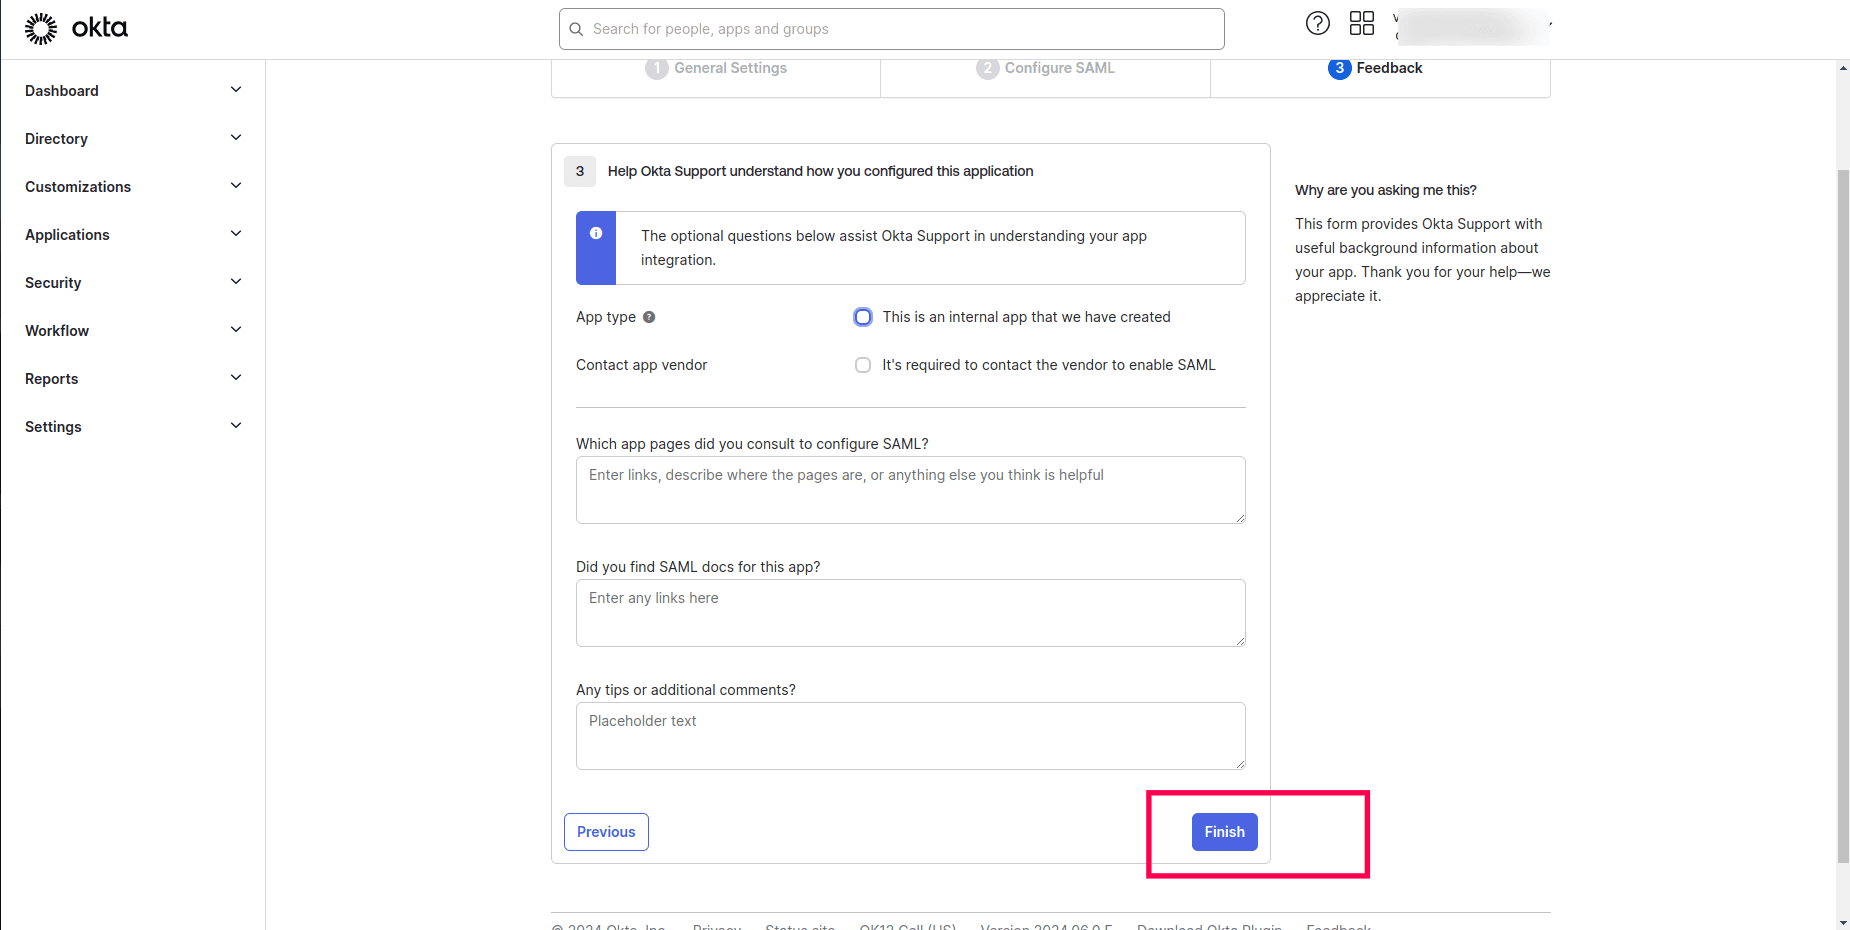
- Click Finish.
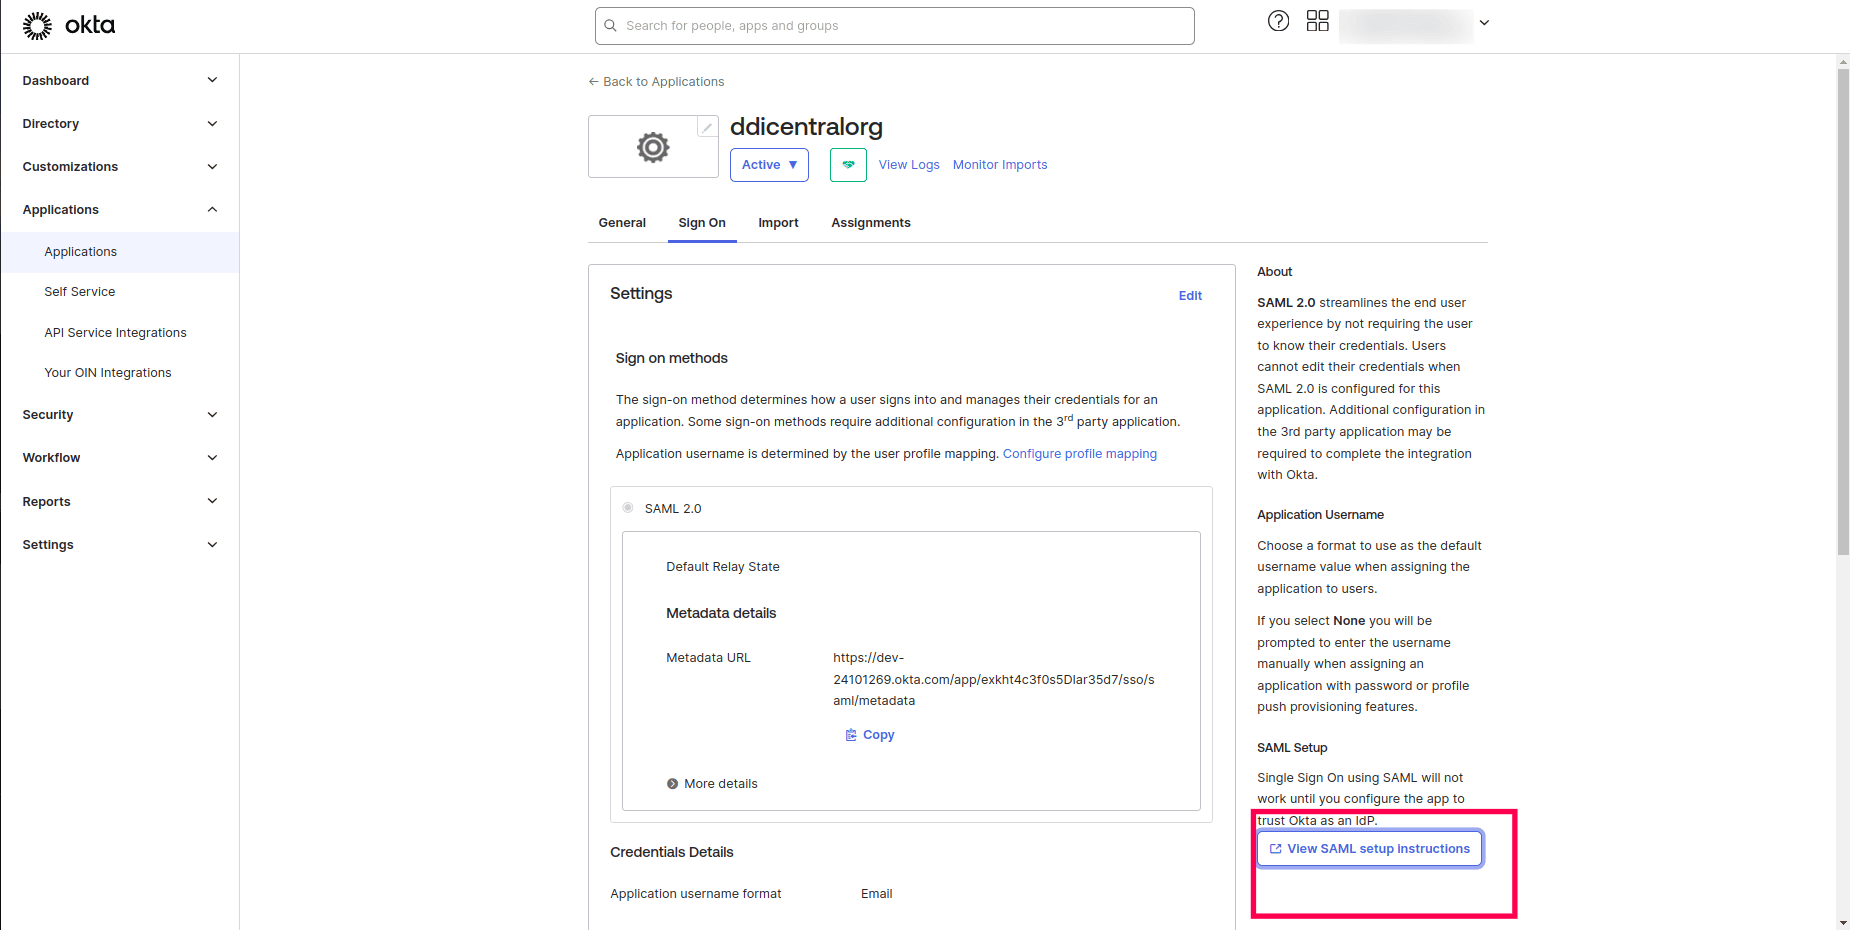
- This takes you to your organization page.
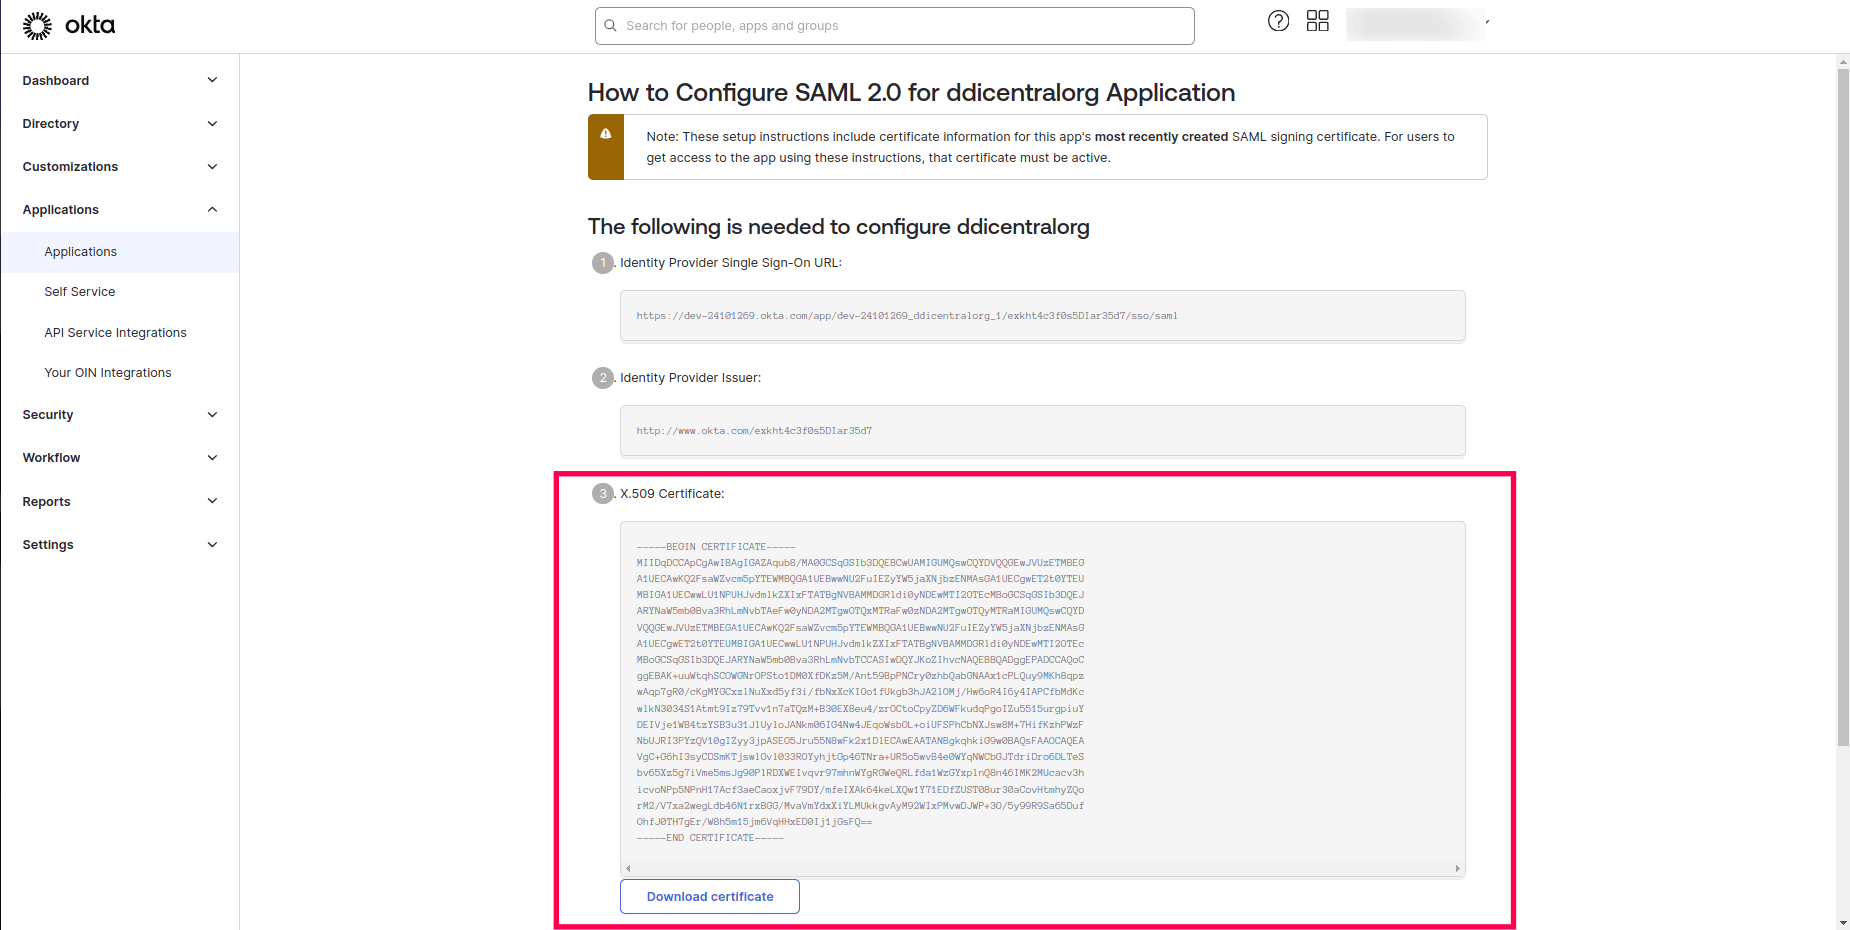
- Click on the View SAML setup instructions.
- Download the certificate and upload it in DDI Central along with other details as detailed in the last section below.
Ping
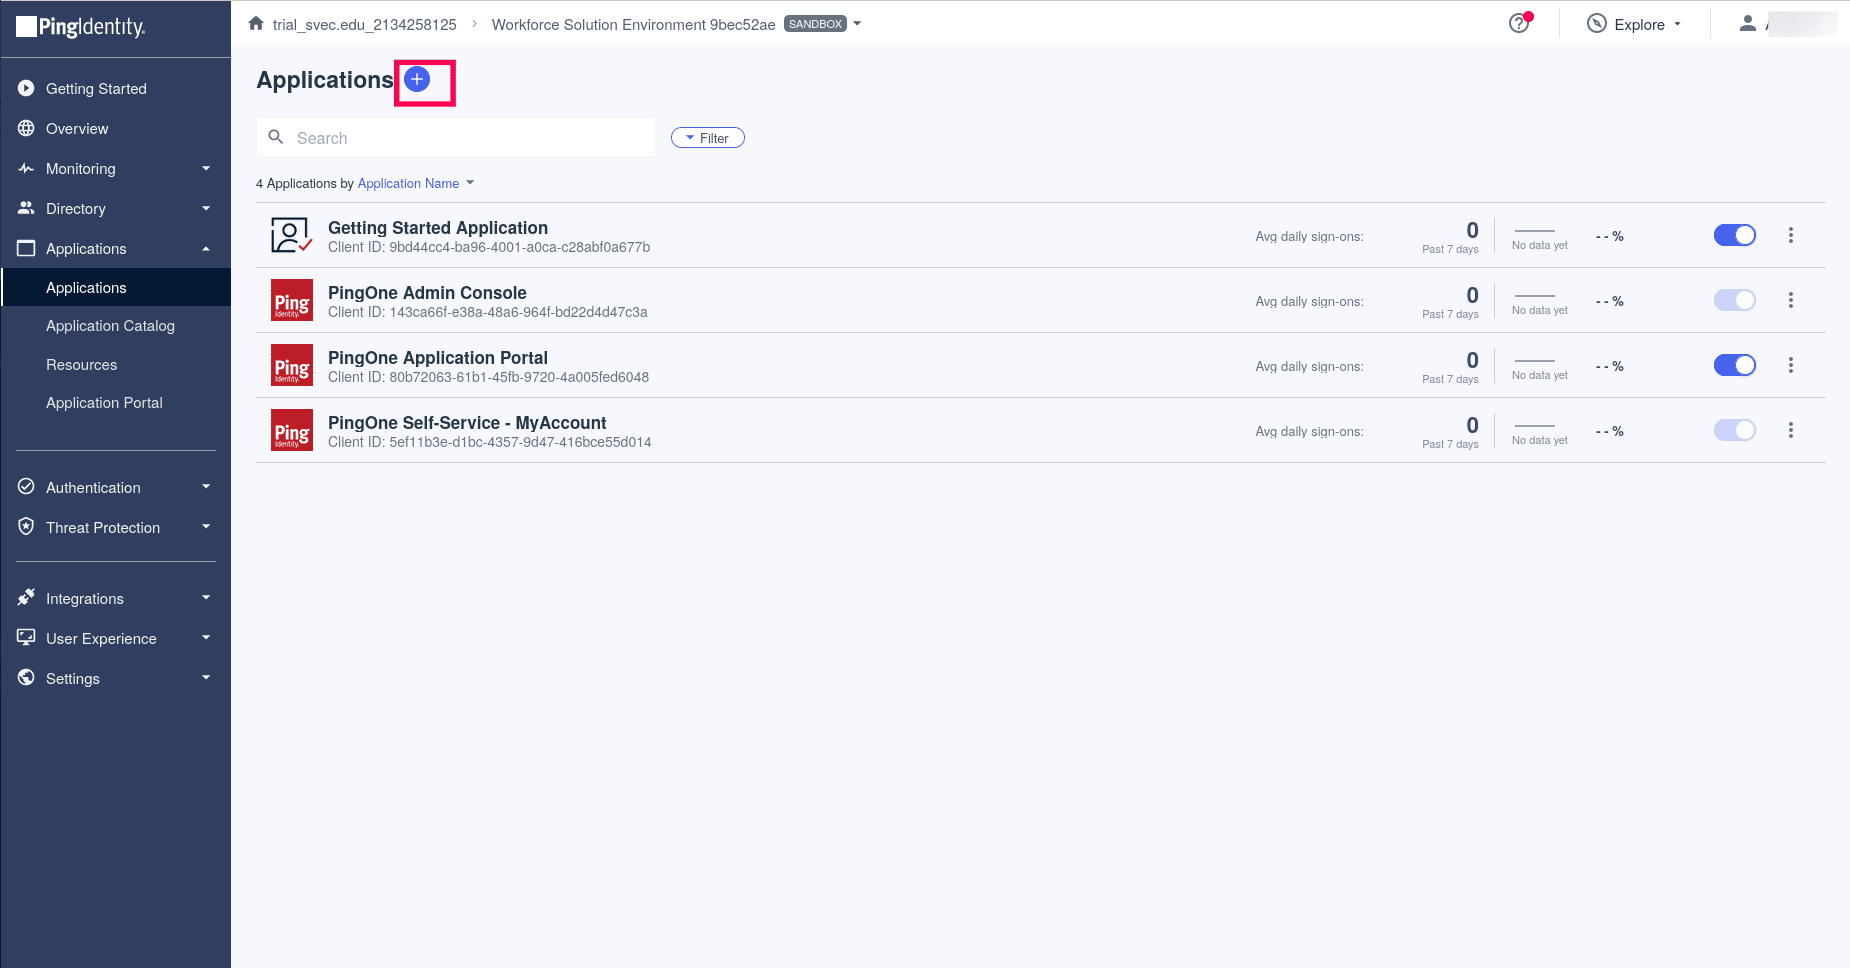
- Go the Pingidentity dashboard. Click on the add icon on the Applications page.
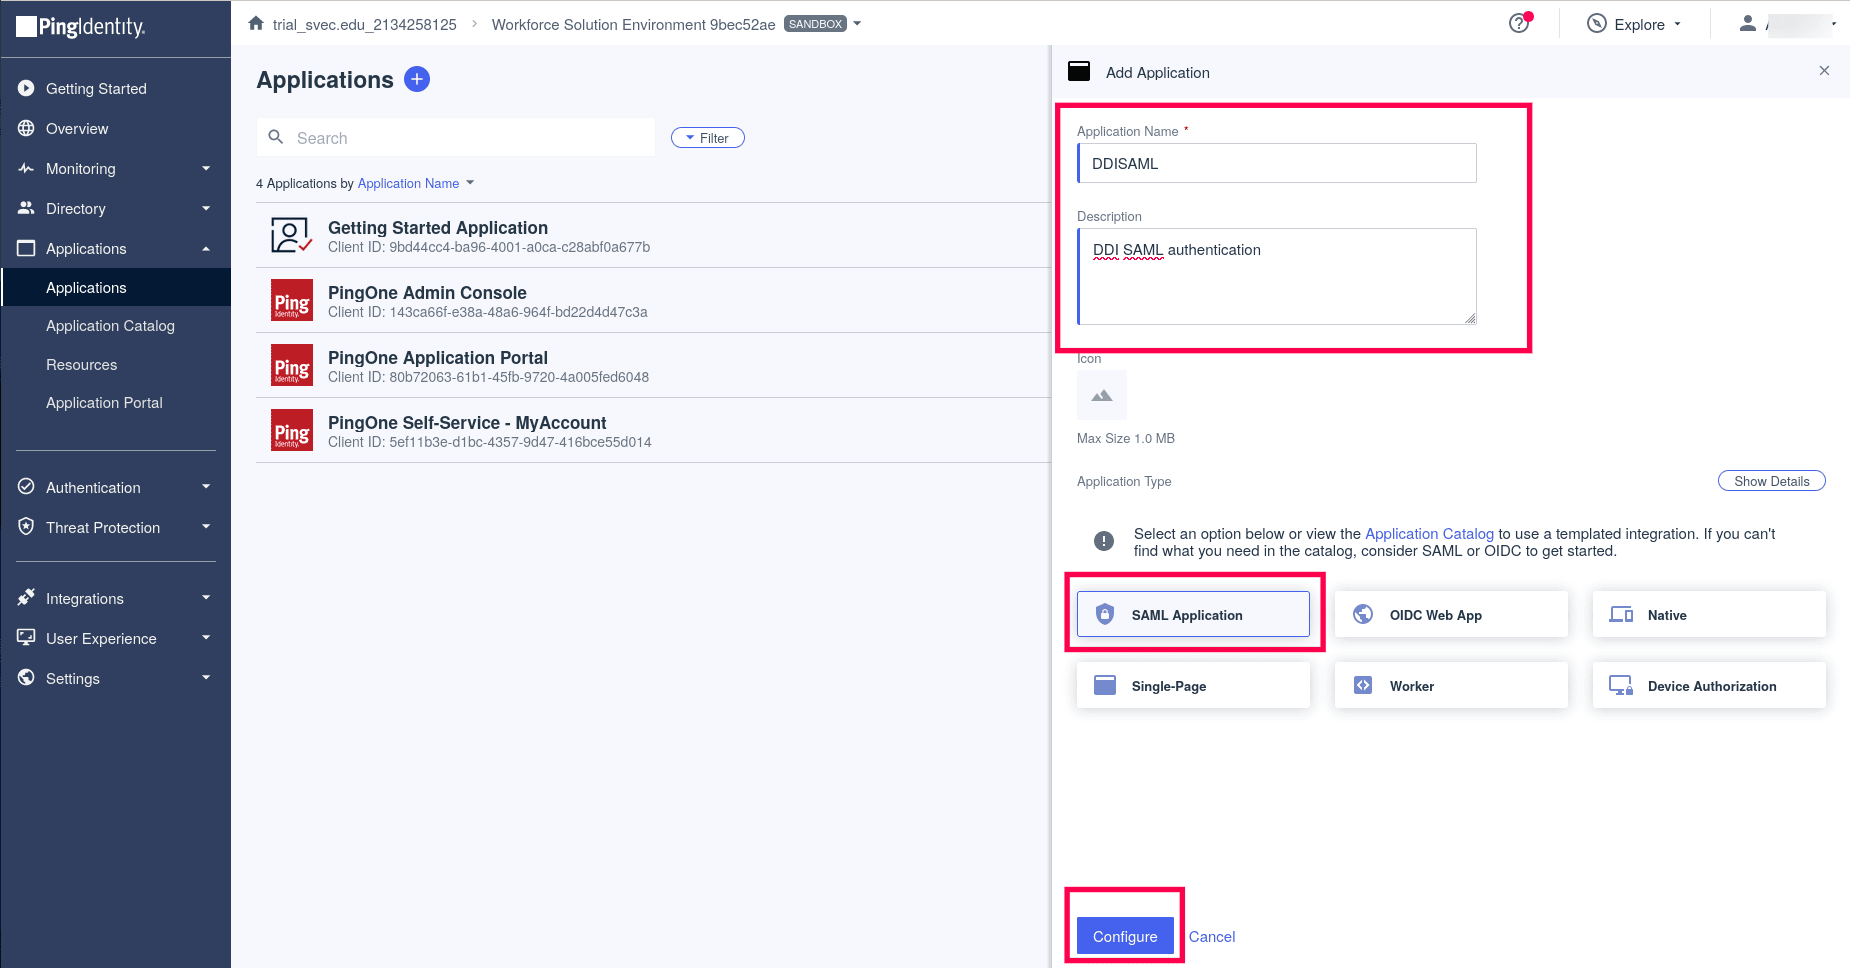
- On the Add Application wizard, Enter the Application name. Give a unique description. Click Configure.
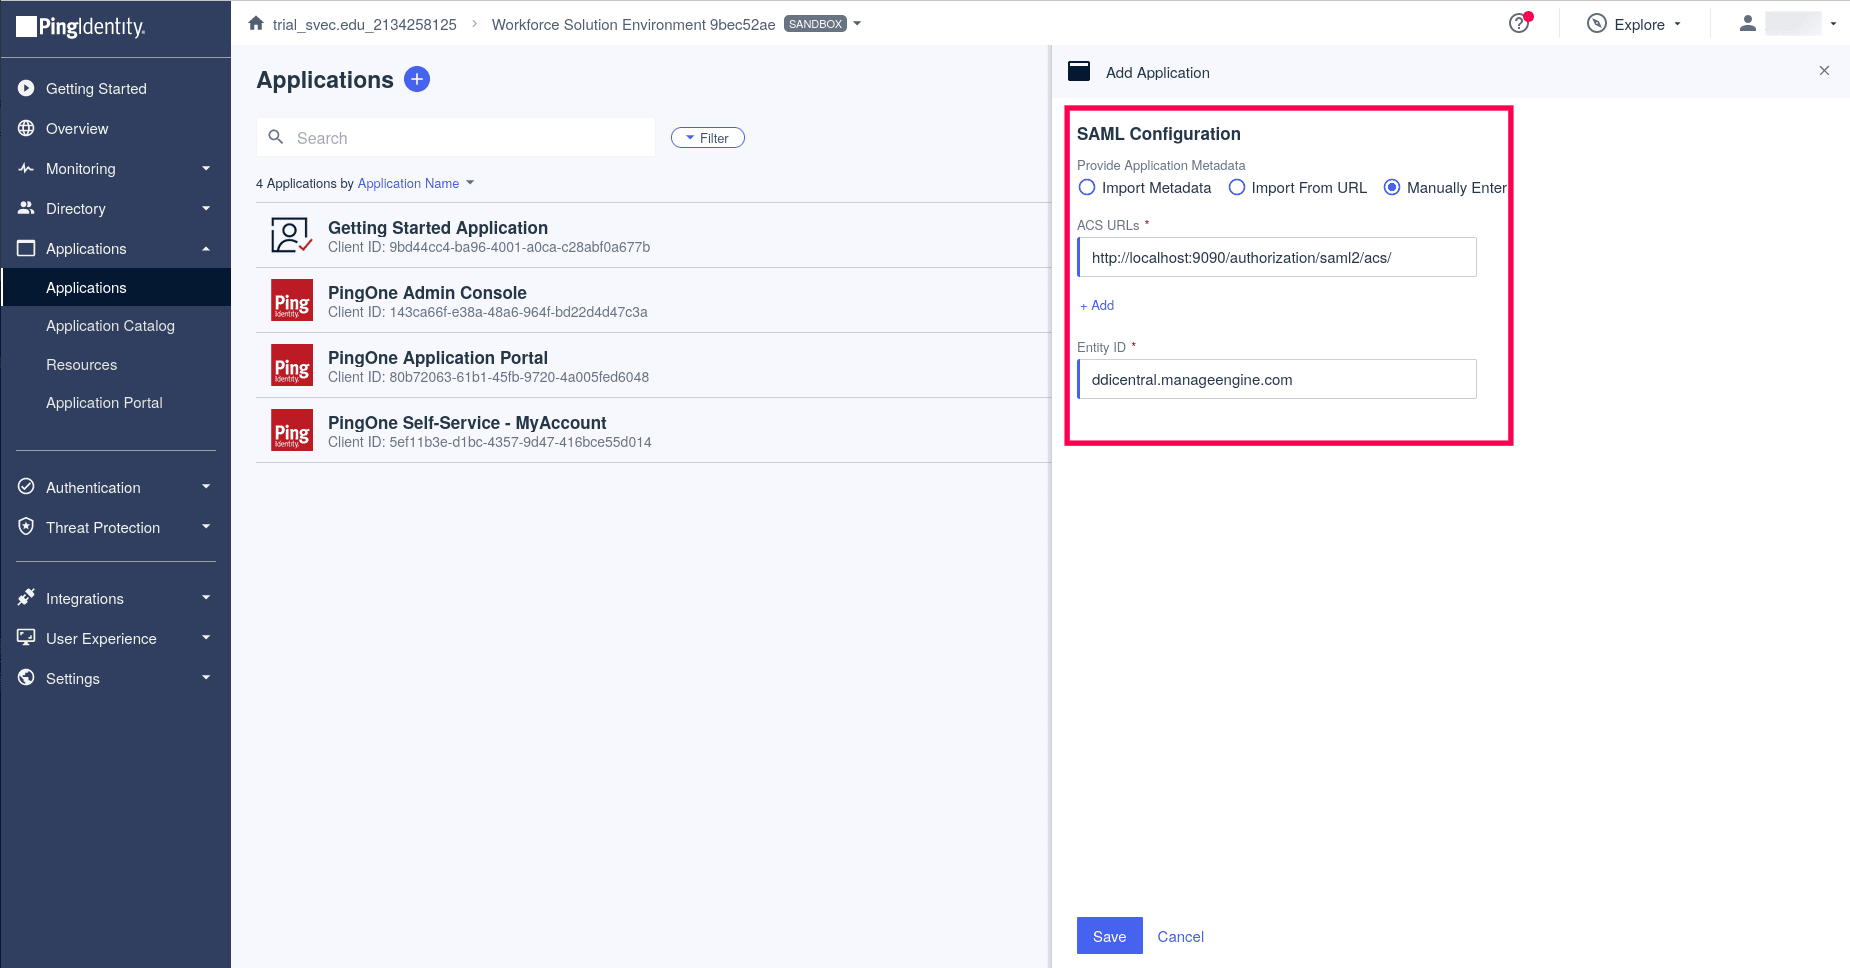
- For the SAML Configuration section, select the option Manually Enter. For the ACS URL enter the ACS url generated by DDI Central once you enable SAML and enter the without uploading the certificate.
- Give the Entity ID as: ddicentral.manageengine.com
-
Note: Do not change this string, as it is a constant. Click Save.
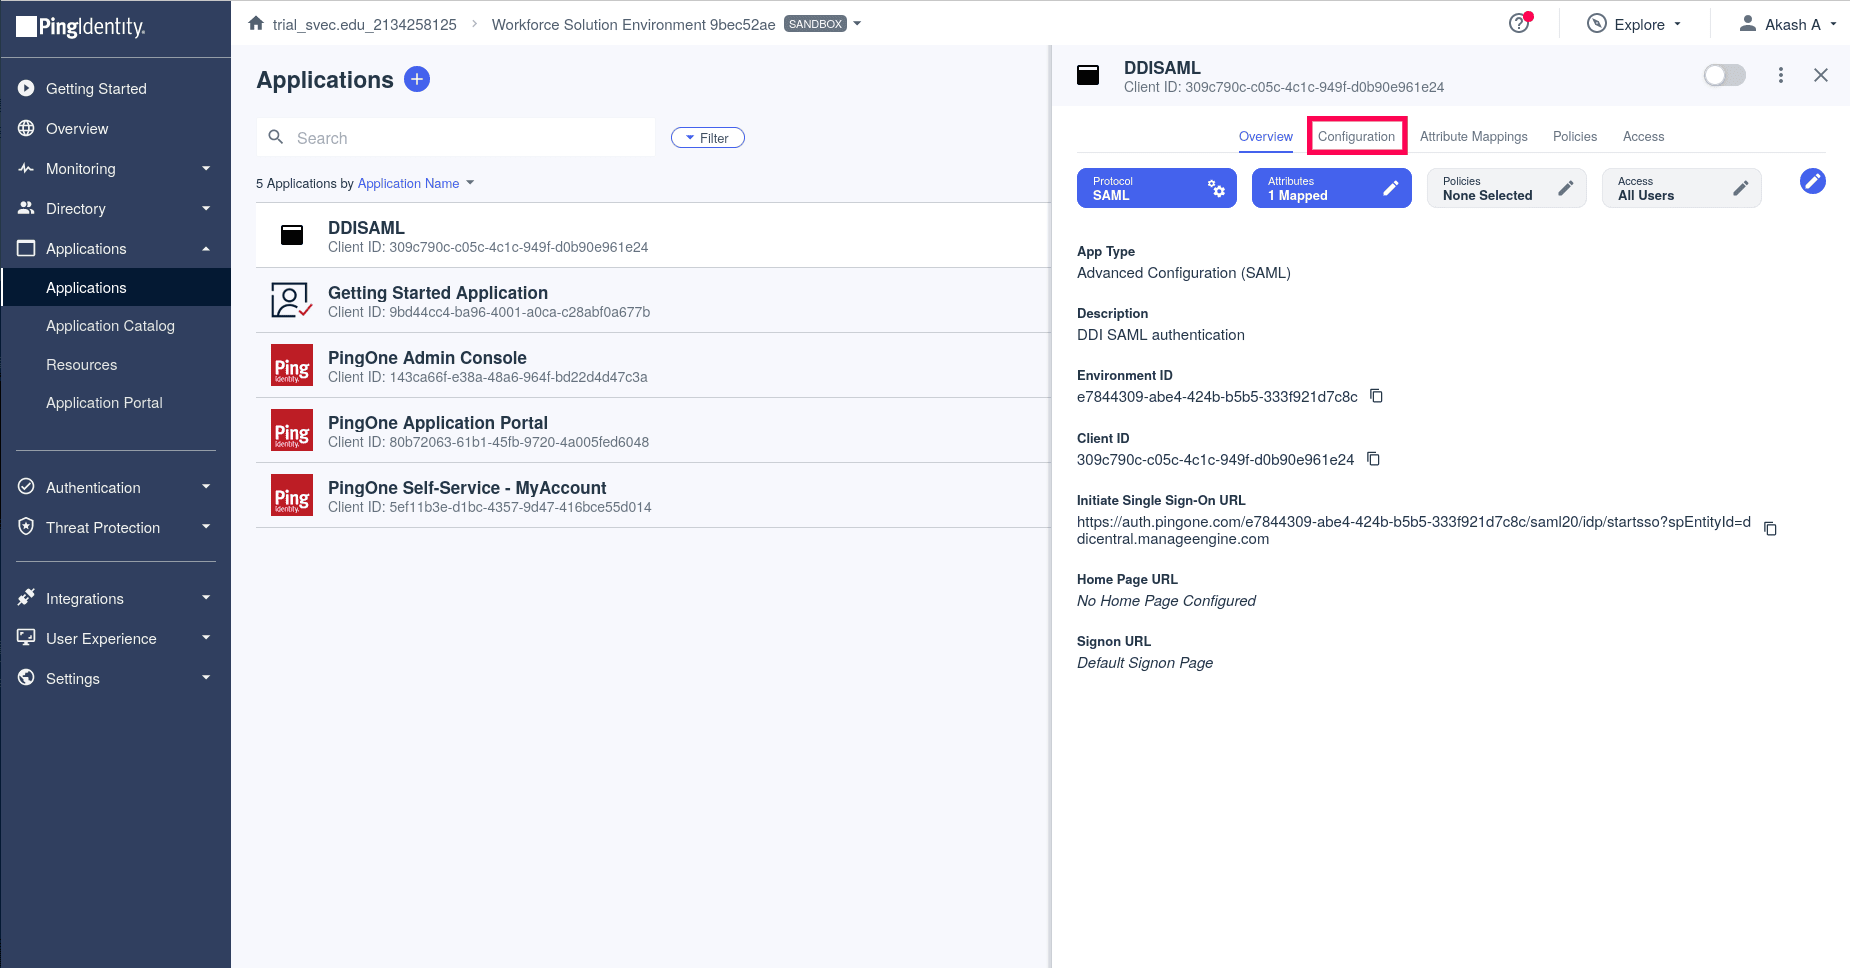
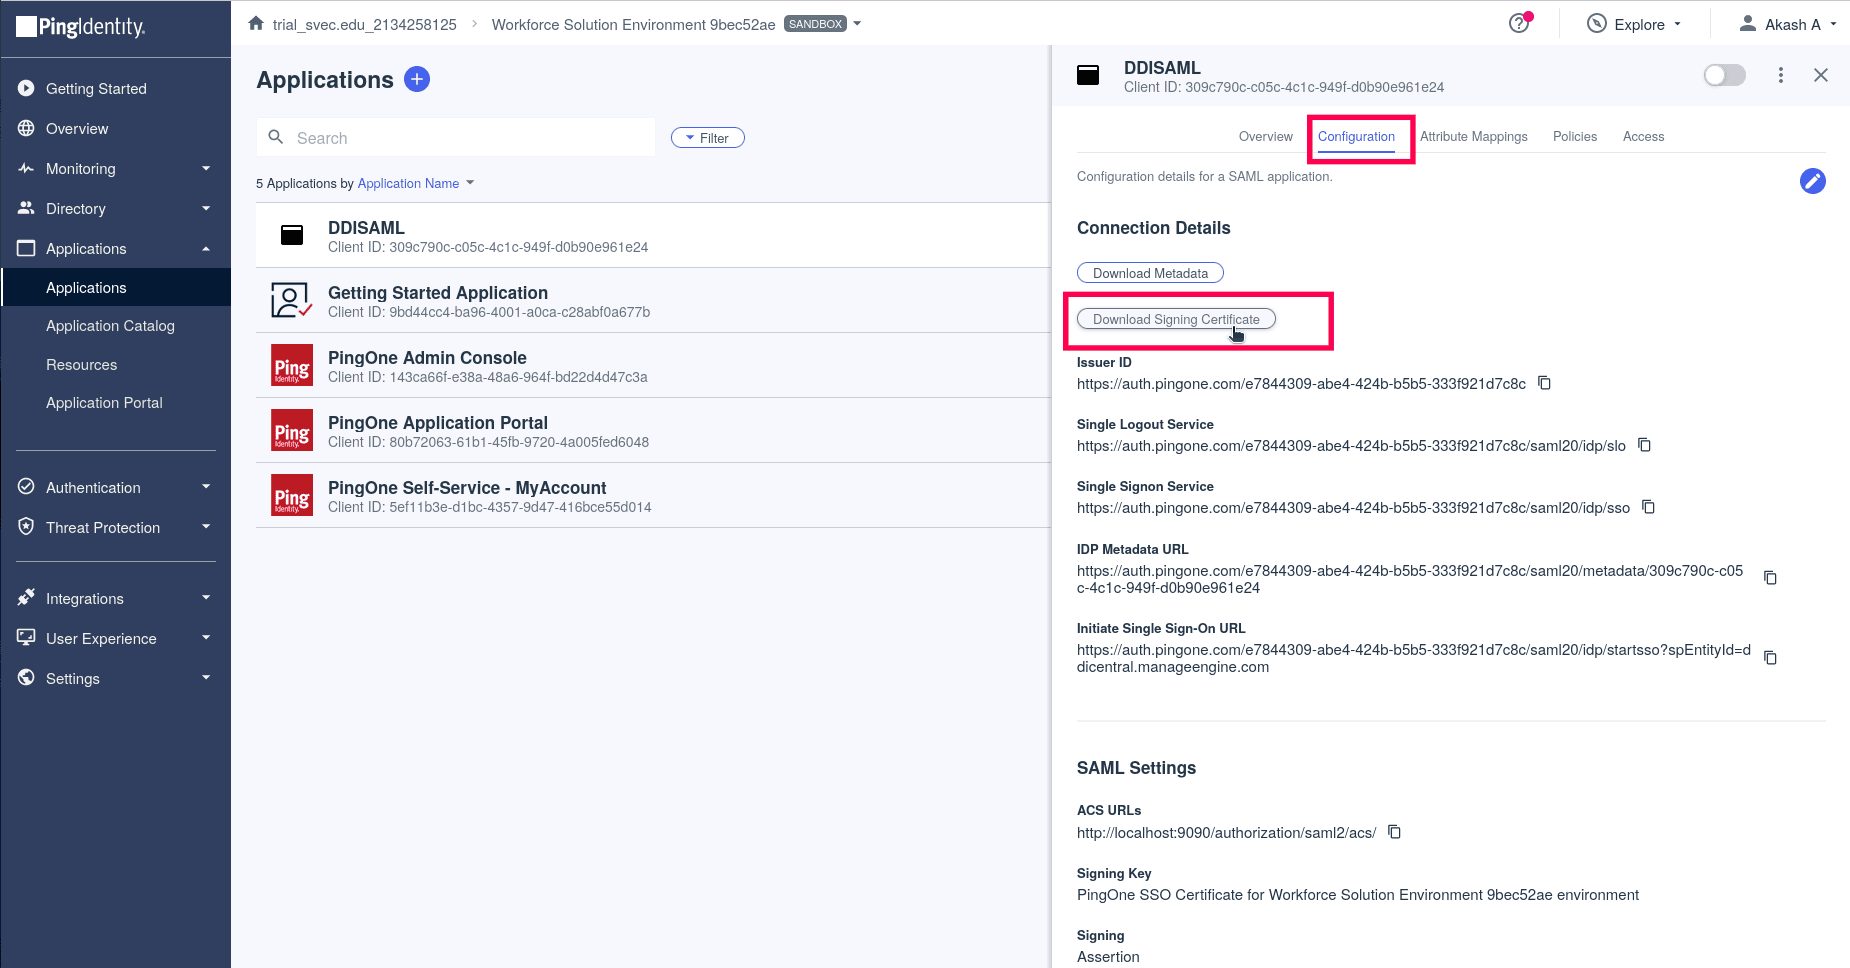
- You will be taken to your Application Page now. Navigate to the Configuration tab.
- Under the Connection Details section, Click on the Download Signing Certificate to download the certificate from Ping and subsequently upload the certificate in DDI Central.
Onelogin
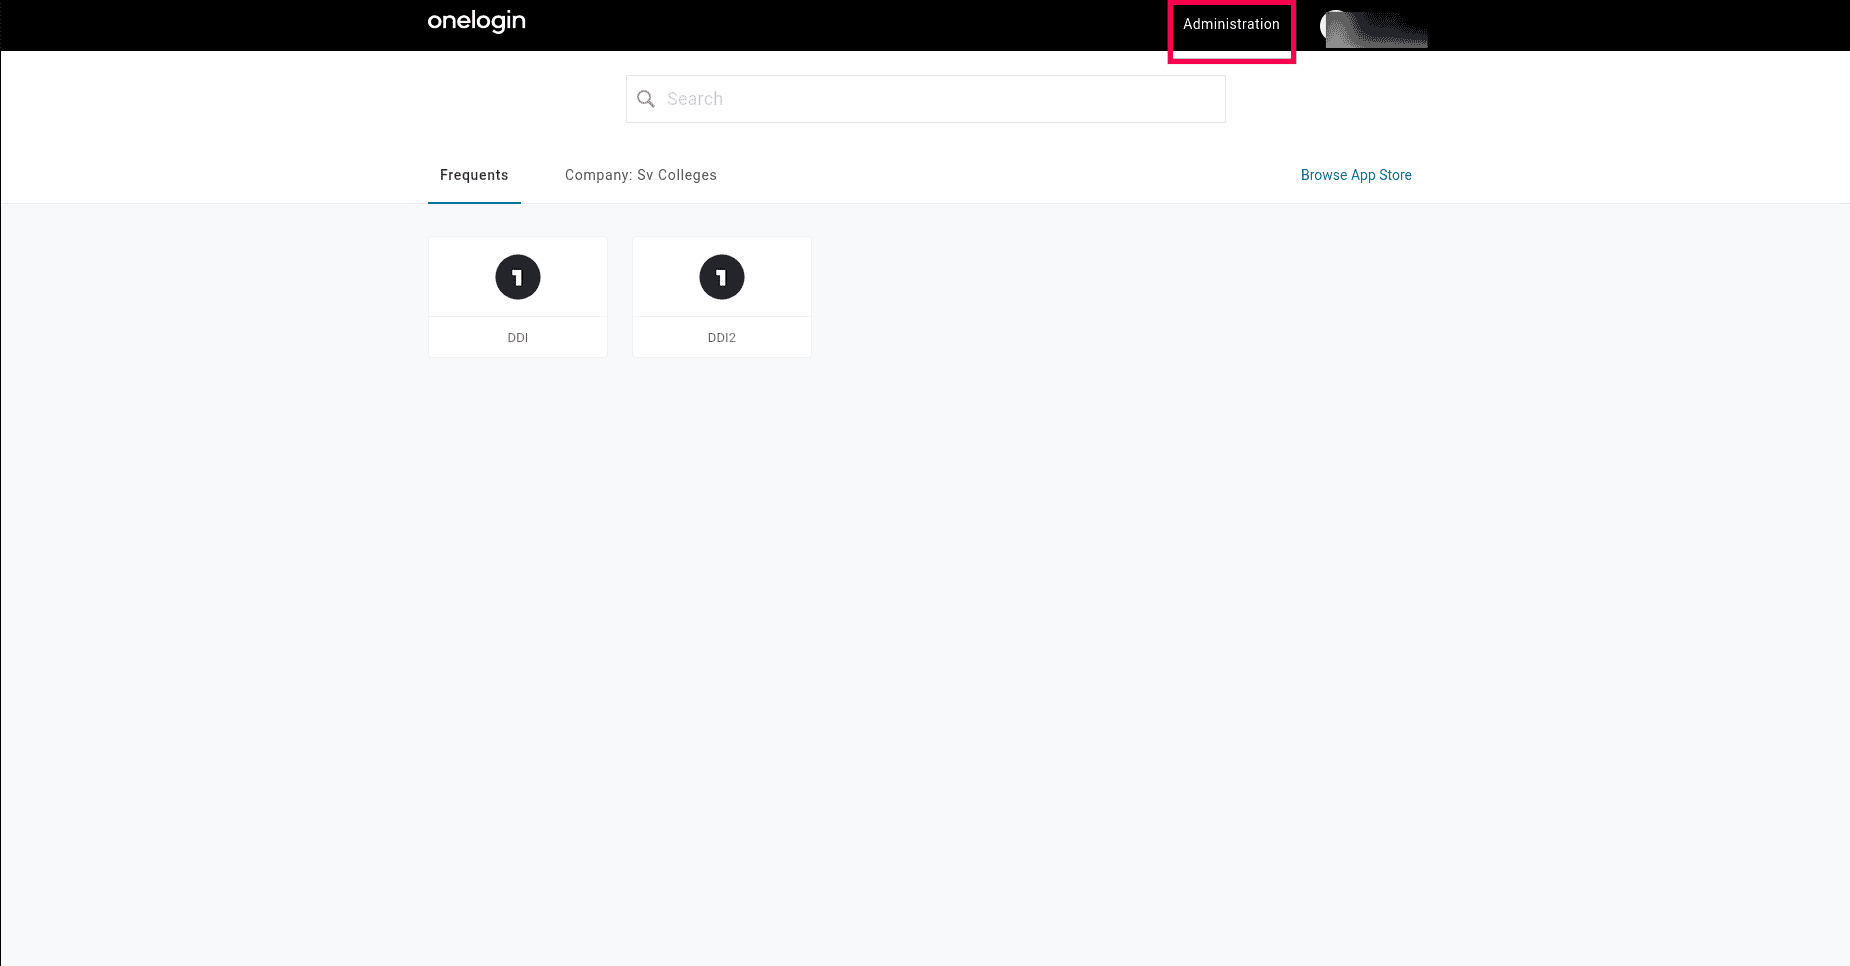
- Login to onelogin. Select the Administration menu at the top of the Onelogin Dashboard.
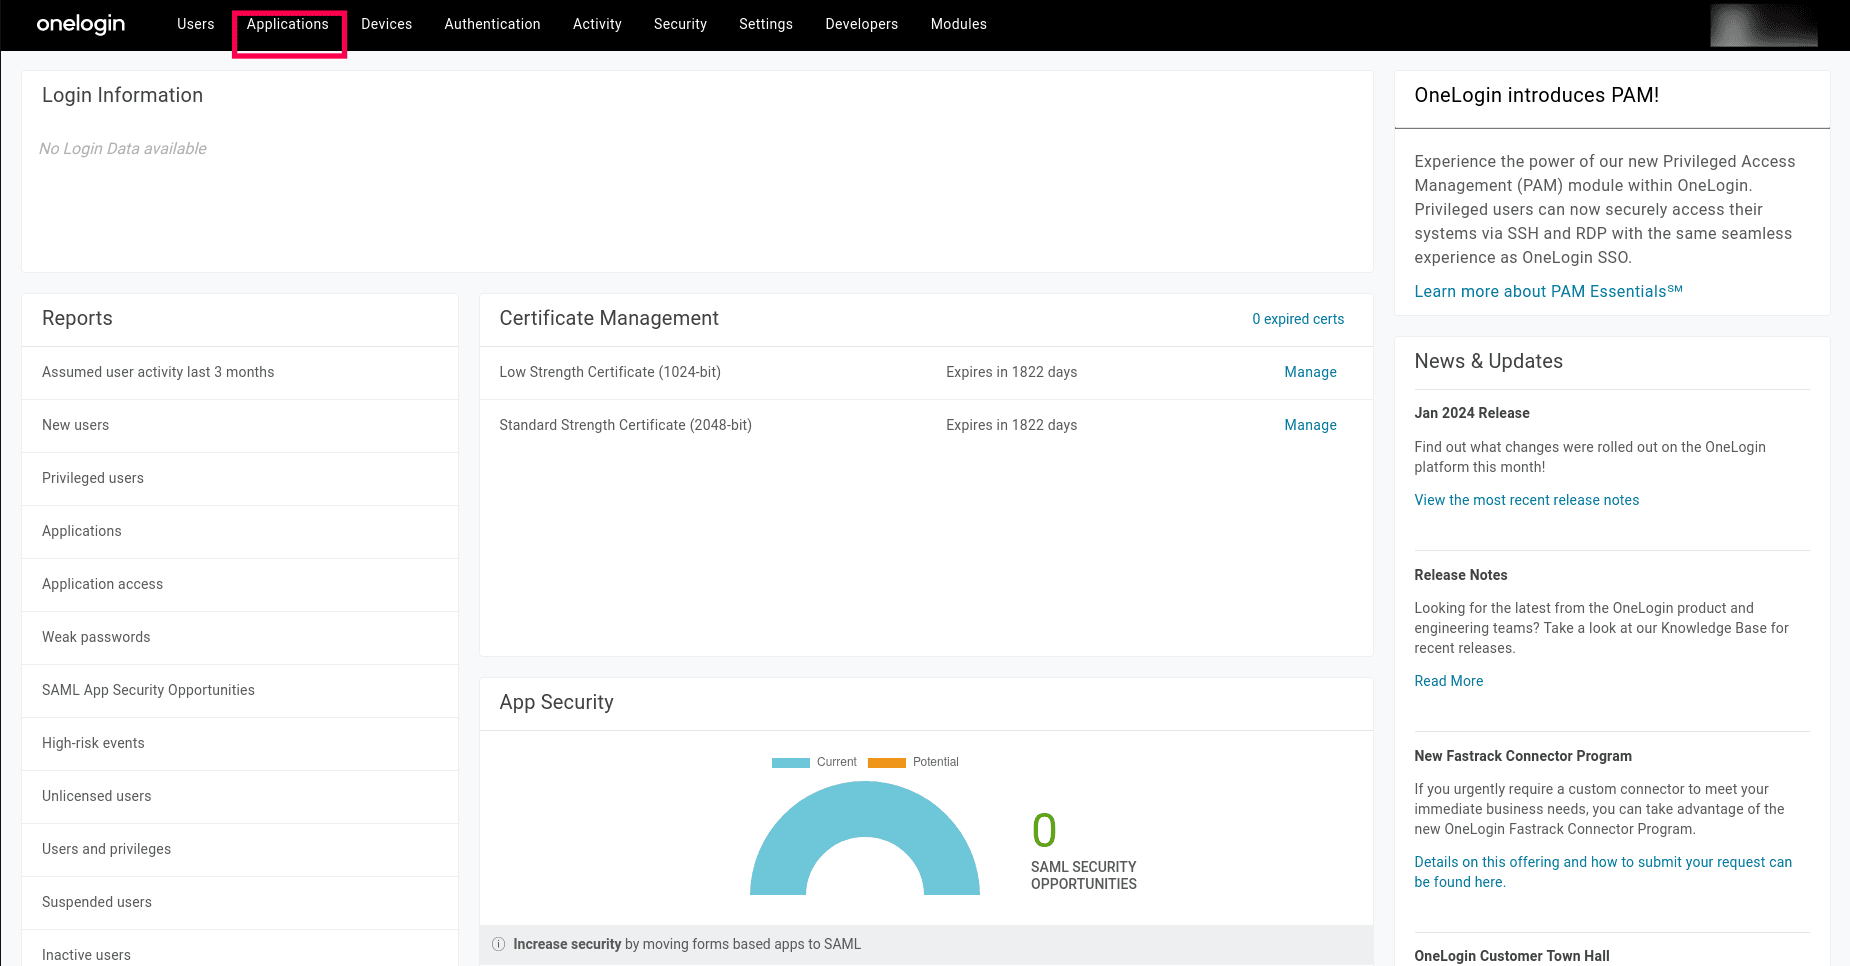
- Select the Applications menu.
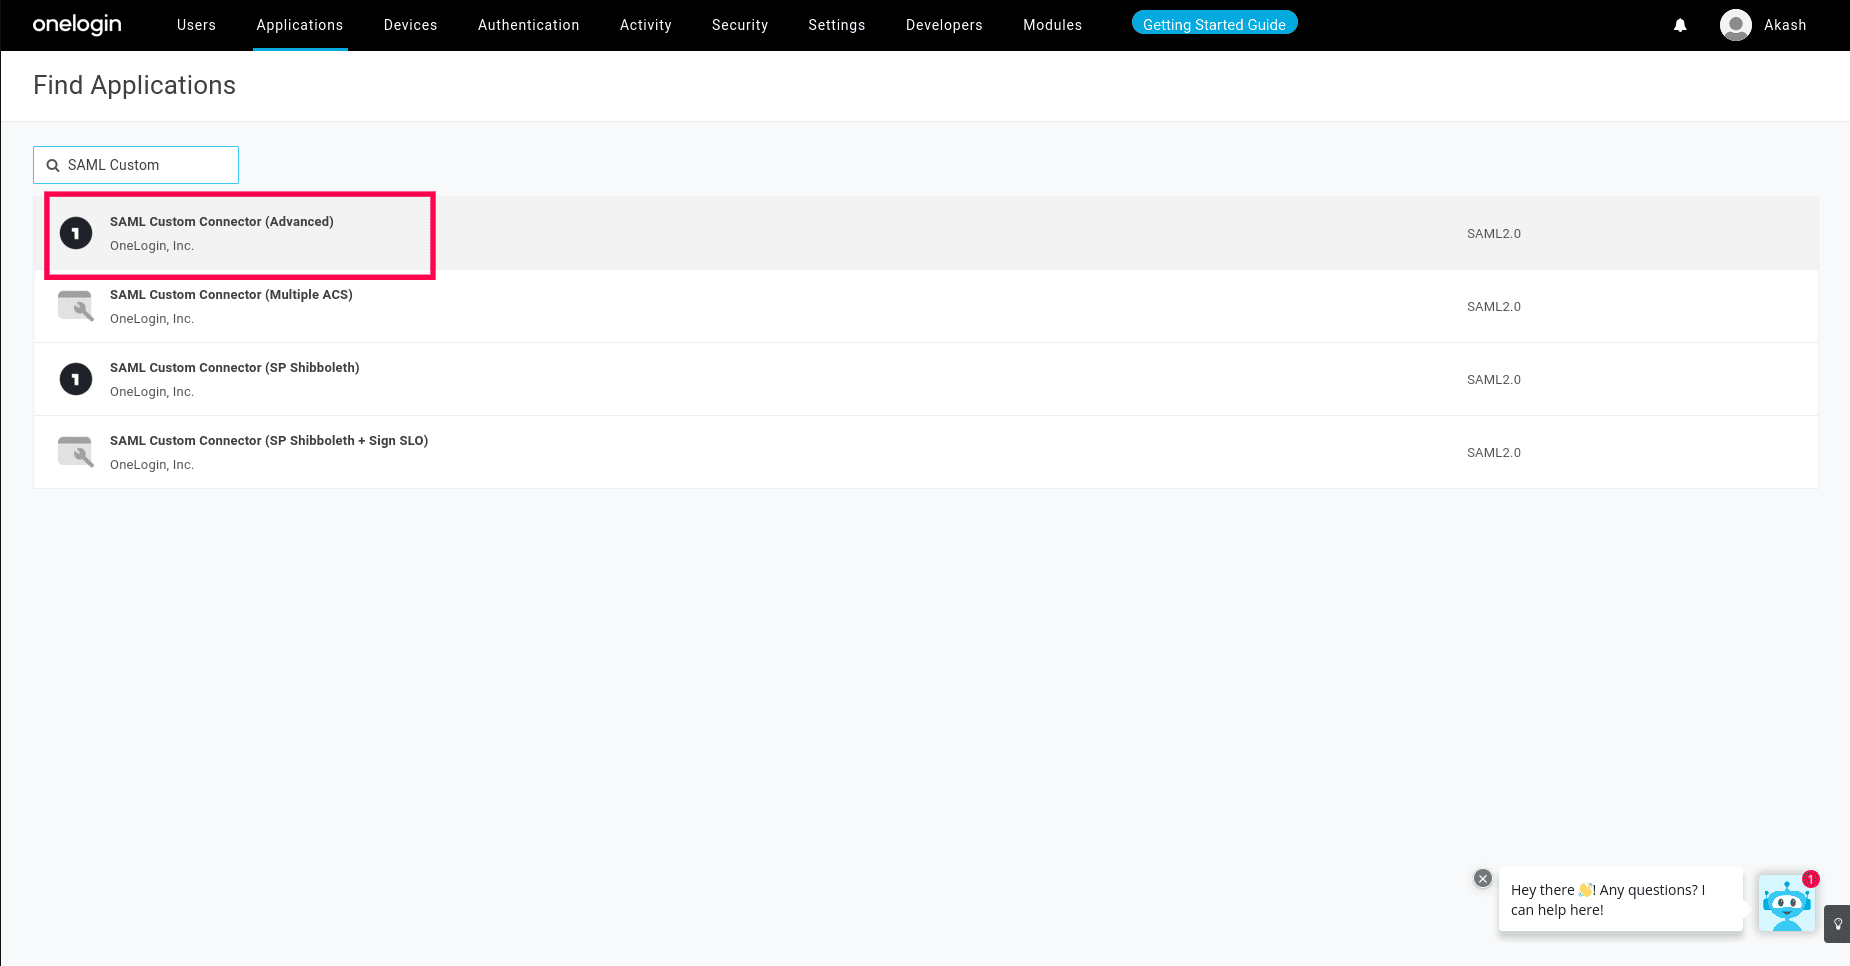
- Search for SAML Custom Connector (Advanced) application in the Applications page using the search bar and select it.
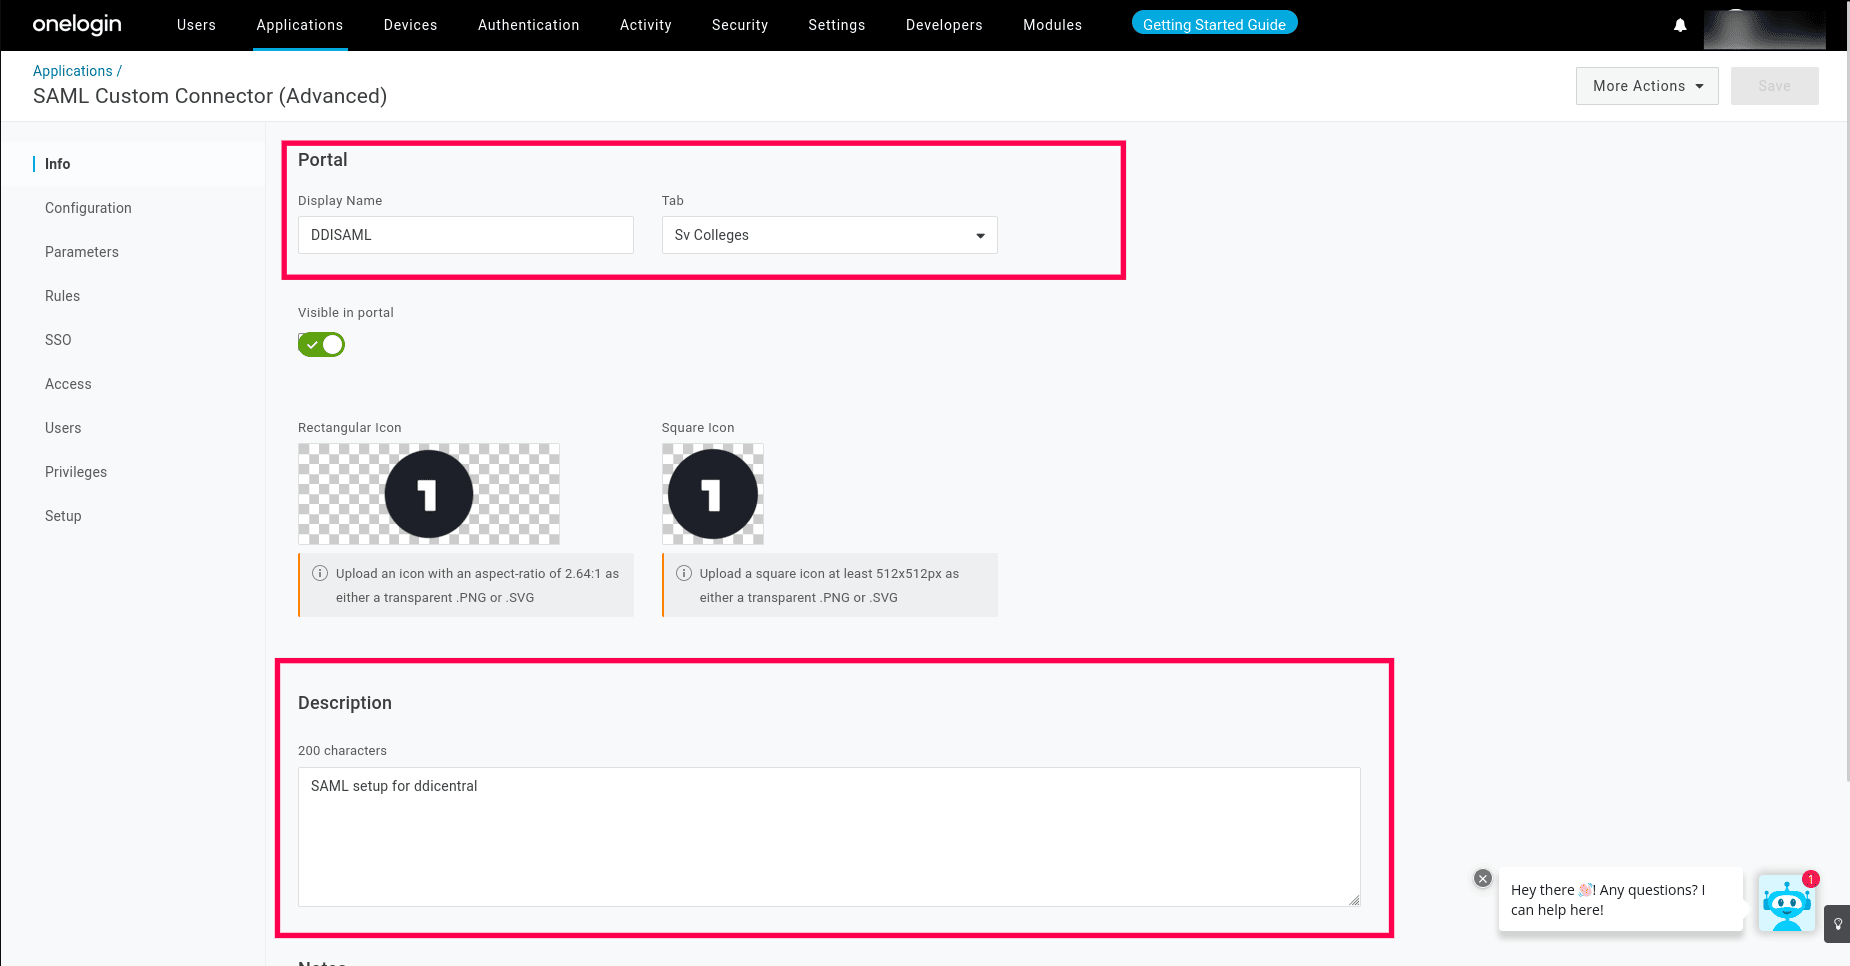
- On the SAML Custom Connector (Advanced) page, under the Info menu, Enter the Display name for DDI Central and select the tab under which it should be displayed. Enter a unique description for the app and click Save.
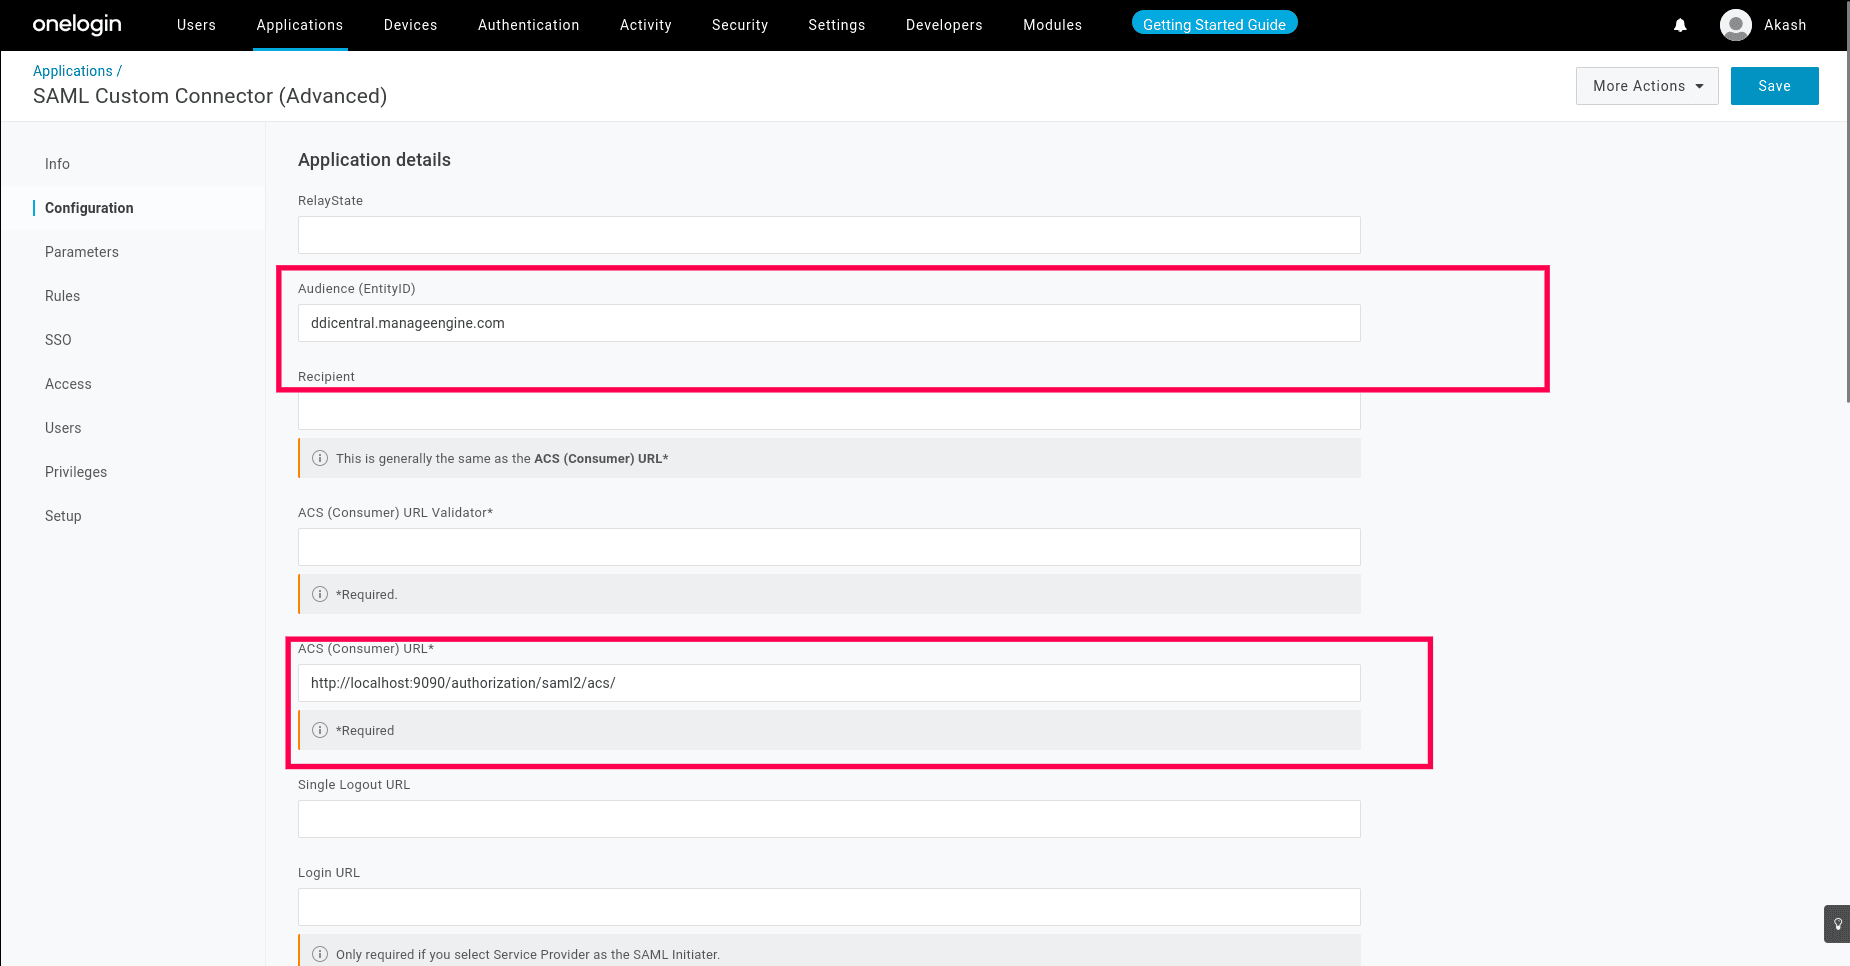
- As you proceed to the next menu Configuration, enter the Audience or Entity ID as ddicentral.manageengine.com
-
Note: This is a constant, and so we recommend not to change it.
- For the ACS URL enter the ACS url generated by DDI Central once you enable SAML and enter the without uploading the certificate.
- Select the SAML nameID format as Email.
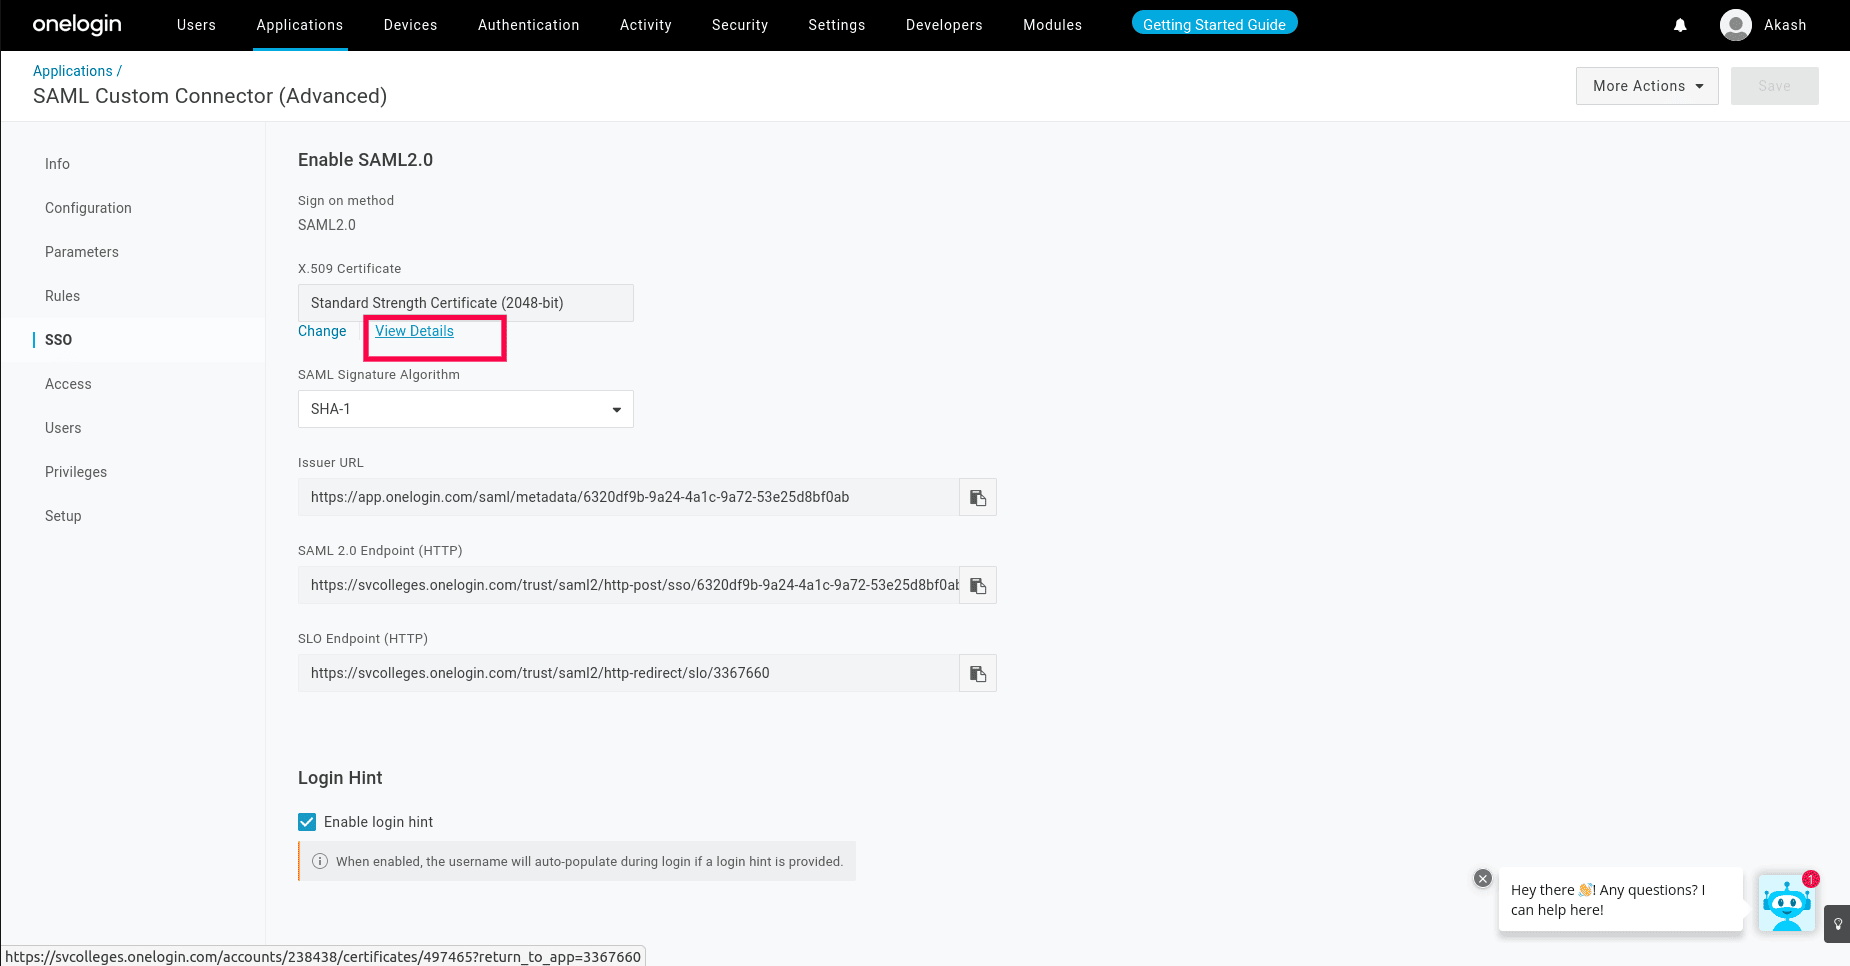
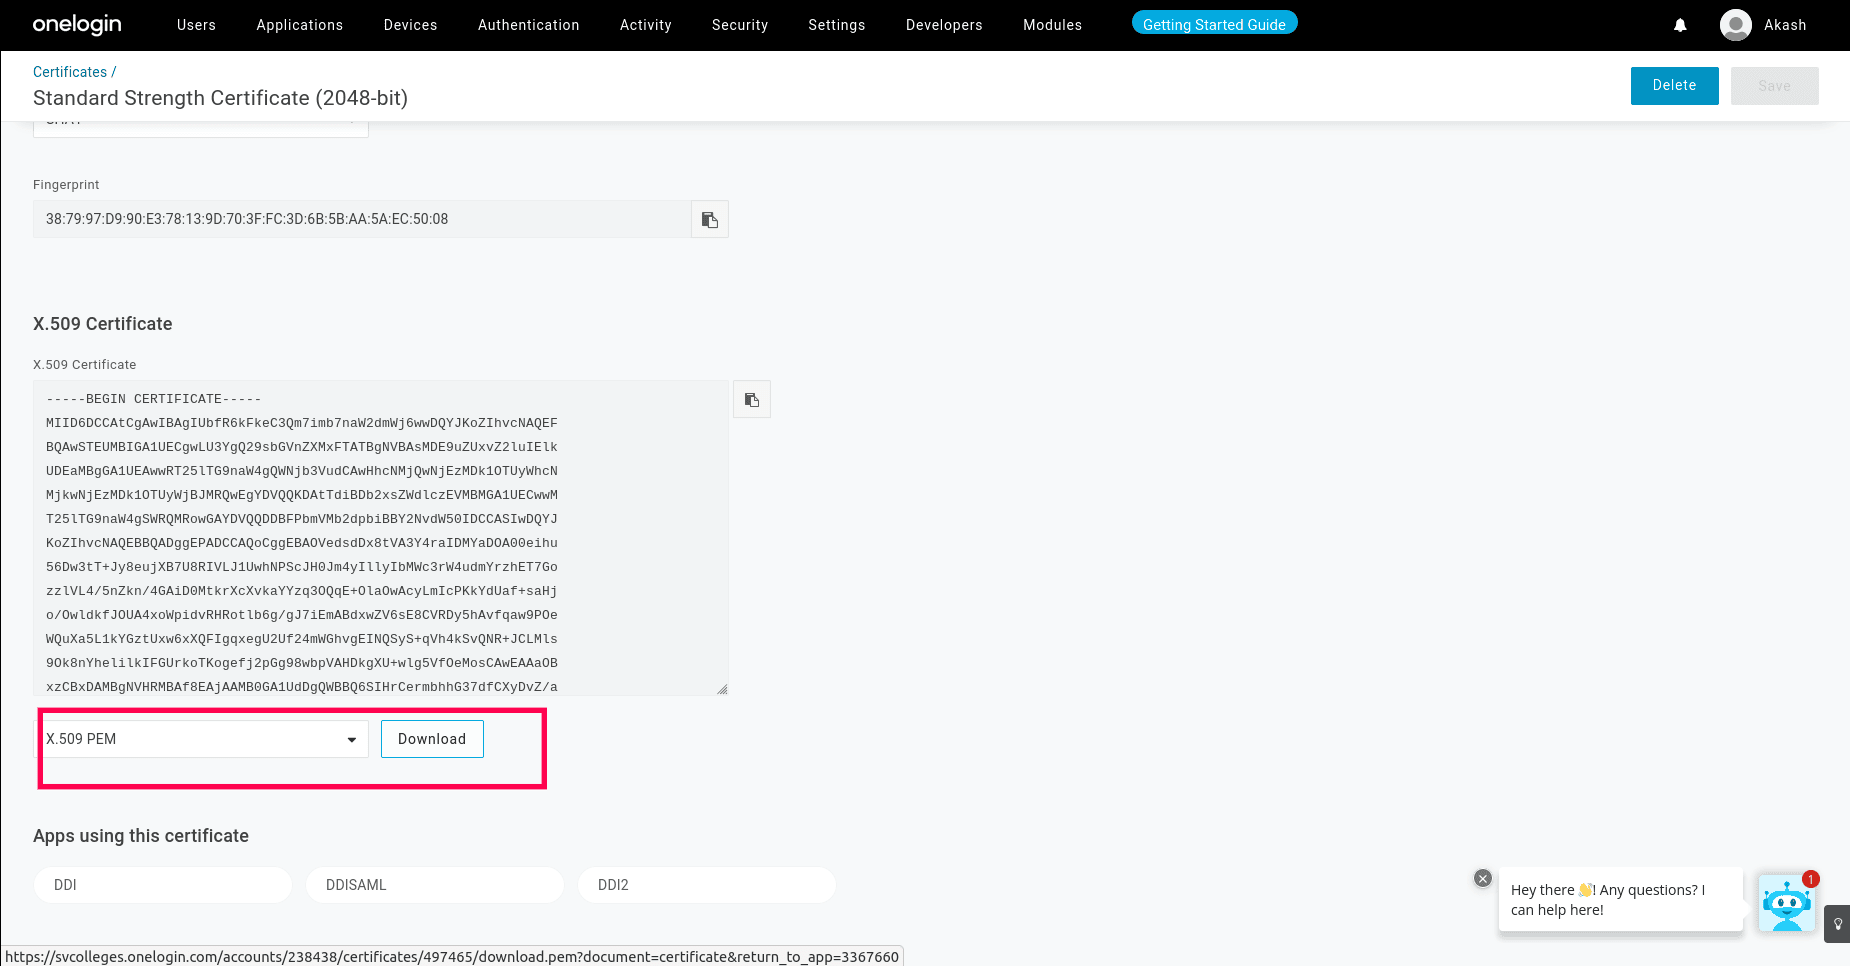
- Now navigate to the SSO menu, and click on the View Details link under the x.509 Certificate. This takes you to the Certificates page, where you can download the Certificate by hitting the Download button. Subsequently, make sure to upload the certificate in DDI Central.
- Get into the Settings module and select the SAML menu.
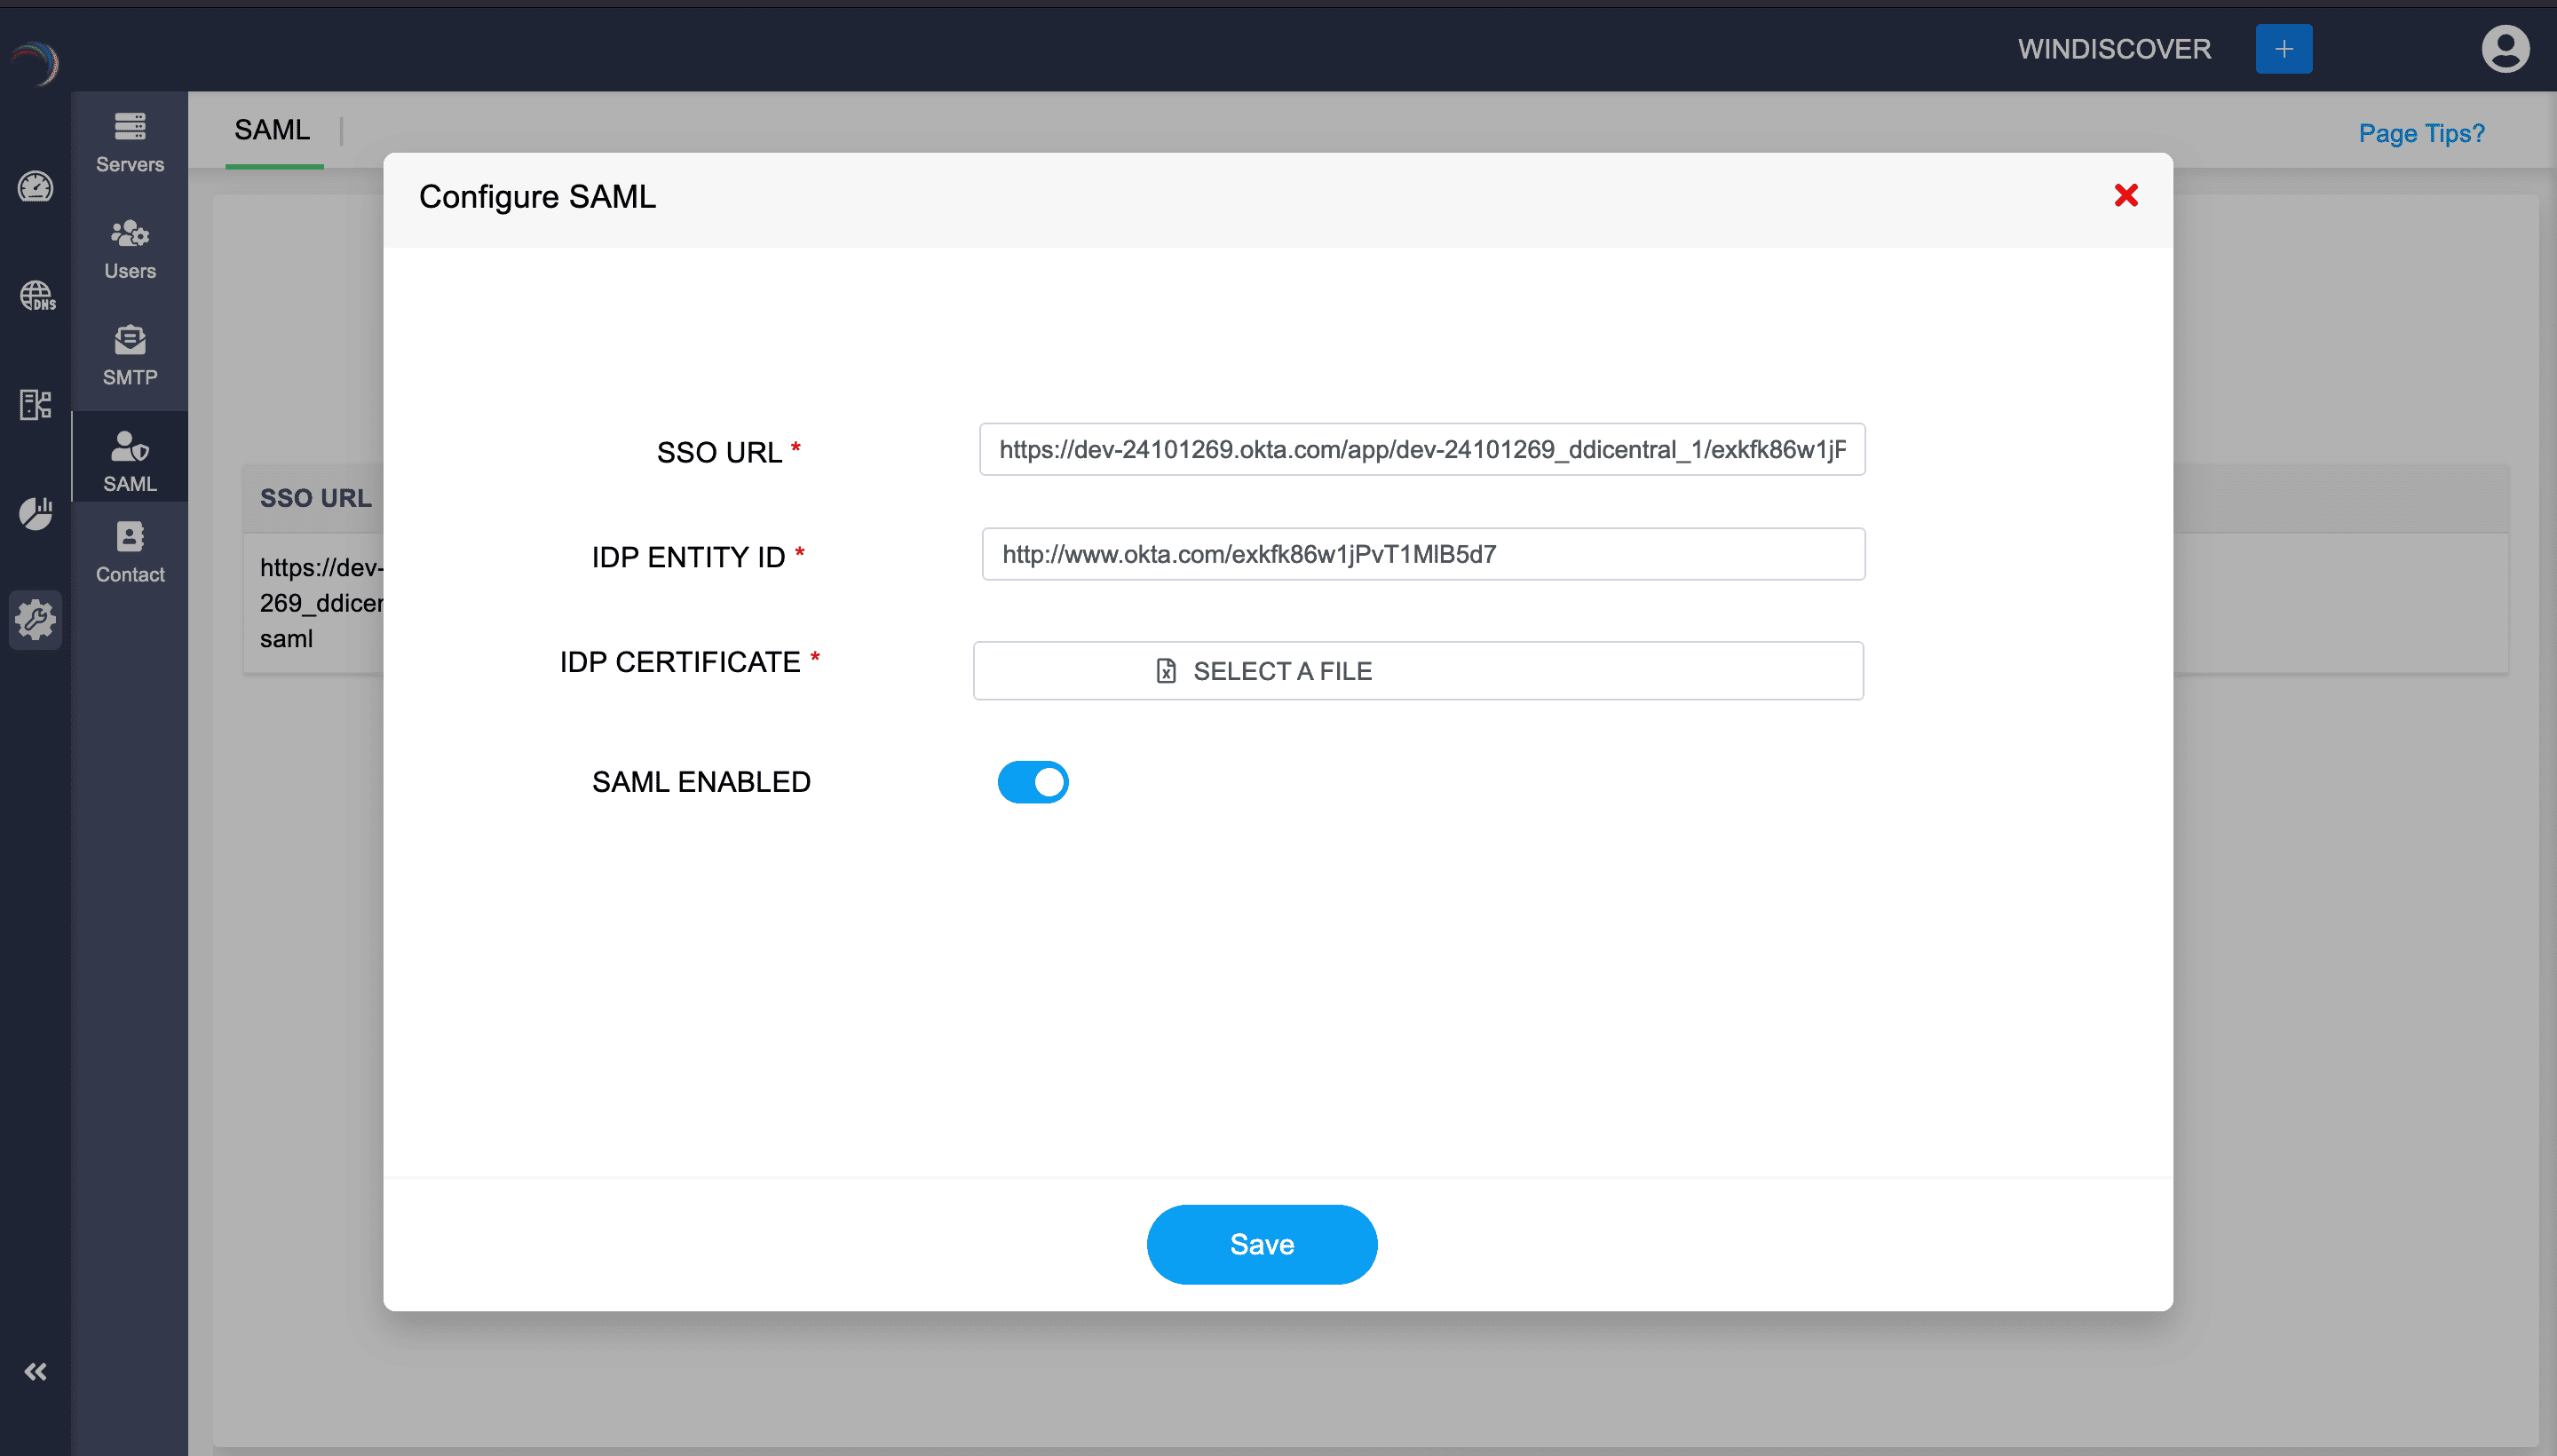
- Click on the Configure SAML button.
- On the Configure SAML form that appears, enter the following details:
- SSO URL (Single Sign-On URL): Enter the URL provided by the Identity Provider (IDP) for SSO. This URL is used by the DDI Central application to redirect users for authentication requests.
- IDP ENTITY ID (Identity Provider Entity ID): Enter the unique identifier for the IDP. This value is provided by the IDP and is used by the application to identify the IdP.
- IDP CERTIFICATE: Upload the certificate provided by the IDP. This certificate is used to validate the identity of the IDP and secure the communication between the DDI Central application and the IDP.
- SAML ENABLED: Toggle the switch to enable SAML authentication for the application. This activates the SAML configuration settings.
- Save Configuration: Once all the required fields are filled out and the certificate is uploaded, click the Save button to apply the SAML settings.
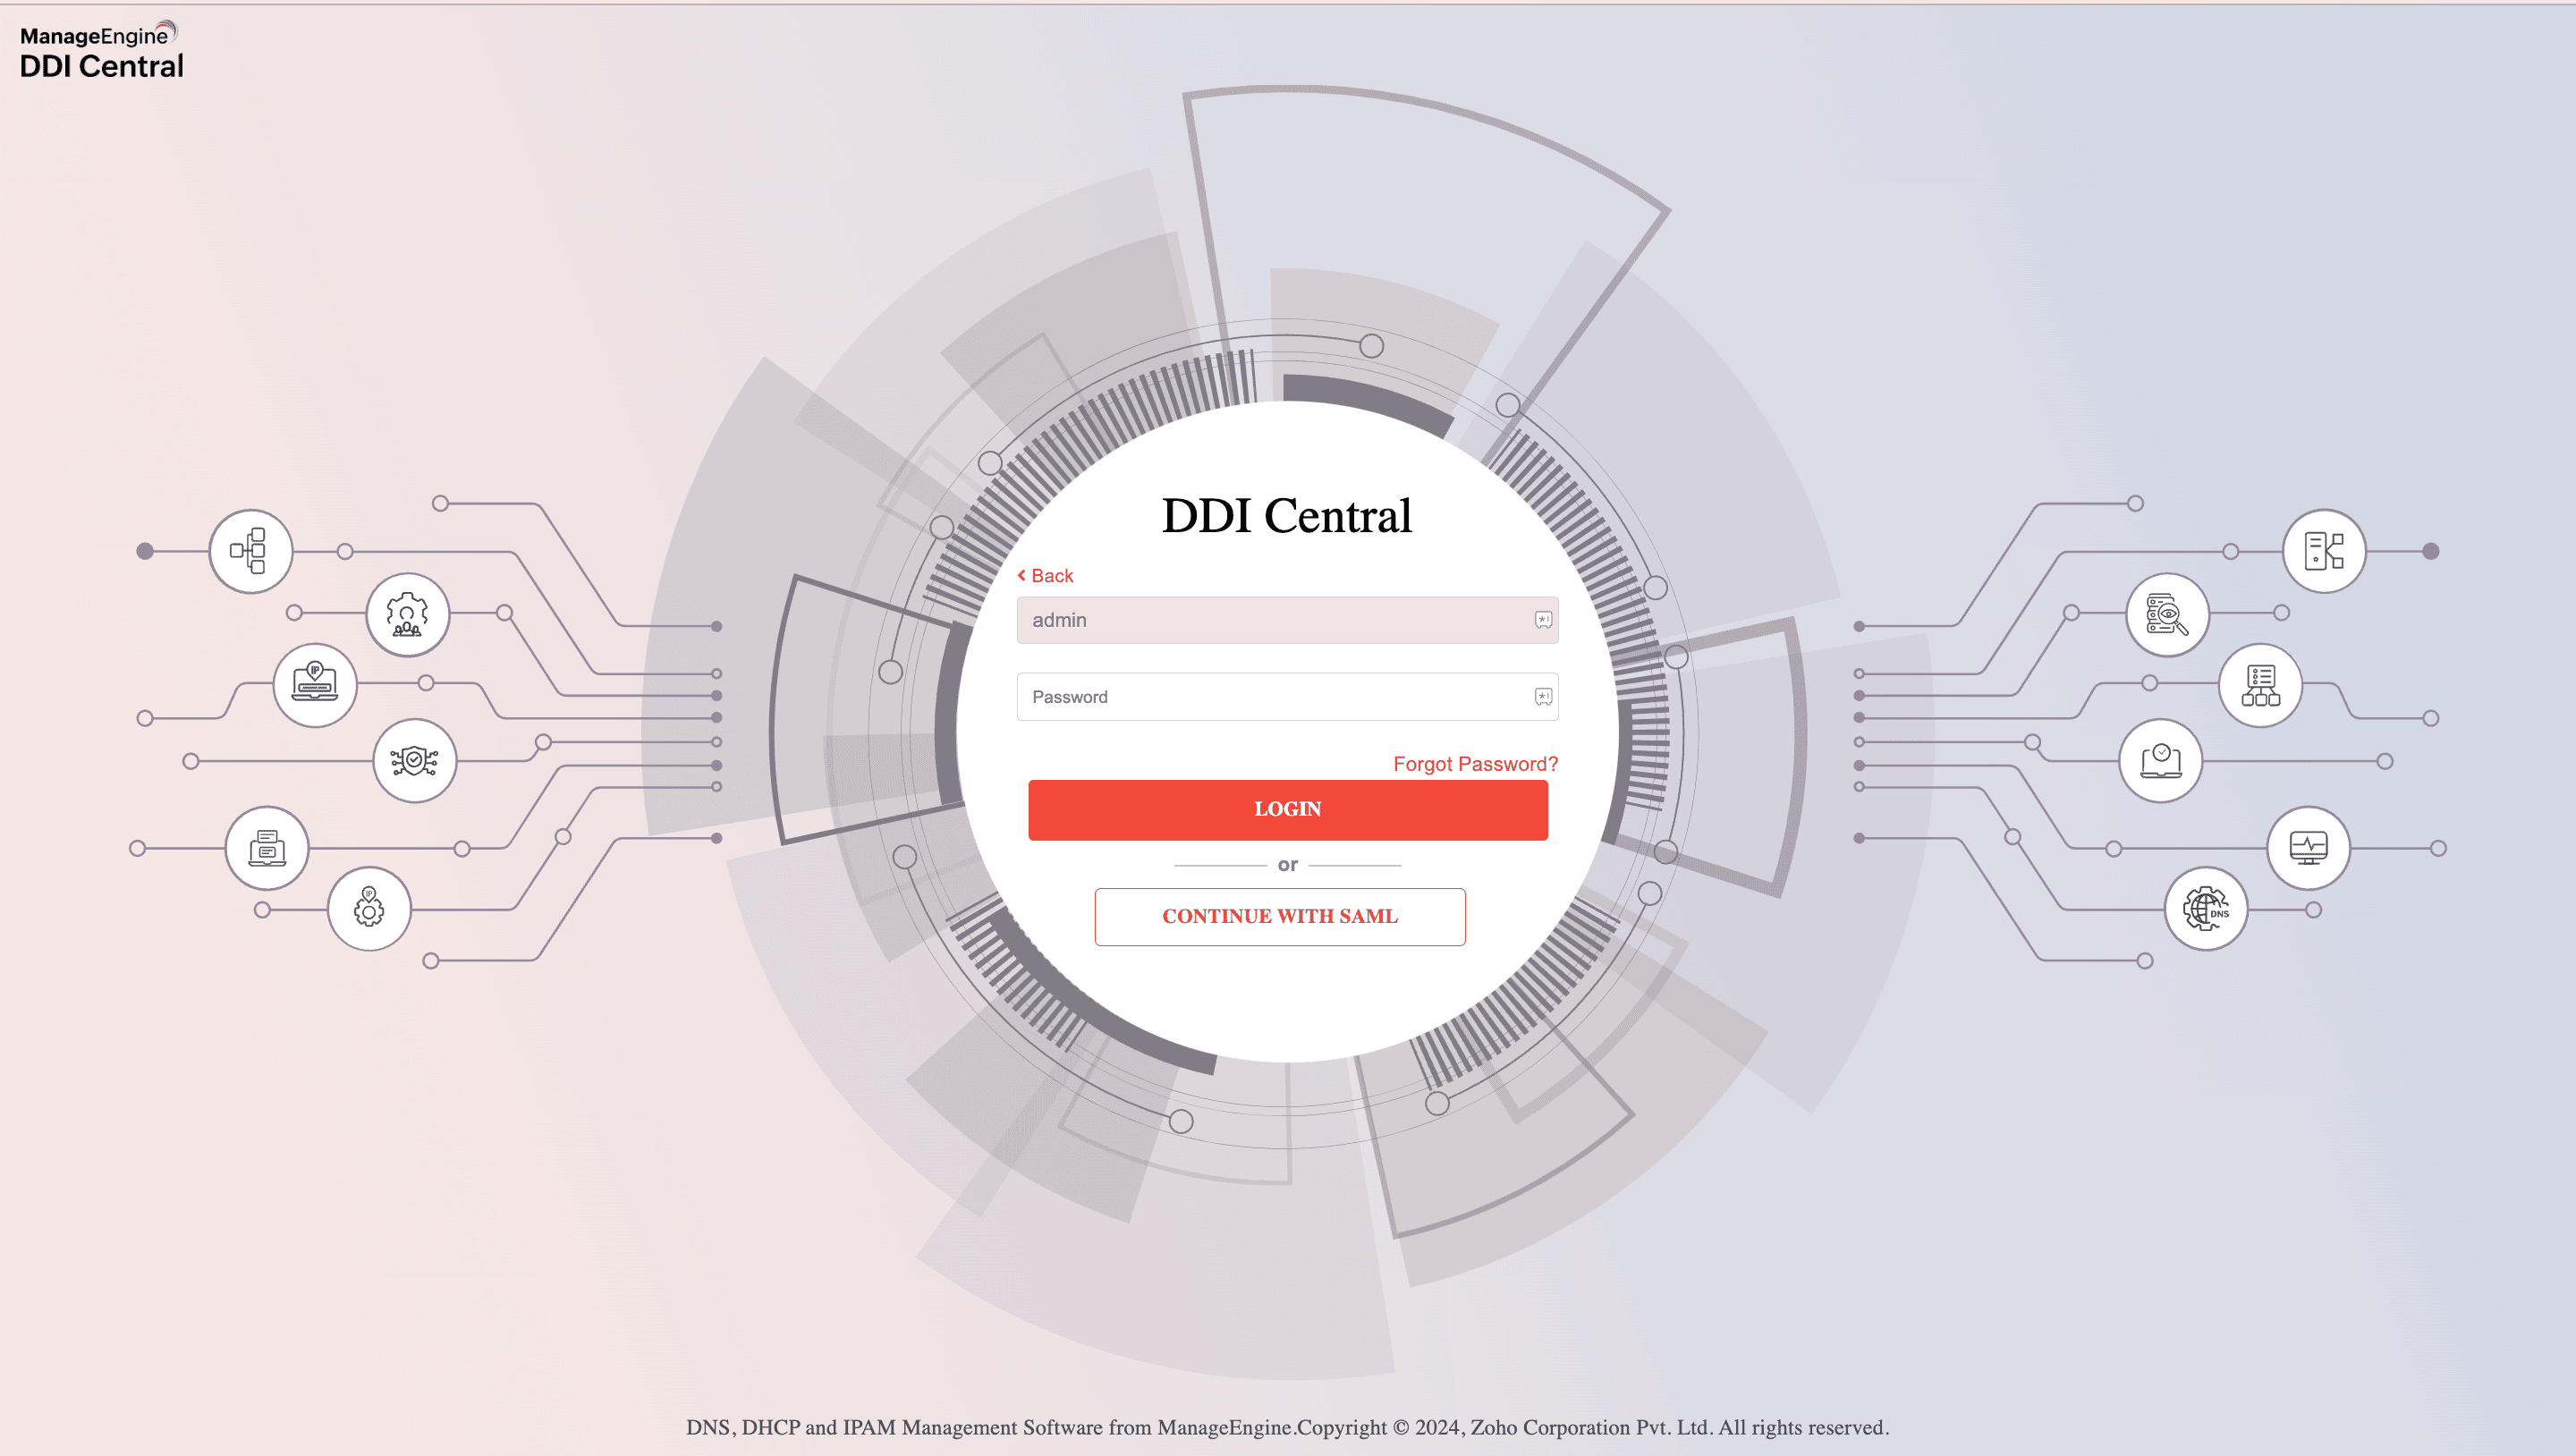
- Once SAML is enabled, you can refrain from entering TOTP or other credentials while accessing DDI Central and just proceed with SAML authentication.

Steps to configure SAML in DDI Central
Here's a step-by-step explanation of how SAML is configured using DDI Central:
This configuration process is typical for integrating SAML-based SSO with applications like DDI Central, ensuring that user identities are authenticated by a trusted IDP. Make sure the settings provided in DDI Central must match the IDP's configuration for successful integration.

New to ADSelfService Plus?
Related Articles
User Login Authentication: SAML
Configuring SAML in DDI Central What is SAML? SAML (Security Assertion Markup Language) is an open standard for exchanging authentication and authorization data between parties, specifically between an identity provider (IDP) and a service provider ...DDI Central for Microsoft DNS DHCP
About ManageEngine DDI Central DDI Central is a comprehensive network management solution that unifies DNS, DHCP, and IP Address Management (IPAM) to enhance operational efficiency and network stability. It is deployed as an overlay on your existing ...Configuring Endpoint Central in DDI Central
Configuring Endpoint Central in DDI central DDI central benefit administrators monitor and manage all the devices, patches and vulnerabilities by fetching and displaying the data from Endpoint central. In order to fetch the Endpoint Central, admins ...Configuring LDAP in DDI Central
Configuring LDAP in DDI Central What is LDAP authentication? Lightweight Directory Access Protocol (LDAP) is a core authentication protocol designed for directory services. Traditionally, LDAP has served as a database for storing information ...Configuring proxy server in DDI Central
Configuring proxy server in DDI Central Many enterprises place servers behind strict network firewalls. By configuring a forward proxy, you ensure that DDI Central can still reach critical internet services—like updates, cloud APIs, or external DNS ...