Procedure to upload local DB to Analytics Plus
The example in the following screenshot illustrates the connection settings for a MySQL database.

The following are the parameters that are to be given in database_connection_params.conf file:
| DBTYPE | Specify your local database type. e.g: MySQL, SQL Server, Oracle, Sybase etc.,. (Refer to the next section which contains the list of possible values) |
| HOSTNAME | Host name of your computer in which the database is running, i.e., the name of the computer where your database is running. |
| PORT | The port number used by the database server. (Refer to the next section to know the default port number for different databases). |
| USERNAME | Your local database login name. |
| PASSWORSD | Password for accessing your local database. |
| DBNAME | Your local database name from which the data is to be uploaded. |
| MDBFILENAME | In case you are going to upload data from MS Access database, then specify the complete path of MS Access database file name which contains the data. e.g., MDBFILENAME=C:MSACCESSmdbfiles est.mdb. |
| SQLITEFILENAME | In case you are going to upload data from SQLite database, then specify the complete path of SQLite database file name which contains the data. e.g., SQLITEFILENAME=C:SQLITEsqlitefilesSales-Database.db |
| FIREBIRDFILENAME | In case you are going to upload data from Firebird database, then specify the complete path of Firebird database file name which contains the data. e.g., FIREBIRDFILENAME=C:FIREBIRD irebirdfilesmydb.fdb |
The database_sql_queries.xml file located under <Uploadtool>\conf\ folder, contains all the settings related to the SQL SELECT Queries that are to be executed in the database for fetching the required data, along with settings about the Analytics Plus database and table names into which the data is to be uploaded. To fetch data from your relational databases, you need to specify SQL SELECT query. These queries will be executed by the upload tool in your local database to fetch the necessary records and upload the same into Analytics Plus according to the settings provided.
You can provide any number of SQL SELECT queries to execute. Each query is to be provided in a <Query> <Query> XML element. Multiple queries can be grouped within the <Queries> <Queries> element.
The following screenshot illustrates a sample SQL SELECT queries in the database_sql_queries.xml file.

The above illustrated queries will fetch data from two tables and import the same into Analytics Plus reporting database ReportsDBName1.
Data from the local_db_table1 will be appended into ReportsTableName1 in Analytics Plus. And data from local_db_table2, where the employee number is less than 1000, will replace the existing data inReportsTableName2.
The following is the SQL SELECT query format to be followed to fetch data from your relational database.
<Query dbname="Analytics_Plus_dbname" tablename="Analytics_Plustablename" importtype="APPEND / TRUNCATEADD / UPDATEADD" matchingcols="matching_cols_for_updateadd" selectcols="columns_to_import_from_csv" skiptop="number_of_rows_to_be_skipped"batchsize="number of lines to send per request" queuesize="number of temporary files can be created at a time">sql_query_ to_be_executed</Query>
Make sure that the 'dbname' mentioned in the query is already created in Analytics Plus.
Save the file once the queries and details are updated.
4. Execute the Uploadfromdb:
Once both the files are updated, Open a Command prompt and access the location <Uploadtool>\bin\.
Execute the batch file UploadFromDB.bat with the below parameters.
Example: <UploadTool>\AnalyticsPlus\UploadTool>UploadFromDB.bat localhost 443 XXXXXX@zohocorp.com admin123
"Usage : UploadFromDB.bat [Analyticsplus-host] [Analyticsplus-port] [userEmailAddress] [<-A authtoken>/<password>] [-D dbowner]""Example:"""" UploadFromDB.bat <Analyticsplus-host> <Analyticsplus-port> <userEmailAddress> <password>"" UploadFromDB.bat <Analyticsplus-host> <Analyticsplus-port> <userEmailAddress> <password> -D <dbowner>" (If uploading to a shared DB, provide DB owners email ID under 'dbowner')" UploadFromDB.bat <Analyticsplus-host> <Analyticsplus-port> <userEmailAddress> -A <authtoken>"" UploadFromDB.bat <Analyticsplus-host> <Analyticsplus-port> <userEmailAddress> -A <authtoken> -D <dbowner>"
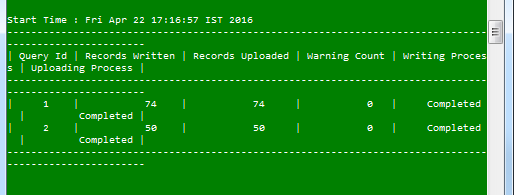
Once the above batch file is executed, the data will be fetched from local database and will be uploaded to Analytics Plus DB and will be shown a success message as below.
Note: For each DB type the parameters updated in the database_connection_params.conf, differs. Please refer this link to get the right set of parameters.

New to ADSelfService Plus?
Related Articles
Analytics Plus Inventory
Aim: To have the detailed list of all the Reports, Databases created in Analytics Open Local & Cloud Databases and fill the entries password = Postgres and if any error occurs stating something like "check the DB connection" change the Port to ...Move Analytics Plus from one Server/folder
Go to Start --> Services.msc and stop the ManageEngine Analytics Plus service. Take a backup of the entire <Analytics Plus_Home> directory and then move it to the new server. On the new server, navigate to (similar path) <Analytics Plus_Home>\bin ...TRUNCATEADD not deleting existing rows in DB import
Issue: when 0 records are imported with 'delete and add records' chosen, the old entries in Analytics table is not getting removed. (DB import) Builds identified: 4300, 4310, 4350 Description: The problem with the table not removing the old entries ...Steps to enable Google Analytics Connector
1. Stop the Analytics Plus services. 2. Modify the entry under <Analytics Plus home>/reports/conf/app.properties show.create.google.analytics.view=true Note: If the above property is missing, add them. By default the value will be set to 'false' 3. ...How do I create and upload Analytics Plus log file to support team?
Logs are collected for detailed analysis which doesn't hold up personal info. So, it is completely safe to generate one and upload. Here is how you can generate a log and upload it to the support team 1. Click on help and choose "Product info" 2. ...