How to skip manual enrollment and allow users to perform self service operation?
This article describes the process to allow users to perform self service password reset and account unlock on ADSelfService Plus without going through the manual enrollment process.
Supported MFA providers
The following authenticators do not require users to enroll with ADSelfService Plus
1. Email-based verification code: If the method is configured to use the email ID attribute value in AD, users don't have to enroll.
2. SMS-based verification code: If the method is configured to use the SMS attribute value in AD, users don't have to enroll.
3. SAML Authentication: When SAML Authentication is enabled, users are directly redirected to their identity provider's (IdP) login URL for authentication and redirected to ADSelfService Plus post-successful authentication.
Steps to configure MFA for self-service password reset and account unlock
A. Email-based and SMS-based verification code
Prerequisites
1. Users must have a valid email address or mobile number saved in Active Directory user properties.
2. Ensure that mail and SMS server settings are properly configured and the test email or SMS is working.
Configuration steps
1. Go to Self-Service > Multi-Factor Authentication > Authenticators Setup.
From the list of authenticators, select Email Verification and SMS Verification.
- For Email Verification, in the Select Type drop-down, choose MFA for Password Reset & Account Unlock and enter Subject and Message of the verification code email to be sent.
- For SMS Verification, in the Select Type drop-down, choose MFA for Password Reset & Account Unlock and enter the Message of the verification code SMS to be sent.
2. Select a policy from the Choose the Policy drop-down. This will determine which authentication methods are enabled for which sets of users.

Note: ADSelfService Plus allows you to create OU and group-based policies. To create a policy, go to Configuration → Self-Service → Policy Configuration → Add New Policy. Click Select OUs/Groups, and make the selection based on your requirements. You need to select at least one self-service feature. Finally, click Save Policy.
3. In the MFA for Password Reset/Account Unlock section, enter the number of authentication methods to be enforced, and select the authentication methods to be used. Ensure that only the configured authenticators are enabled.
4. Click Advanced. In the Advanced pop-up that appears, select the Verification Code tab.
5. Under Mail/Mobile Attributes, use the Select Type drop-down to select either Mail or Mobile. By default the mail attribute and mobile attributes are selected by default for the email ID and mobile number respectively.
6. If any other attribute has to be used for these values, click on Add Attributes, and enter the AD attribute name and click on the checkmark icon.
7. Enable the advanced settings under the Secondary Email/Mobile Number and the Others sections according to your requirements.
8. Click OK.
9. Back in the MFA for Reset/Unlock tab, click Save Settings.
B. For SAML Authentication
Prerequisites
1. SAML Authentication is an Advanced Authenticator available as part of the Professional edition of ADSelfService Plus.
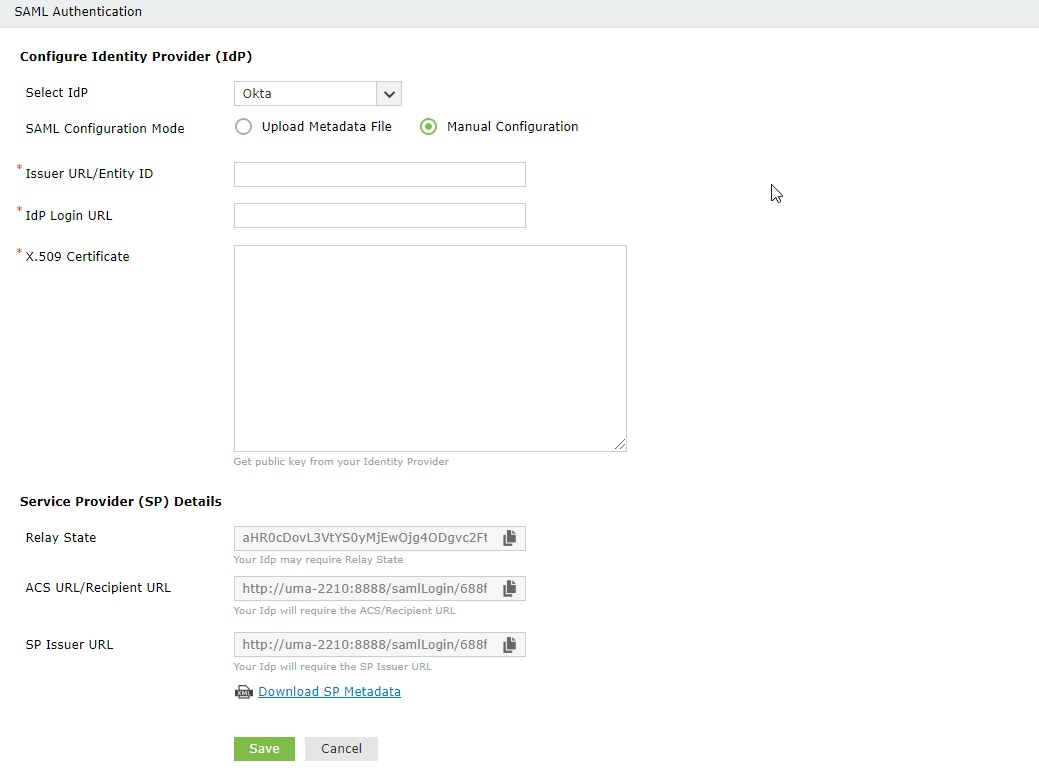
2. Log in to ADSelfService Plus web console as an administrator. Navigate to Configuration tab > Self-Service > Multi-factor Authentication > Authenticators Setup > SAML authentication. Click the copy icon in the ACS URL/ Recipient URL and the Relay State fields to copy the values.
3. Use the values to configure ADSelfService Plus in the Identity Provider application.
4. Next, either download the Metadata in XML format, or get the required data by copying the Issuer URL/Entity ID, IdP Login URL, and the X509-certificate from the IdP application.
Configuration steps
1. Log in to ADSelfService Plus web console with admin credentials.
2. Navigate to Configuration tab → Self-Service → Multi-factor Authentication → Authenticators Setup.
3. Click SAML Authentication section.
4. Choose an IdP from the drop-down list.
5. There are two SAML Config Modes: Upload Metadata File and Manual Configuration.
i. Select Upload Metadata File to manually upload the IdP metadata file downloaded from the identity provider (Refer to step 4 of Prerequisite).
a. Click Browse to upload the IdP metadata file.
ii. Select Manual Configuration to manually configure the URLs and certificates.
a. Enter the Issuer URL/Entity ID URL obtained from the identity provider in the respective field. (Refer to step 4 of Prerequisite).
b. In the IdP Login URL, enter the login URL obtained from the identity provider (Refer to step 4 of Prerequisite).
c. In the space provided for X.509-Certificate, enter the public certificate key fetched from the identity provider (Refer to step 4 of Prerequisite).

Note: The X.509-Certificate begins with '-----BEGIN CERTIFICATE-----', and ends with '-----END CERTIFICATE-----'. If this pattern--though default in most cases--is absent, you'll need to manually add it to the file.


Important:
- By default, ADSelfService Plus utilizes the same SAML authentication configuration for multi-factor authentication during password self-service and single sign-on (SSO) during login. This means that the MFA SAML configurations will automatically be reflected on the logon SSO settings, if the latter is enabled.
- When you select the Create a new SAML SSO checkbox, you can maintain a separate SAML configuration for multi-factor authentication by generating a new ACS URL/Recipient URL and SP Metadata file. Use the newly generated ACS URL/Recipient URL or the SP Metadata file to create a new SAML configuration for ADSelfService Plus in your identity provider.
- Click Save, and the new ACS/Recipient URL will be generated.
- Copy the Relay State value.
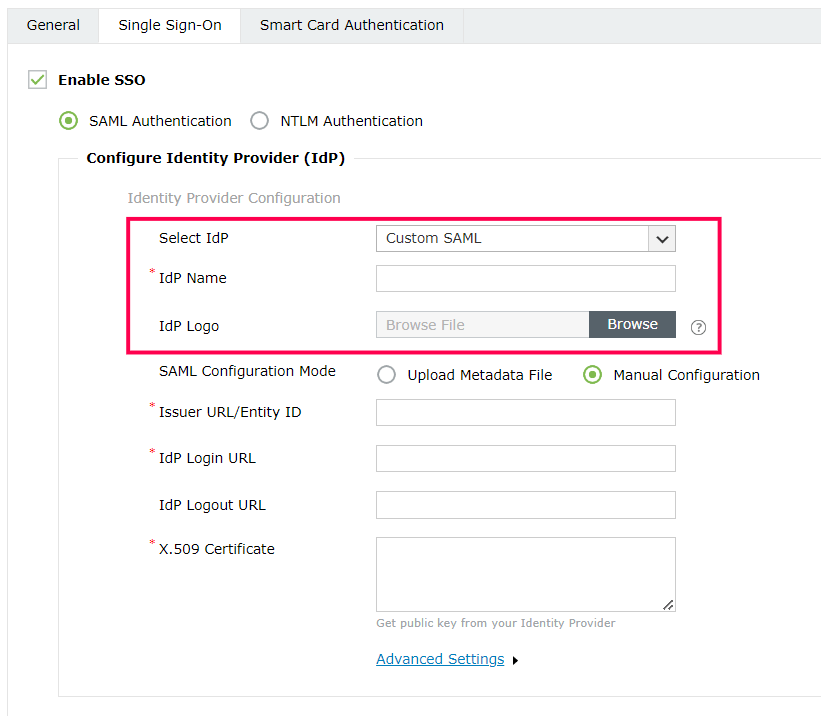
d. If you want to use a custom SAML IdP, select Custom SAML from the Select IdP drop-down menu, and enter the name of the IdP in the IdP Name field. You can also choose to attach the IdP's logo in the IdP Logo field.

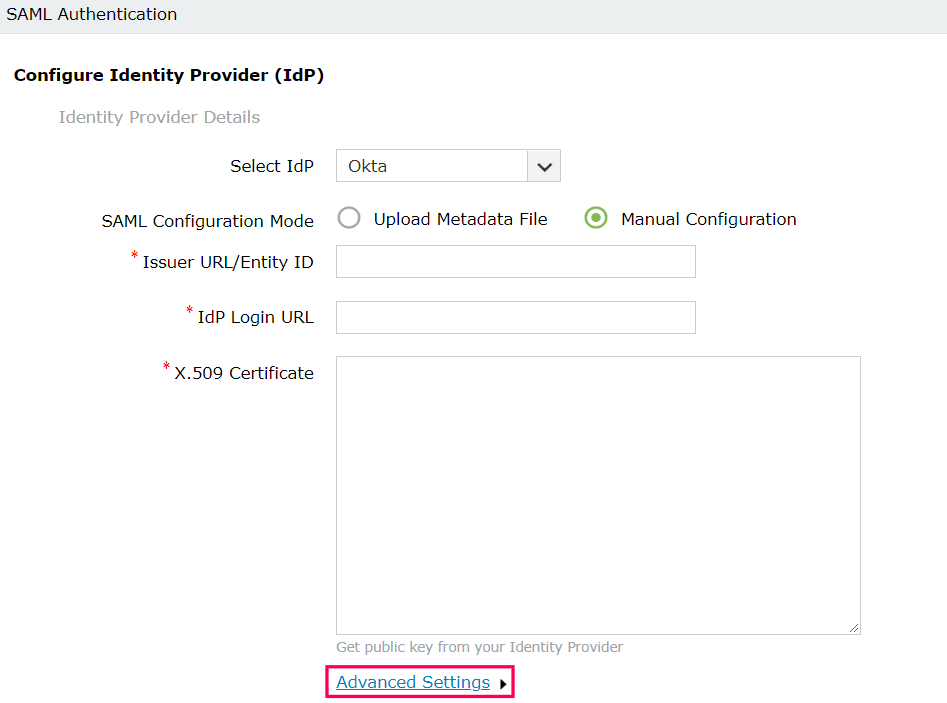
e. Click Advanced Settings to configure the SAML request and response that are processed.

f. Select whether the SAML request sent to the IdP is signed or unsigned from the SAML Request drop-down menu.
g. Select the authentication context class sent in the SAML request from the Authentication Context Class drop-down menu.
h. Select the SAML Response and Assertion Signature from the respective drop-down menus, to determine whether the messages received from the IdP are signed or not.

i. Select the signature algorithm that the IdP uses to sign the SAML response and assertion from the Signature Algorithm drop-down menu.

j. Select whether the SAML assertion is encrypted or unencrypted from the Assertion Encryption drop-down menu.

Note: Please check with your IdP if encrypted assertion is supported.

k. If the SAML assertion is encrypted, then select whether the Encryption Certificate is Self-Signed or CA-Signed from the drop-down options provided.
l. If the encryption certificate is CA-Signed, then upload the CA Public Key and CA Private Key as given by the Certificate Authority.

m. If the encryption certificate is Self-Signed, then you can download the self-signed certificate by clicking Download Self-Signed Certificate. You will need this for configuring SAML authentication in the IdP.


Note: You can choose which encryption certificate you want to use based on your organization's requirement. However, choosing a CA-signed encryption certificate is the recommended practice.
6. Click Save.
7. A summary of the SP configuration is displayed below. Click Download SP Metadata to download the metadata file and save it in a location. We will need this in a later step.

8. To regenerate the SAML signing and self-signed encryption certificates, click on Regenerate button corresponding to the respective Signing Certificate and Encryption Certificate fields. The certificates expire by default after a period of one year.
 Note: Click here to refer to the complete list of the SAML authentication error codes and their description.
ADSelfService Plus supports SAML authentication using the following IdPs:
Click on the links provided above for the configuration steps for the respective IdPs.
That's is all. Users can directly access the self service portal to reset their password or unlock the account. When users try to reset password, the application will fetch the user's email / mobile number from AD and use that data to send email / sms verification code to the user. The users do not need to manually enroll in this case.
New to ADSelfService Plus?
Related Articles
How to enable Partial Enrollment for Active Directory users in ADSelfService Plus
Active Directory domain users need to complete enrollment with ADSelfService Plus before they can use the below listed features: Self-service password reset Self-service account unlock Endpoint multi-factor authentication ADSelfService Plus' logon ...Bulk enrolling Duo Security-enabled users for password self-service
Enrollment is the only task that has to be completed before users can start enjoying the benefits of ADSelfService Plus password self-service. But many a time, administrators might have to constantly shoot out reminders urging users to enroll. Or ...Self-service password reset for Windows 7, 8, and 10
We've all had to reset a forgotten password at some point in our lives. But have you ever wondered what goes on behind the scenes when you initiate a password reset? Have you considered the security risks that can arise due to poor password ...Configuring the ADSelfService Plus login agent for machine MFA and password self-service in Linux
Securing data and resources on the corporate network is of paramount importance to organizations. In a world where most corporate attacks originate at an endpoint, ADSelfService Plus offers 20 MFA factors to protect endpoints by allowing access only ...ADSelfService Plus self-service password reset configuration: Reset & Unlock tab
Reset & Unlock tab The Reset & Unlock tab consists of settings related to the self-password reset and account unlock features. Learn how to configure these settings to suit your requirements. Here are the settings under the Reset & Unlock tab: Unlock ...