How to modify a specific authenticator enrolled by a user?
Once the user has enrolled with the enabled authenticators in ADSelfService Plus, they may want to modify the enrollment information. This article explains the multiple methods to modify authenticator enrollment modification.
Self-modification of the enrollment information by the end-user
End-users can modify the enrollment information from the ADSelfService Plus end-user portal. In case they have lost access to the authenticators and are unable to access the ADSelfService Plus portal, the administrator will have to disenroll the end-users first so that they can enroll again.

Note:
- Some enrollment information cannot be modified by the end-user. For example, the primary email address and mobile number used for email and SMS verification, answers to AD security questions, and custom hardware TOTP token. They have to reach the administrator for this.
- Mobile-app based authenticators can only be modified via the mobile app.
Modification steps
- Log into ADSelfService Plus with end-user credentials.
- Go to Enrollment. Under Enrolled Verification Methods, click on the edit icon next to the authenticator you wish to modify.
- In the pop-up that opens, provide the information required to complete the modification.
- For example, in the case of Google Authenticator, click on Change Phone.
- Select Scan QR code and scan the displayed QR code.
- If that method fails, click Can't scan it? link. A set of numbers will be displayed.
- Go to Google Authenticator app in your mobile. Select Manual entry and enter the displayed numbers in the app.
- A one-time-passcode is generated in the app. Type that value in the Enter code field.
- Click Next.
Disenrolling stranded end-users via the admin portal to let them enroll again
In certain situations, the end-user could have lost access to the authenticators. For example, if Google Authenticator is set as mandatory, and the user loses access to their mobile device the admin will have to disenroll them so that the end-user can enroll again.
- Log in to the ADSelfService Plus admin portal with administrator or operator privileges and navigate to Reports > MFA Reports > MFA Enrolled Users Report.
- Specify the domain using the Select Domain option.
- Use the Select OUs option to specify the OUs, if necessary.
- Use the Enrollment Status drop-down to filter the entries based on whether the users are Enrolled or Partially Enrolled. Enrollment status is considered based on the fulfillment of the conditions below. If all of these conditions are satisfied, then the user is considered to be Enrolled. If not, the user is considered Partially Enrolled.
- Condition 1: The user has enrolled for all mandatory authenticators.
- Condition 2: The user has enrolled for the required number of authenticators set by administrators.
- Condition 3: If Security Questions and Answer is configured as the authenticator, the user has enrolled with all the mandatory questions and the correct number of questions.
- You can narrow-down the results based on MFA methods using the Enrollment Type drop-down.
- Click Generate.
From the MFA Enrolled Users Report, individual users can be disenrolled
Choose the user(s) you want to disenroll by checking the box in the column to the left of the user, and then click Disenroll next to the search button. In the pop-up that opens, select the authenticators you want to disenroll the user(s) from and click OK. Click All Authenticators to disenroll the users from all authenticators.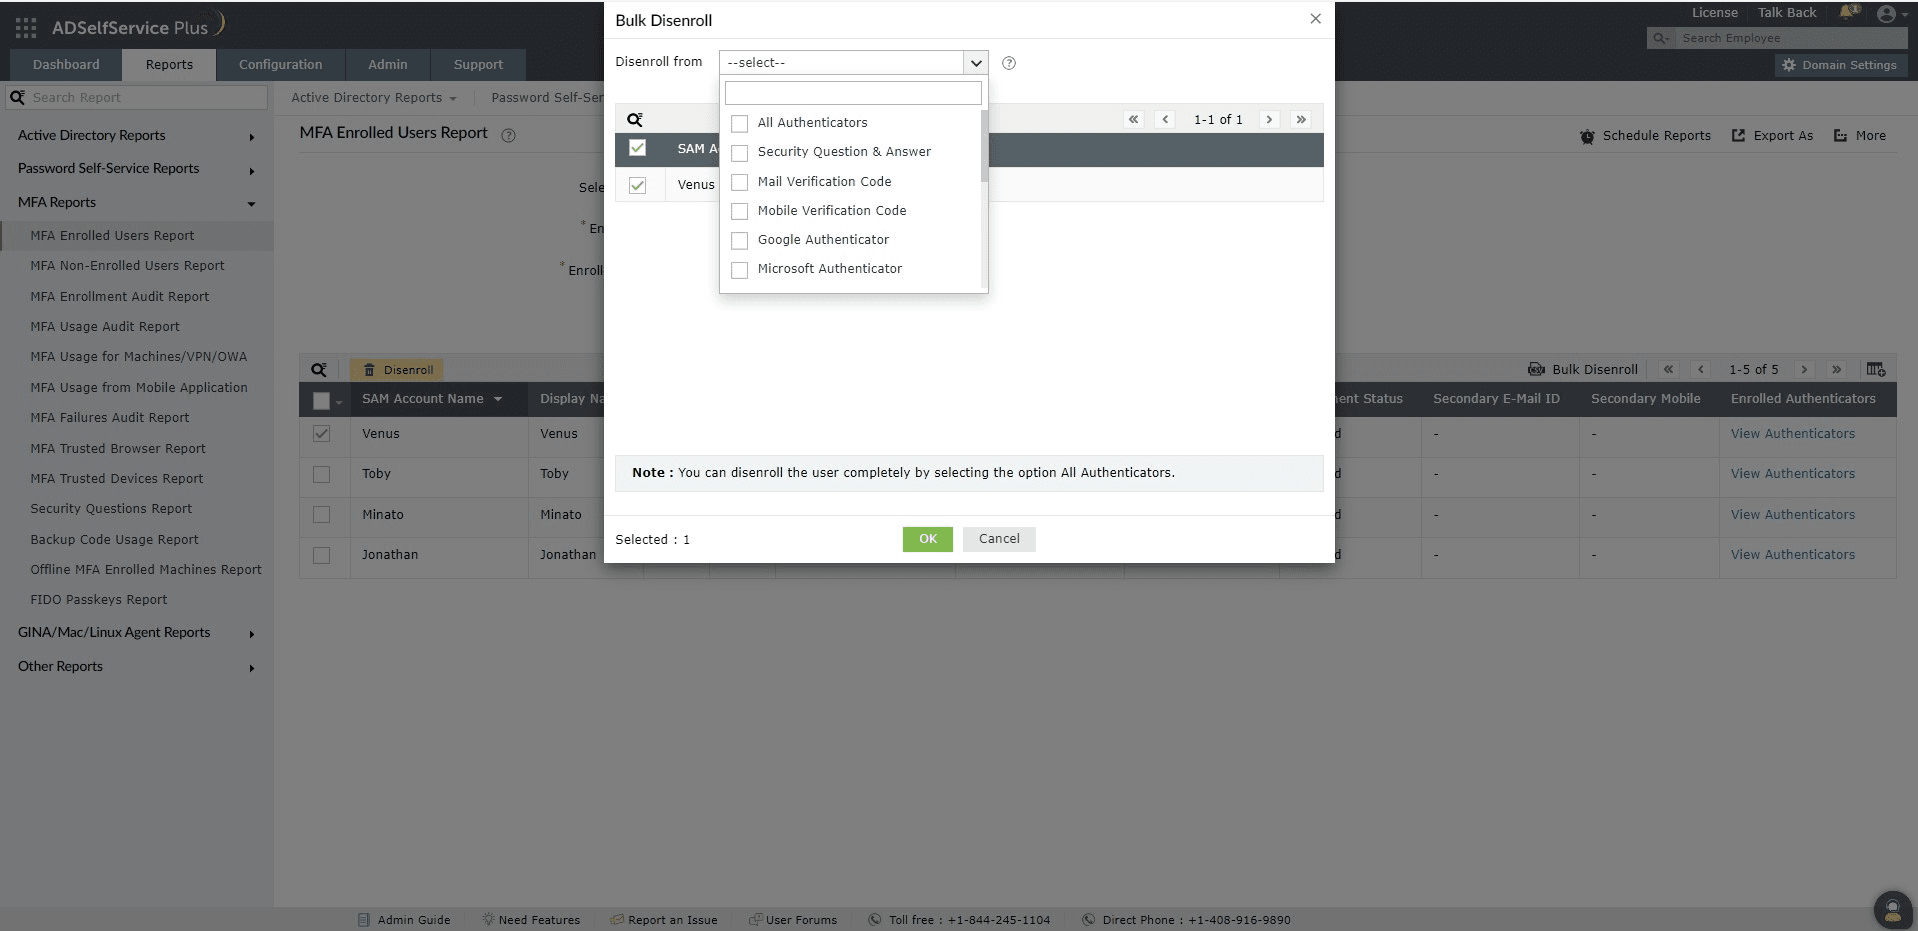

New to ADSelfService Plus?
Related Articles
How to enable Partial Enrollment for Active Directory users in ADSelfService Plus
Active Directory domain users need to complete enrollment with ADSelfService Plus before they can use the below listed features: Self-service password reset Self-service account unlock Endpoint multi-factor authentication ADSelfService Plus' logon ...Multi-factor authentication techniques in ADSelfService Plus
Let's take a look into the various authentication methods supported by ADSelfService Plus for enterprise multi-factor authentication (MFA). Why should you use MFA? Authentication based solely on usernames and passwords is no longer considered secure. ...How to automatically enroll new users for self-password reset with CSV files?
With a multitude of users, ensuring them to enroll for password expiry notifications can be a cumbersome process. Despite the reminders, when the user fails to enroll, the administrator’s intervention becomes mandatory. With ADSelfService Plus' Auto ...Customizing SMS Verification Code Content for User Enrollment in MFA
This article explains how to customize the SMS content sent during user enrollment when using the SMS verification code method for Multi-Factor Authentication (MFA). Follow these steps: Log in to the ADSelfService Plus admin portal. Navigate to Admin ...How to enable offline MFA in ADSelfService Plus
ManageEngine ADSelfService Plus supports offline multi-factor authentication (MFA) for Windows machine logins, User Account Control (UAC) prompt elevation, and Remote Desktop Protocol (RDP) server authentication when the product server is ...