How to install self-signed certificates?
Summary
This article will guide you through the process of applying a self-signed (Internal CA) SSL certificate in ADSelfService Plus.
Configuration steps
Step 1: Enable HTTPS in ADSelfService Plus
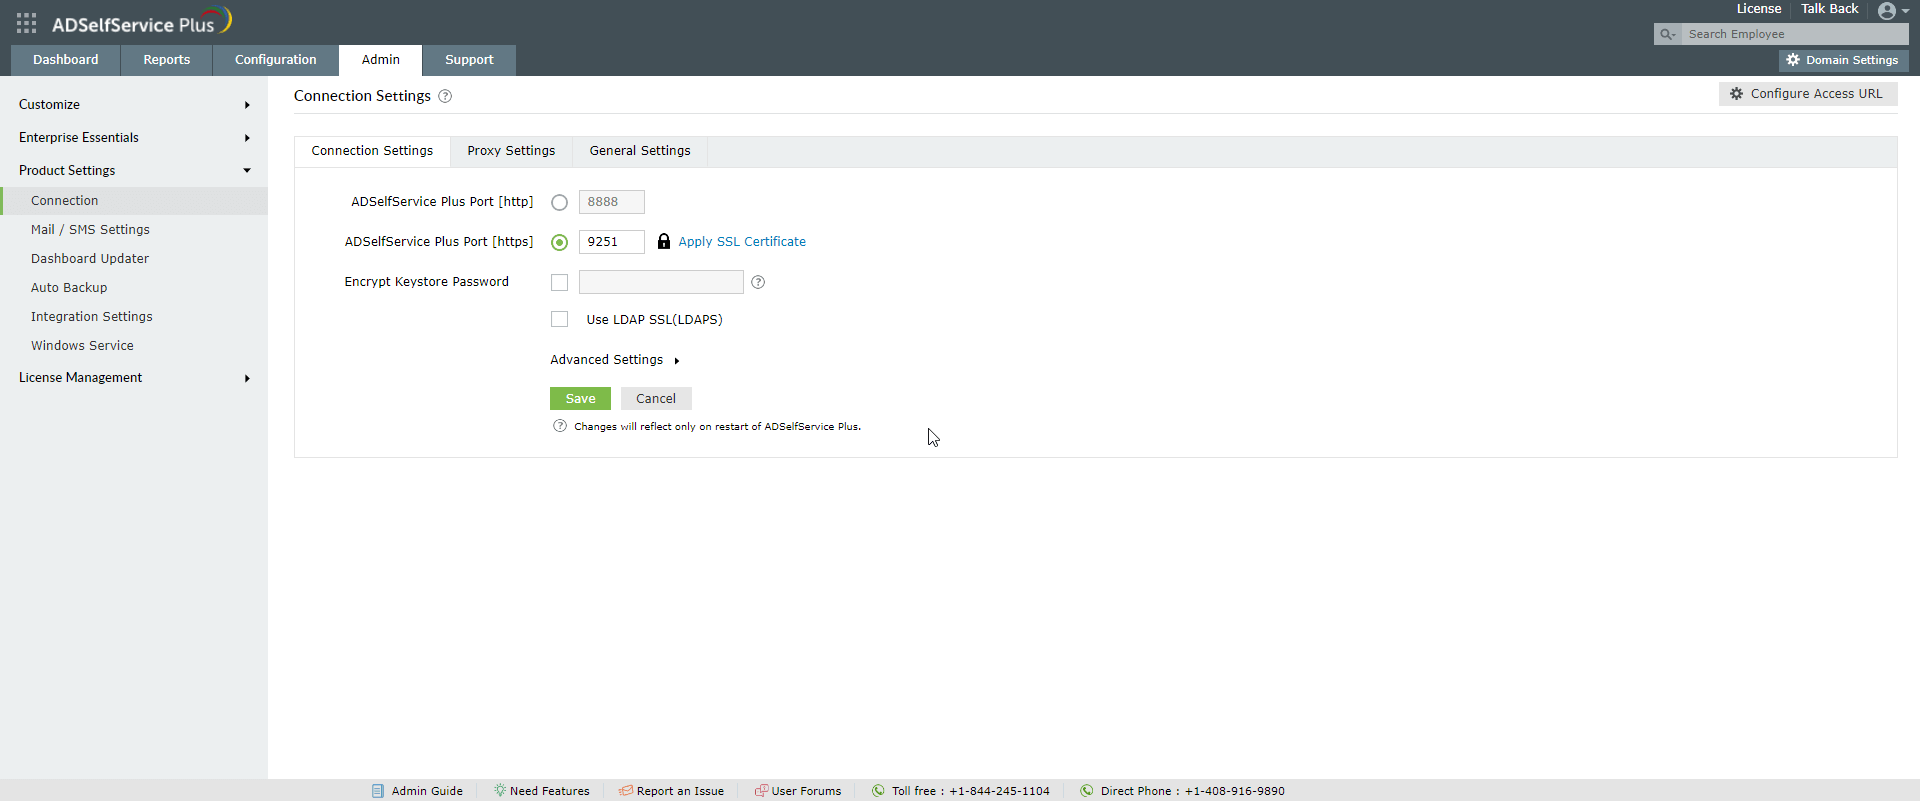
- Log in to ADSelfService Plus with admin credentials.
- Navigate to Admin → Product Settings → Connection.
- Check the Enable SSL Port [https] box
- Click Save.
Step 2: Generate CSR

Note: If you already have an SSL certificate, skip to Step 4.
1. Click the SSL Certification Tool button.

2. Click Generate Certificate and fill in all the necessary fields. Refer to the table below:
| Common name | The name of the server in which ADSelfService Plus is running. |
| SAN Name | The names of the additional hosts (sites, IP addresses, etc.) to be protected by the SSL certificate. |
| Organizational Unit | The department name that you want to appear in the certificate. |
| Organization | The legal name of your organization. |
| City | The city name as provided in your organization’s registered address. |
| State/Province | The state/province as provided in your organization’s registered address. |
| Country Code | The two-letter code of the country in which your organization is located. |
| Password | A password must be at least six characters. The more complex the password, the better the security. |
| Validity (In days) | The number of days the certificate should be valid. If no value is provided, it will be set to 90 days. |
| Public Key Length (In bits) | The public key length. The larger the size, the stronger the key. The default size is 1024 bits and can be incremented only in multiples of 64. |
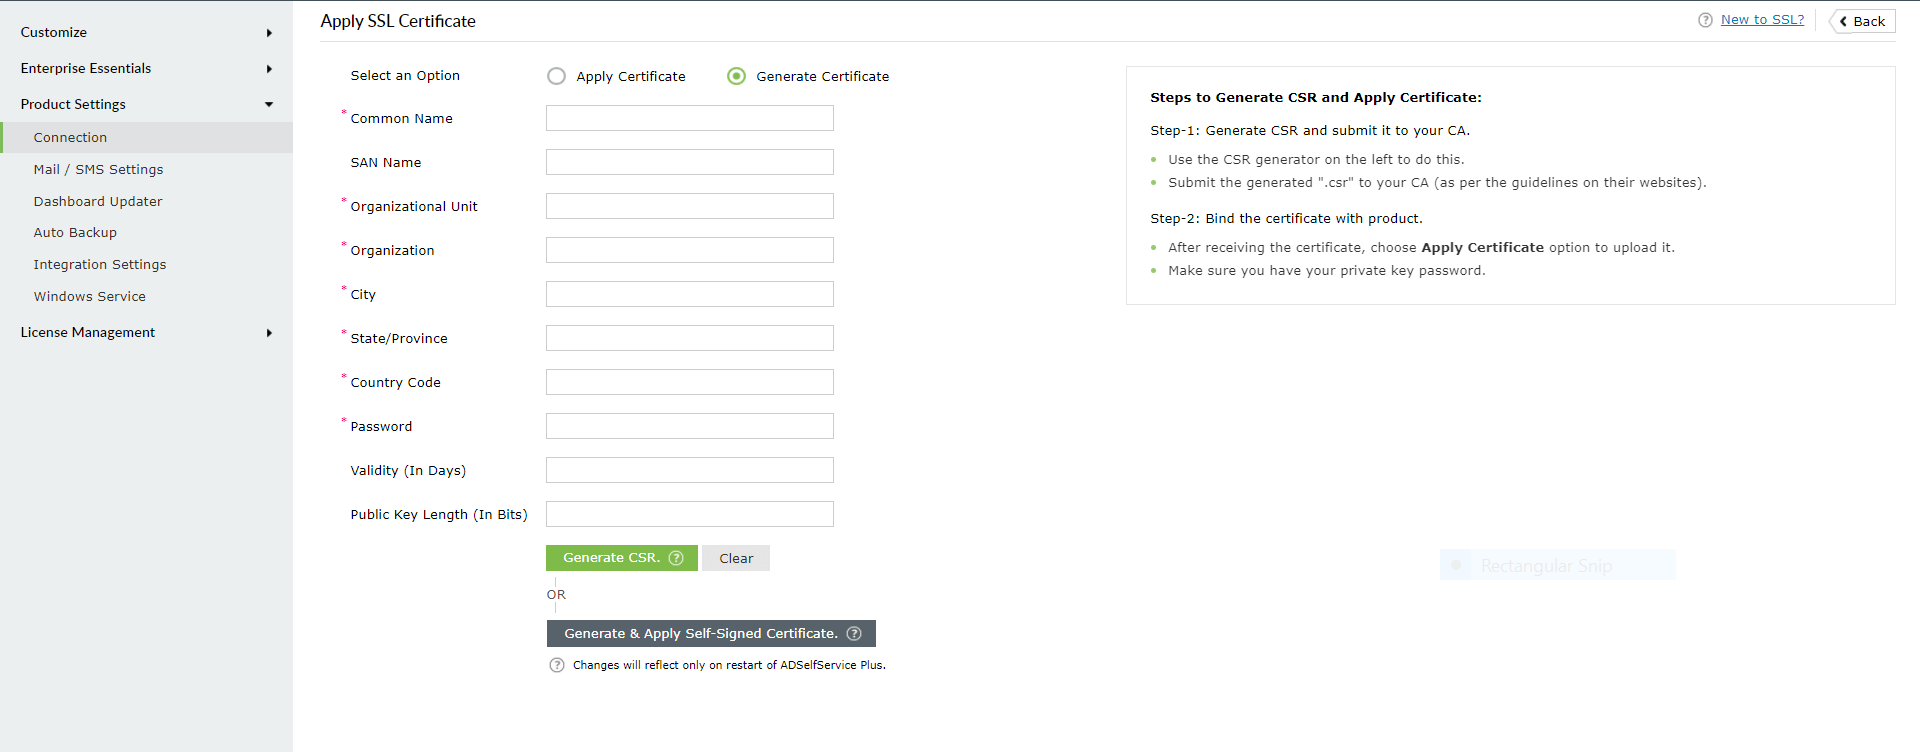 3. Once you’ve entered all the details, click the Generate CSR button.
Step 3: Submit the generated CSR file to your Certification Authority
- When you click the Generate CSR button, two files—SelfService.csr and SelfService.keystore—will be generated.
- You can locate the SelfService.csr file in <Installation_directory>\webapps\adssp\certificates folder and the SelfService.keystore file in <Installation_directory>\jre\bin folder.
- Submit the SelfService.csr file to your Certification Authority (CA).
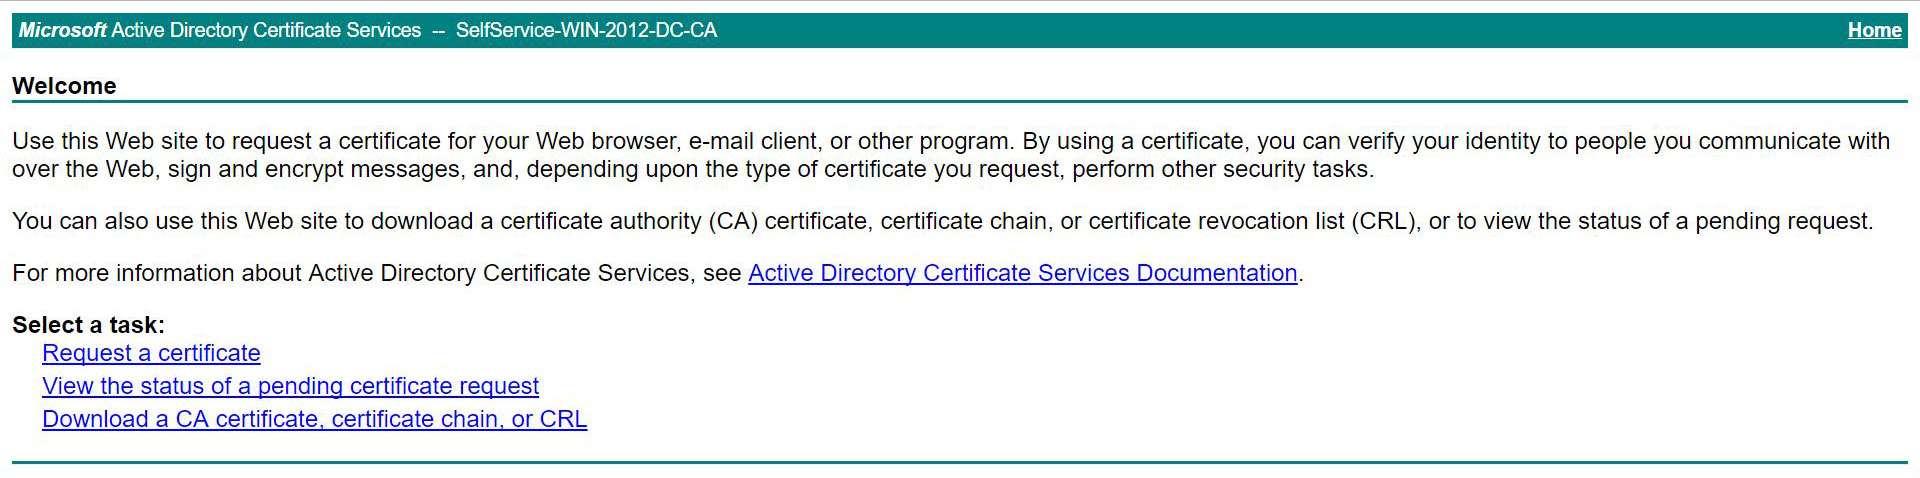
- Log in to Microsoft Certificate Services (https:\\server-name\certsrv).
- Click Request a Certificate → Advanced Certificate Request.
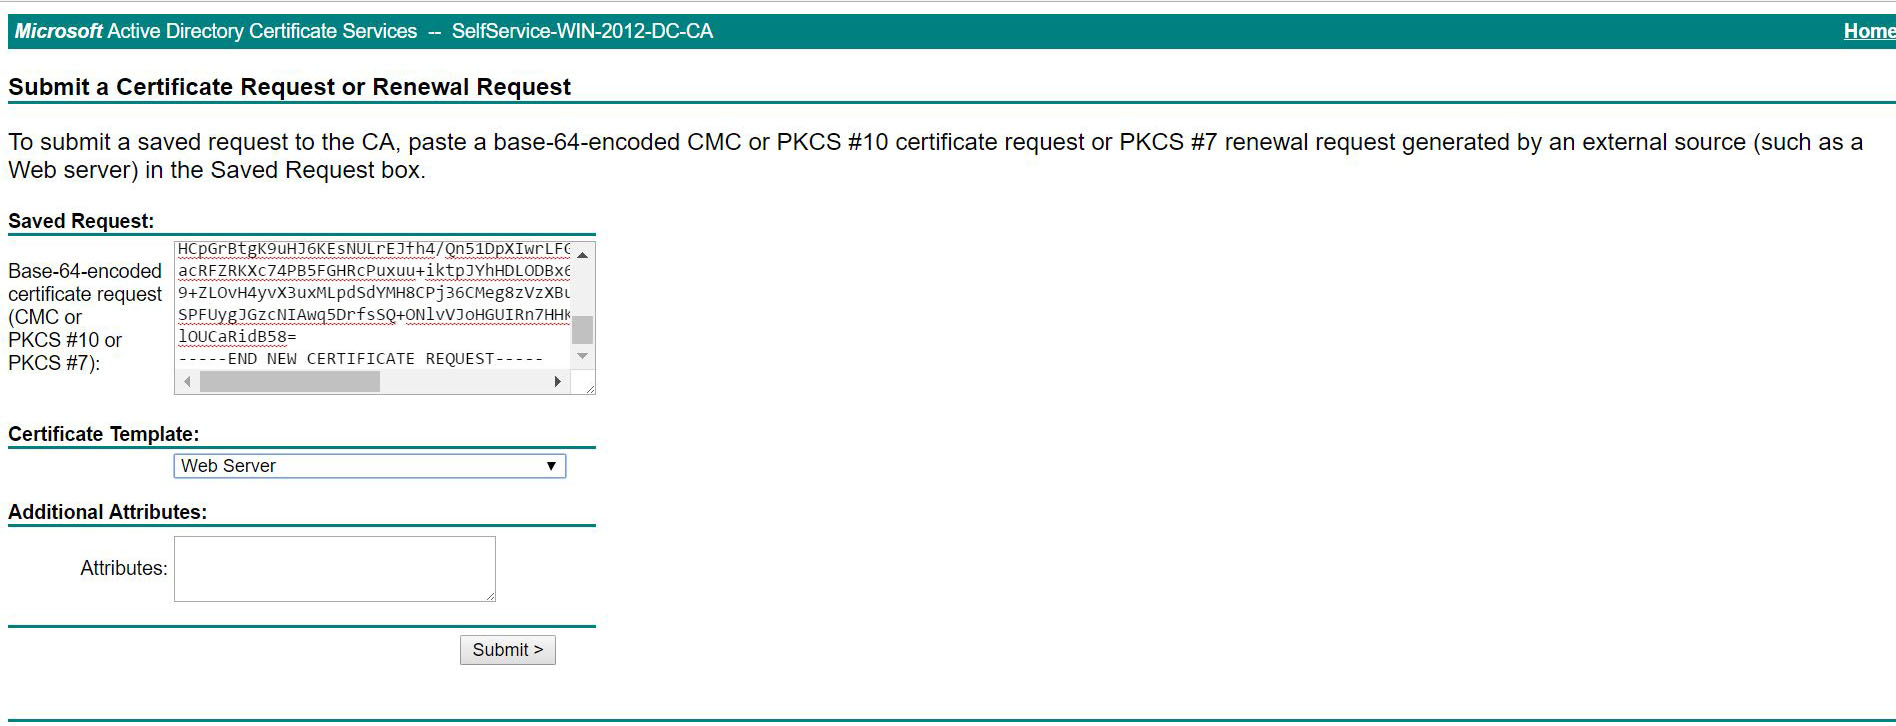
6. Click Submit a certificate request by using a base-64-encoded CMC or PKCS #10 file, or submit a renewal request by using a base-64-encoded PKCS #7 file.
7. Paste the contents of your SelfService.csr file in the Saved Request field.
8. It's always recommended to open the CSR file from its native location using a text editor rather than opening from the browser.
9. When you copy the contents of SelfService.csr file, please ensure that no additional space from the end of the file is also copied along with it.
10. Set the certificate template as Web Server and click Submit.
11. In the Certificate Issued page that appears, select DER encoded.

- Click Download certificate to download the certificate in CER file format.
- Click Download certificate chain to download the certificates in a P7B file format.
12. Place the certificate files at <Installation_directory>\jre\bin.
Note: Convert your certificate from CER to P7B format. Follow the steps given here.
Step 4: Import the CA signed Internal certificates to the keystore
1. Open an elevated command prompt and navigate to <Install Directory>\jre\bin.
2. Back up the SelfService.keystore file.
3. Execute the following command to import the internal certificate to keystore file :
Keytool -import -alias tomcat -trustcacerts -file certnew.p7b -keystore selfservice.keystore
4. Execute the following command to add your internal CA's root file to the list of trusted CAs in the Java cacerts file:
keytool -import -alias tomcat -keystore ..\lib\security\cacerts -file certnew.cer
Note: Use "changeit" as the password when you install the Chain Certificate.
Step 5: Bind the certificate with ADSelfService Plus
- Copy the SelfService.Keystore file to <Install Directory>\conf.
- Back up the server.xml and web.xml files.
- Edit the server.xml file (at <Install Directory>\conf) by replacing the values of the following SSL connector tags :
- "keystoreFile" with "./conf/SelfService.keystore".
- "keystorePass" with the password you entered while generating CSR.

Example: <Connector SSLEnabled="true" acceptcount="100" clientauth="false" connectiontimeout="20000" debug="0" disableuploadtimeout="true" enablelookups="false" keystorefile="./conf/selfservice.keystore" keystorepass="keystore_password" maxsparethreads="75" maxthreads="150" minsparethreads="25" name="SSL" port="9251" scheme="https" secure="true" sslprotocol="TLS" sslprotocols="TLSv1,TLSv1.1,TLSv1.2"> <connector>
4. Restart ADSelfService Plus and check if the certificates are installed correctly.

New to ADSelfService Plus?
Related Articles
How to install P7B certificate in ADSelfService Plus?
Summary This article will guide you through the process of applying a single-domain certificate (CER, CRT, P7B, etc.) in ADSelfService Plus. Configuration steps Step 1: Enable HTTPS in ADSelfService Plus Log in to ADSelfService Plus with admin ...How to install existing PFX Certificate?
Summary This article will guide you through the process of applying a multi-domain or wildcard certificate (PFX) in ADSelfService Plus. Configuration steps Step 1: Enable HTTPS in ADSelfService Plus Log in to ADSelfService Plus with admin ...How to migrate the ADSelfService Plus installation from one machine to another
Description This article will guide you through the process for migrating the ADSelfService Plus installation from one machine to another. Important: Before you start the migration process, please update your ADSelfService Plus installation to the ...How to enable offline MFA in ADSelfService Plus
ManageEngine ADSelfService Plus supports offline multi-factor authentication (MFA) for Windows machine logins, User Account Control (UAC) prompt elevation, and Remote Desktop Protocol (RDP) server authentication when the product server is ...Multi-factor authentication techniques in ADSelfService Plus
Let's take a look into the various authentication methods supported by ADSelfService Plus for enterprise multi-factor authentication (MFA). Why should you use MFA? Authentication based solely on usernames and passwords is no longer considered secure. ...