General - Request FAQ's
For detailed configuration steps, please refer to our help guide.
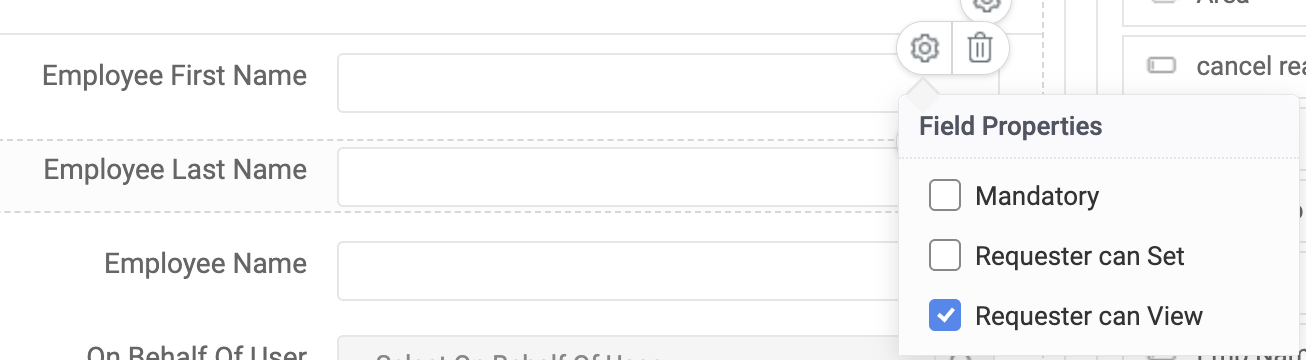
1. An user reports seeing "Not Authorized" in certain fields within the request list view. How should I address this issue
Kindly navigate to Set up --> Templates & Forms and edit the current template and check if that field has "Requester can view" permission.
2. Can recurring incidents and changes be created on a monthly basis?
Yes, this can be achieved via Maintenance module. Please refer, https://help.sdpondemand.com/maintenances
3. How can I ensure the "Show to requester" option is enabled by default when adding a note?
This can be achieved by navigating to setup → General Settings → Advanced Portal Settings and selecting "When creating a note, the following options will be enabled by default if selected."
4. How can I mandate a reason when the request status is moved to "On Hold"?
Yes, this can be enabled by navigating to setup → General Settings → Advanced Portal Settings and by selecting this option "Prompt for a reason when a request’s status changes".
5. How can I set the status to "Reopened" (custom "In Progress" status) whenever a requester replies to an "On Hold" request?
This can be configured by navigating to the setup → General Settings → Advanced Portal Settings → Request reopen settings.

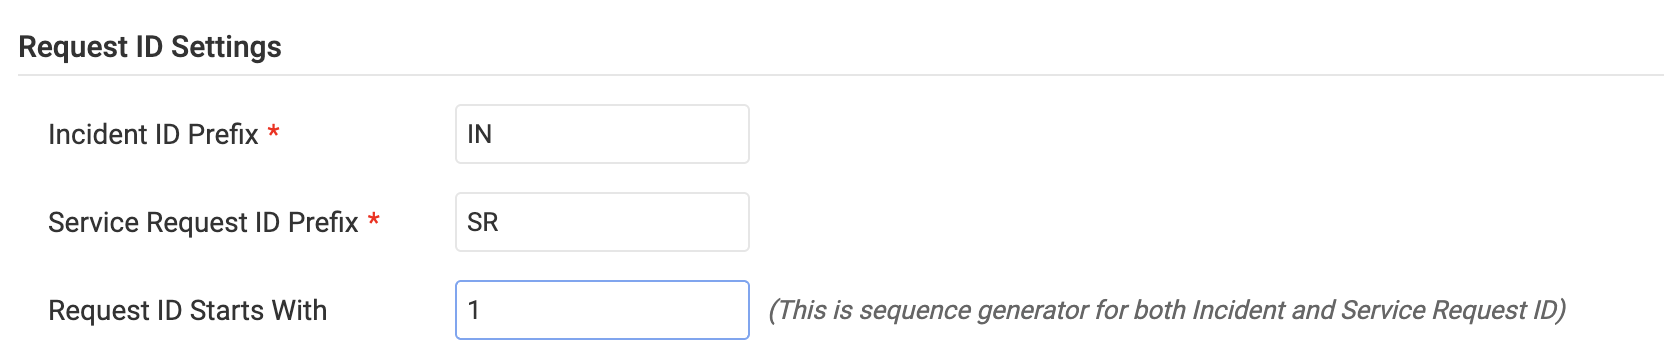
6. How can I reset the request ID to 0?
You can reset the request ID by navigating to Setup → General Settings → Advanced Portal Settings → Request ID Settings. Before changing the ID, ensure that all requests, including those in the trash and Archive are deleted. Additionally, export all data to avoid any discrepancies during the process.
7. Why am I unable to edit any fields on the request details page?
Please navigate to Setup → General Settings → Advanced Portal Settings and uncheck "Disable spot edit in the request details page."
Note: If this setting is enabled, you will not be able to make any changes on the request details page, and the lifecycle transitions will also be hidden.
8. Is it possible to generate a report on Category, Sub-Category, and Item from SDP Cloud?
Yes, you can export it by navigating to Setup → Data Administration → Export Data and selecting the module as "Category."
9. What happens to requests when users are deleted from the application?
- Deleting a requester will not impact existing closed or open tickets created by them. The requester’s name in these tickets will remain unchanged unless privacy settings are enabled. However, all notifications, escalations, and workflow settings associated with the requester will be removed.
- When deleting a technician, closed tickets will remain unaffected, but any open tickets will become unassigned. The deletion of a technician also removes all related notifications, escalations, and workflow settings. Despite this, settings like SLAs and BRs created by the technician will remain intact. Historical ticket data will still be accessible for reporting purposes, and no data will be lost from the application.
Note :Based on the configuration in PII/ePHI Fields, data will also be anonymized and erased for the users leaving the organization.
10. Are there reply templates available for requesters, similar to the ones for technicians?
Yes, it is available under Setup → Automation → Notification Rules → Request → Email Notification Templates → Requester's Reply Email.
You can also customize the request forward email content in the same section.
11. Can I generate a report for request approvals and customize it with other request fields?
The default query report can be found under Reports → Query Reports → All Requests → Reports By Request Approver. Generally, query reports cannot be customized in ServiceDesk Plus Cloud. However, if needed, you can export and merge both reports using third-party tools or integrate with Analytics Plus to access your data.
12. How can I create a basic report on the number of requests handled by each technician every month?
To generate a request count report, navigate to Reports → New Custom Report → Matrix Reports → Requests/All Active Requests and select Advanced Matrix Report. Choose the columns "Created Time/Month" and group by "Technician," then summarise the count of Request ID. Once completed, you can save the report and schedule it as needed.
12.Is it possible to create a dashboard for requesters?
Yes, the executive dashboard can be shared with users or user groups; however, it is restricted to the request module only. Pleaser refer, https://help.sdpondemand.com/dashboard-customization$executive%20dashboard
13. What is the remote connection option in the bottom right corner of the request, and is it free to use?
Yes, you can send an invite to connect with the requester via Remote Connection, and it is free of charge.
14. As a technician, why are some requests missing from my request list view even though I am allowed to view all requests?
a) Check if the date filter is set to All.
b) Verify under archived requests.
c) Also, ensure that the request type is set to Both under the All Requests view.
15. What is the total number and size limit of attachments in requests and notes.
Either number or size which ever reaches first , Request Attachments 50
16. How can I set an out-of-operational-hours notification in SDP Cloud?
- Navigate to setup → Automation → Triggers, then select:
- Trigger applies to "Requests"
- Execute when a request is "Created"
- Execute during "Outside operational hours"
- Conditions: Configure as per your requirements
- Actions: Select "Notifications"
17. How to create an Operational hours for a group working in US shift hours that extend from evening to the next morning?
- You can configure this by navigating to setup → Instance settings → Operational hours → New operational hour. Select the group under "Applies to," then set the standard start and end times. It would be automatically marked as overflowing hours.
18. Is there a way for a requester to submit a request on behalf of another user, considering they cannot edit the requester name field while creating a request?
- Admins can navigate to setup → Templates and Forms, select the desired template, and add the "On behalf of user" field from the available fields section. Users can then use this field to create requests on behalf of other users.
- The user added to this field will be considered the requester and will receive all notifications just like the actual requester. Technicians, however, will not see this field when creating a request, as they already have permission to select the requester’s name.
 If the requester cannot find all their organization's users while creating a request, they can go to setup → General settings → Requester Portal and select the option from "Requesters can create requests on behalf of".
19. How can I assign a specific technician to a particular category, regardless of any criteria? What is the easiest way to achieve this?
Category Based Assignment
Go to setup → Customization → Helpdesk → Category
This can be used to automatically assign technicians for a specific category, regardless of the site. So whenever a request is created, technicians will be assigned automatically
20. The priority field is greyed out while creating a request, so I enabled the "Requester can set" option within the template, but it results in an error. How can I resolve this?
Navigate to setup → Customization → Helpdesk → Priority Matrix, and make sure the option "Allow requesters and technicians to override the priority matrix" is enabled.
21. How can we auto generate a sequential number for a specific template similar to the request ID?
To achieve this, go to setup → Customization → Additional Fields and add a field with the type "Auto Number". Afterwards, you can include this field in the template where it is needed.
22. I am encountering the following error message while submitting a request: "Some mandatory fields are either disabled or hidden."
This indicates that certain fields have been marked as mandatory within the template but may have been hidden or disabled using form rules. Please check if any form rules are in place that might be affecting these fields.
23. How are 'Time Spent' and 'Time Elapsed' defined?
The terms 'Time Spent' and 'Time Elapsed' have been updated for better clarity:
- Time Elapsed → Time Spent
- Time Spent (Worklog) → Time Elapsed
These terms will be used consistently across the help desk.
- Time Elapsed: The total time from request creation to resolution, excluding any time the request was placed on hold. This is calculated based on operational/non-operational hours, as defined by SLAs and site settings. By default, only operational hours are considered.
- Time Spent: The total time a technician (or multiple technicians) actively worked on the request, recorded through worklog entries.
Usage in Different Sections:
- In the Request Details page, Time Elapsed is displayed once a request is resolved.
- In Worklogs, Time Spent represents the time logged by technicians.
- In Reports, both Time Elapsed and Time Spent are available for selection in respective modules.
24. How do I disable the 'Quick Create' option for creating requests?
- Go to Setup → General Settings →Advanced Portal Settings --> disable the option "Enable 'Quick Incident' option for technicians"
25. How do I allow technicians to appear in the requester list when creating a ticket on their behalf?
- Navigate to Setup → General Settings →Advanced Portal Settings
- Enable the option "Include technicians in the list of requesters while creating/updating requests"
26. How do I split any merged requests?
Go to Conversations of the parent request, locate the merged request, and click on the icon as shown below:
Split requests will be logged as new requests.
27. How can I create filters to view only high-priority tickets?
- Navigate to the Request tab in the request list view.
- Click "New Custom View" → Name the view → Set the criteria and conditions for high-priority tickets.
28. Can the system automatically assign priorities to requests?
Yes, using the Priority Matrix:
- Go to Setup → Customization → Helpdesk --> Priority Matrix.
- Define priority levels based on Impact (Y-axis) and Urgency (X-axis).
- The system will automatically assign priorities based on these configurations.
29. Why is the request first moved to Resolved instead of being directly Closed?
As per ITSM best practices, a request should be closed only after the user confirms the issue is resolved.
How it works in ServiceDesk Plus Cloud:
- When a technician resolves an incident, the request moves to "Resolved" status.
- An email is sent to the requester, asking them to confirm the resolution.
- If no response is received within 2 days, the request is automatically closed.
To enable Automated Closure:
- Go to Setup → Automation → Closure Rules → Request Closing Process.
- Select 'Automated Closure' to enable this feature.
30. How do I disable the 'Close Request' (Yes/No) confirmation popup?
- Navigate to Setup → Automation → Closure Rules → Request Closure rules → Confirm User Acknowledgment to disable the prompt.
31. How can a requester re-open a resolved request if the resolution is unsatisfactory?
Email-based Reopening:
Enable ‘Notify Requester when a Request is Resolved’ under Setup → Automation → Notification Rules → Requester Notifications.
The requester will receive an email with a Close Request link. If unsatisfied, they can reply to the email, which will reopen the request.
Request Reopen Settings:
Go to Setup → General Settings → Advanced Portal Settings → Request Reopen Settings.
Enable the option "Do you want to allow requesters to reopen their "Select the request status" requests?" .
32. How can I make a requester to view all the requests without converting him as a technician?
Yes it is possible. Go to Setup --> Users & Permissions --> Users --> Requesters --> Edit Requester and choose from the options listed beside 'Requester allowed to view' under the Department Details column.
33. How can I ensure that the full conversation history appears when replying to a request in ServiceDesk Plus Cloud?
To ensure the full conversation appears in your replies, please follow these steps:
- Navigate to Setup → Templates & Forms → Reply Template. Click on Default Reply Template and add the
$descriptionvariable in the Message section. This will include the request description and the conversation history in your replies. - When replying to a request, always reply to the latest email reply of the request, not just the request itself.
- Ensure you use the reply buttons in the individual conversations (instead of composing a new mail under the same subject). This will keep the entire email chain intact and visible to the customer, avoiding fragmented replies.
34. How can I set a personalized email signature with formatting in ServiceDesk Plus Cloud?
To set your own personalized email signature in ServiceDesk Plus Cloud:
- Click your profile icon or username at the top-right corner of the application.
- Select Personalize.
- In the Email Signature section, enter your desired signature.
You can customize the signature to include text formatting, images, tables, hyperlinks, quotes, or emoticons by setting the text area to Rich Text Mode.
Once done, click Save. This signature will automatically be added to your replies.
35. Is there a limit to the number of recipients in email notifications from ServiceDesk Plus Cloud?
Yes, the number of recipients is now capped at 50 per email notification. This includes all addresses in the To, Cc, and Bcc fields combined, and applies across all modules in ServiceDesk Plus Cloud.
36. How do we ensure that the replies are appended to the existing ticket as conversations?
The following are the parameters that are considered while merging a reply to an already existing request:
a. Message ID of the mail- This information will be there in the header of the mail.
b. Request ID in the subject of the mail.
Additionally, if you want any conversation to append to an existing ticket, please make sure that the subject of the email contains the request id in the format ##Request id##.
This feature works only when an automated notification( any automated notification) regarding the ticket is sent out from the application.
The ##Request id## format can be used only by those users who have received a notification with respect to that ticket id.
In case the above parameters are not met then the conversation will not be merged automatically and a new request would be created which would then have to be merged manually.
37. Is there any special character restriction while adding additional fields?
Yes, there are specific characters supported. Please find the below list supported,
! Exclamation
@ Ampersand
$ Dollar
_ Underscore
- Hyphen
: Colen
, Coma
. Pointer or Dot
/ Slash

Please provide a valid input for field Field values
The following error will be found while creating an additional field value and if any special character is used apart from the one mentioned above
The following error will be found while creating an additional field value and if any special character is used apart from the one mentioned above
38. Is it possible to edit a cancelled request?
No, once a request has been moved to a cancelled request, it cannot be edited as it will be in a read only mode. However, technician will be able to revert the cancellation.

Canceling the request will move it into Read-only mode. You cannot edit or change its status.
39. Approval Status keeps showing Pending Approval even after the request is approved.
If the approval has been triggered through workflow, make sure the following field update action is defined. If approved, the field update can be marked as approval status is approved and for rejected the field update can be marked as approval status is rejected.
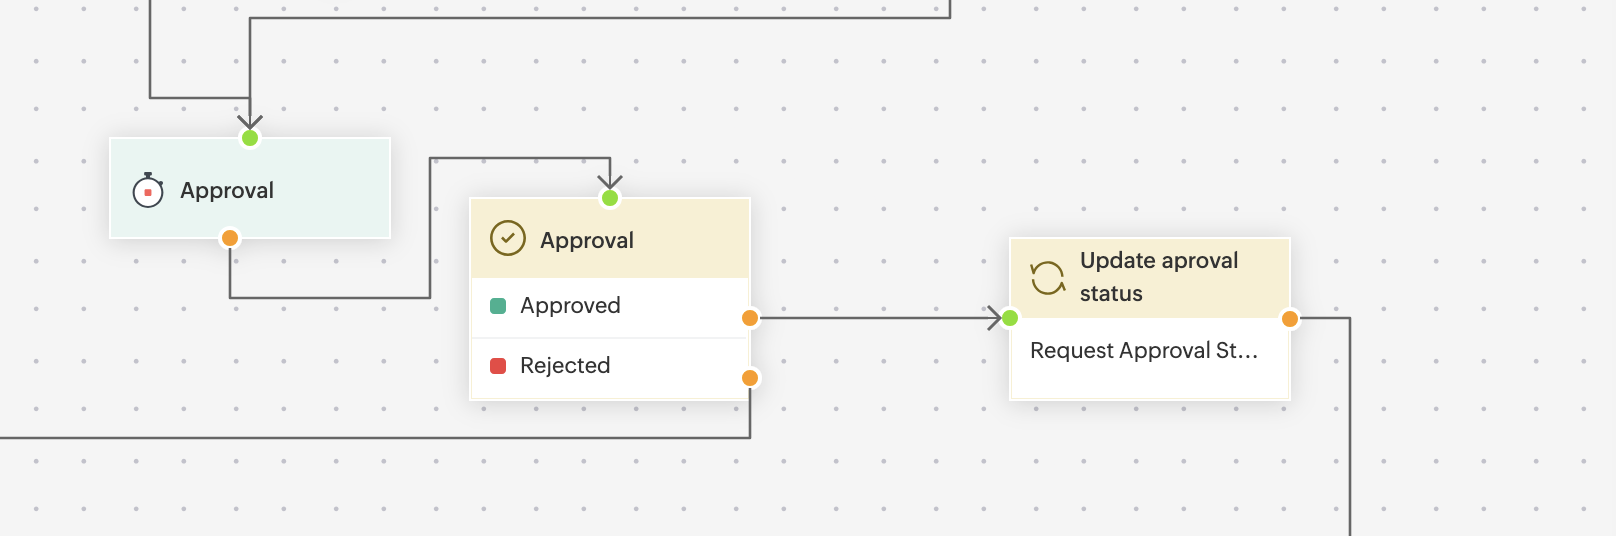
If the approval has been triggered through workflow, make sure the following field update action is defined. If approved, the field update can be marked as approval status is approved and for rejected the field update can be marked as approval status is rejected.
40. How to ensure that the worklog timer is started automatically?
The worklog timer can be configured to start automatically when the owner of the task views the request. In order to configure this, navigate to setup > general settings > advanced portal settings > worklog settings > enable "Auto-start worklog timer when the owner views the request" > save the changes.
41. In the approval section, receiving the message "The approval request is no longer required or valid". How can I fix this?
This error may occur if the email address used to approve the request does not match the one configured on the Approval page, or if the request has already been approved by either of the two users, in case if the approval is set to 'Anyone to approve.' We recommend reviewing whether the logged in user is the same as per the email address configured for the approval.
42. The Reply all option is no longer available when replying.
As per recent change in the SDP Cloud, if a requester having technician permission will have the Reply option instead of Reply All since the user is considered a requester within the request. However, if you still want the Reply All option, navigate to setup > General setting > requester portal > requester portal setting > enable the option "Allow requesters to add recipients when replying" > save the changes.
You can also enable the above option if the requester should have the privileges to add recipient's while replying from the portal.43. How to exclude a group from being assigned with tickets using Technician auto assignment?
Technician auto-assignment can be configured to exclude specific groups from ticket assignment. Currently, the auto-assignment settings allow exclusions for technicians and requests. Additionally, we can enable a backend parameter that introduces group as an exclusion criteria. Once this parameter is enabled, you’ll be able to configure specific groups to be excluded from the auto-assignment process. You can reach out to our support team and will be able to guide you further.
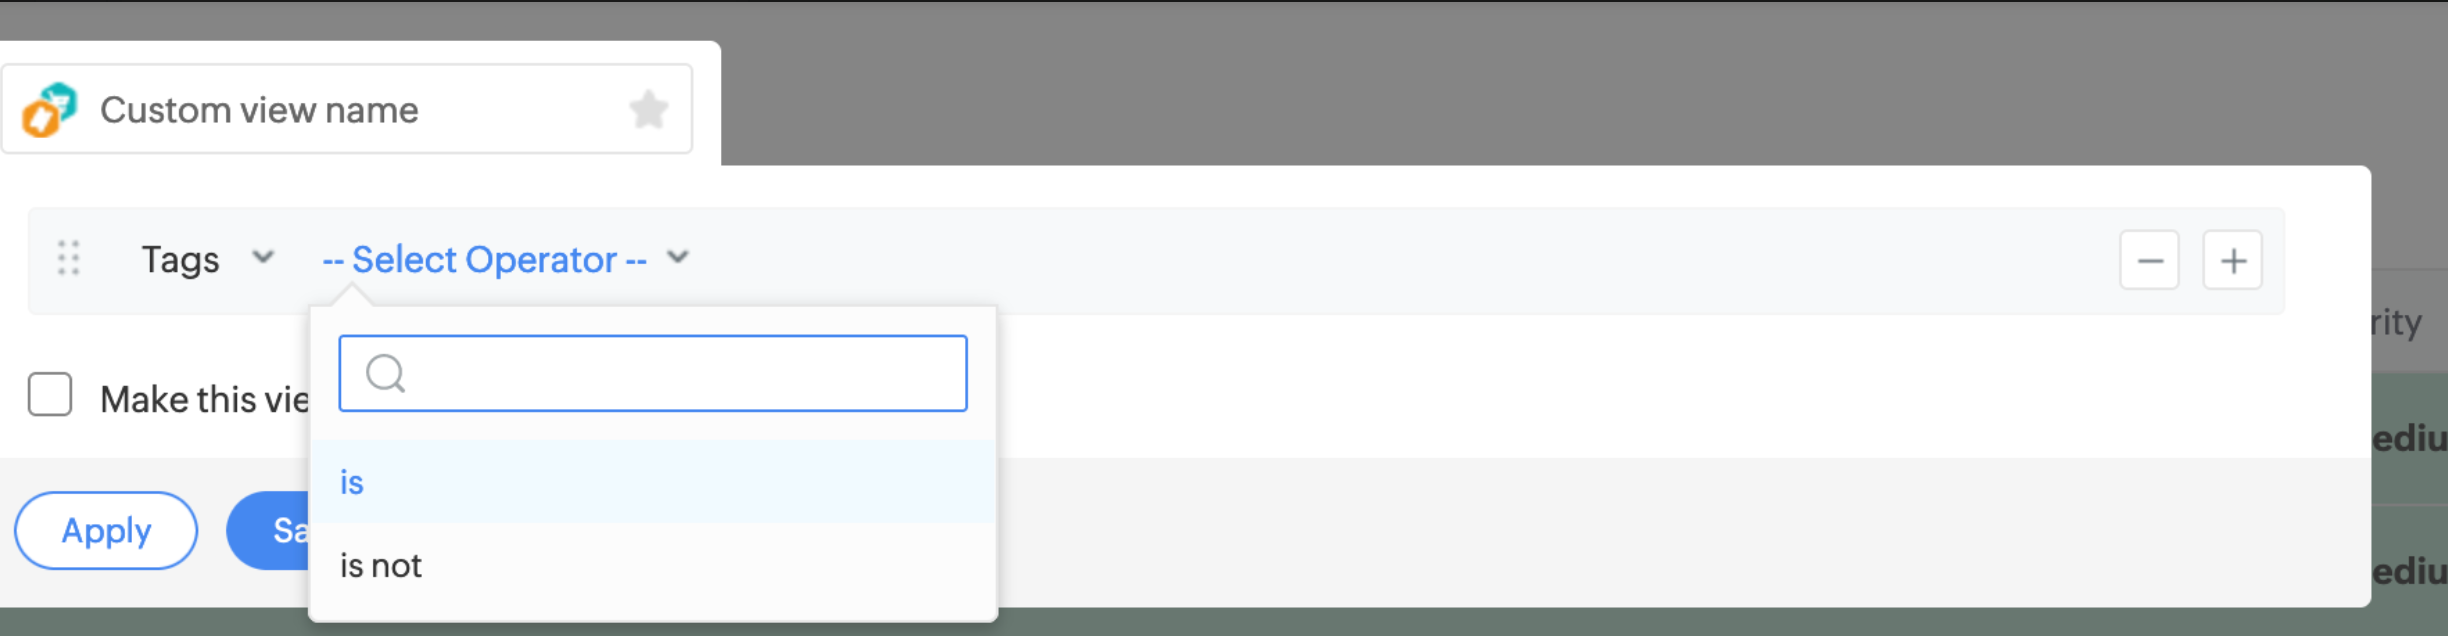
44. What is Tags in request and is it possible to display the tags in a column view?
Tags help technicians find requests based on a topic of interest and can be added within each request.
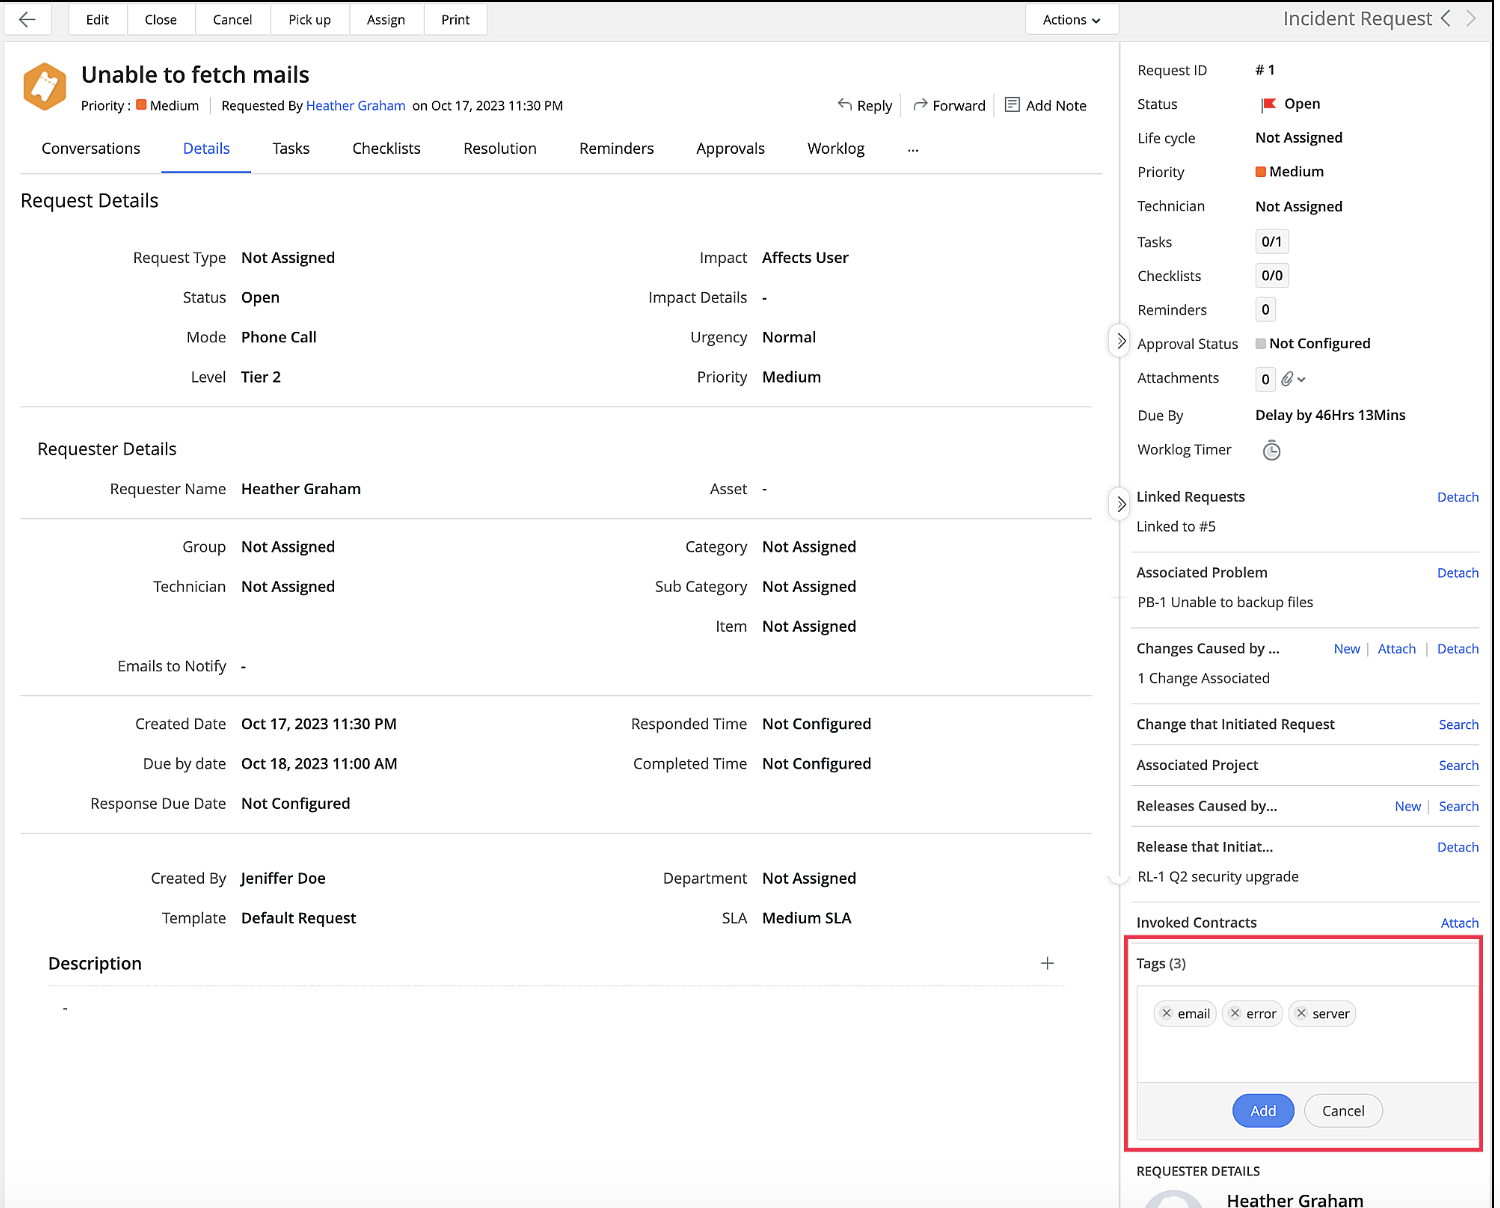
Once tags are added, you can easily view the request within each tag with help of default view that will be created for each Tags.
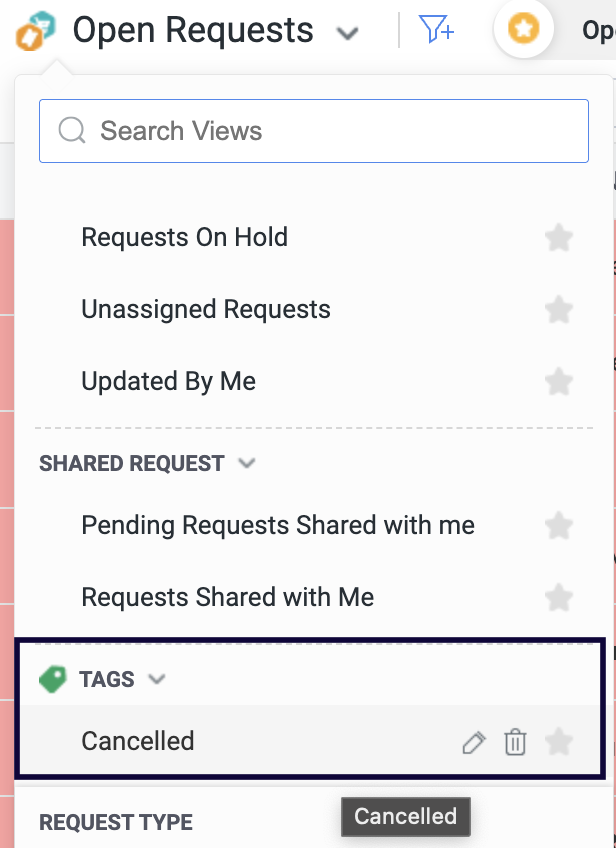
As of now, tags will not be present under column chooser, however, you can create a custom view with Tags as criteria.
Once tags are added, you can easily view the request within each tag with help of default view that will be created for each Tags.
As of now, tags will not be present under column chooser, however, you can create a custom view with Tags as criteria.
45. What is the purpose of request metadata?
Meta data includes information such as Request ID, Subject, Requester Name, Created Date, and the URL of the request so it can quickly be used to facilitate effective collaboration within and across teams by providing a shared platform for managing tasks and sharing relevant information related to tickets.
To do this, click the Copy icon beside Request ID and select the required action.
46. We cannot get approval notification emails to appear in the required German language in the Outlook mailbox. How to fix this issue?
In regard to the language translation within the notification, always ensure that you have chosen the option to "Always translate" in your Outlook mailbox so that the email notification that is being sent to the user is received in the desired language as per the notification template configured in the application. To check this, kindly navigate to your Outlook > Settings > Translation > Always translate
47. Is it possible to add and modify the right pane within the request with custom fields?
Yes, you will now be able to add and modify the right pane within the request. Please navigate to setup > Layouts > Details Page Layouts > Technician layout > customize > edit the properties for right pane order where you can manage upto 20 fields which can include default as well custom fields that will be reflected under the right hand pane.
Now, you will be able to choose which field that should be reflected on the right pane
The above setting would be defined by the admin under setup, however, the below option can be enabled in order to allow the technician to create their view from the respective request.
Now, the technician can navigate to the request and use the gear icon next to Actions > My layout, where the technician can customise the right panel in the request.
Similarly, the right pane for requester can be customized by the admin. Please navigate to setup > Layouts > Details Page Layouts > Requester layout > customize > edit the properties for right pane order where you can manage upto 20 fields which can include default as well custom fields that will be reflected under the right hand pane.
Unlike technician having the option to set their view, requester will not be able to set their own layout.48. How can I rename or modify a value in a custom field added to a request?
To modify a custom field, navigate to Setup → Customization → Additional Fields. Select the relevant module from the drop down, choose the specific field, and update its name or values as required.
 Note: Once a custom field is created, its field type cannot be modified.
New to ADSelfService Plus?
Related Articles
Request Details Page
View Request Details The request details page contains all the details relevant to a request. The request details are structured to help technicians access information instantly. Each element in the request details page is tailor-made to simplify the ...Admin Related FAQ's
For detailed configuration steps, please refer to our Help Guide. 1. What is the architecture of ServiceDesk Plus Cloud and its framework? ServiceDesk Plus Cloud application is hosted in our proprietary SaaS framework in our own data centres . ...Automations
For detailed configuration steps, please refer to our help guide. 1. Is it possible to create a service request via email? Yes, we can make both technicians and requesters to create service requests using the email command feature. 2. Can an approval ...Change Module FAQ's
For detailed configuration steps, please refer to our help guide. 1. I am unable to see a few technicians when I click the Change Manager field. How can I make other technicians appear in the Change Manager list? The technicians have to be assigned ...ServiceDesk Plus Cloud Artificial Intelligence Related FAQ's
1. What is Zia? Does Zoho have its own LLM? Zia (Zoho's Intelligent Assistant) is Zoho’s in-house AI assistant integrated across various Zoho applications, including ServiceDesk Plus Cloud. It helps users with features like chatbot, solution ...