Configuring MFA for Cisco ASA SSL VPN using RADIUS
This guide provides steps for enabling multi-factor authentication (MFA) using RADIUS for Cisco's Adaptive Security Appliance (ASA) product using ManageEngine ADSelfService Plus' MFA for VPN feature.
To enable RADIUS-based authentication for VPN providers, the MFA for VPN supports the following authentication methods in addition to the default username and password-based authentication:
- Push Notification Authentication
- Fingerprint/Face ID Authentication
- ADSelfService Plus TOTP Authentication
- Google Authenticator
- Microsoft Authenticator
- Yubico OTP (hardware key authentication)
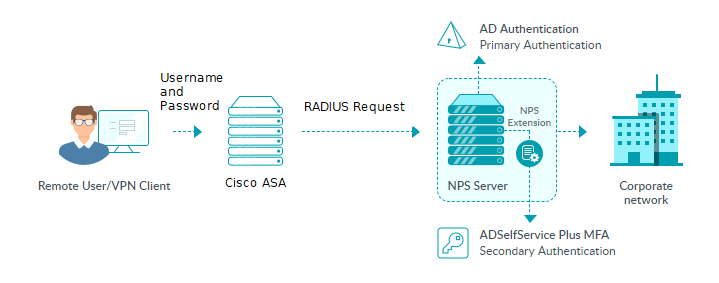
The RADIUS-based MFA process for Cisco ASA using ADSelfService Plus
Configuration process
Prerequisite:
- Your ADSelfService Plus license must include Endpoint MFA. Purchase it from the store.
- Configure your Cisco ASA server to use RADIUS authentication.
- For the RADIUS server, you must use a Windows server (Windows Server 2008 R2 and above) with the Network Policy Server (NPS) role enabled.
- Enable HTTPS in ADSelfService Plus (Admin → Product Settings → Connection).Note: If you are using an untrusted certificate in ADSelfService Plus to enable HTTPS, you must disable the Restrict user access when there is an invalid SSL certificate option in Configuration → Administrative Tools → GINA/Mac/Linux (Ctrl+Alt+Del) → GINA/Mac/Linux Customization → Advanced.
- In Active Directory, set users’ Network Access Permission to Control access through NPS Network Policy in their Dial-in properties.
- The Access URL you have configured in Admin → Product Settings → Connection → Configure Access URL will be used by the NPS extension to communicate with the ADSelfService Plus server. Make sure you have updated the Access URL before installing the NPS extension.
- In the Windows NPS server, where the NPS extension is going to be installed, set the authentication settings of the Connection Request Policy to authenticate requests on this server.
Step 1: Configuring MFA in ADSelfService Plus
- Log in to ADSelfService Plus as an admin.
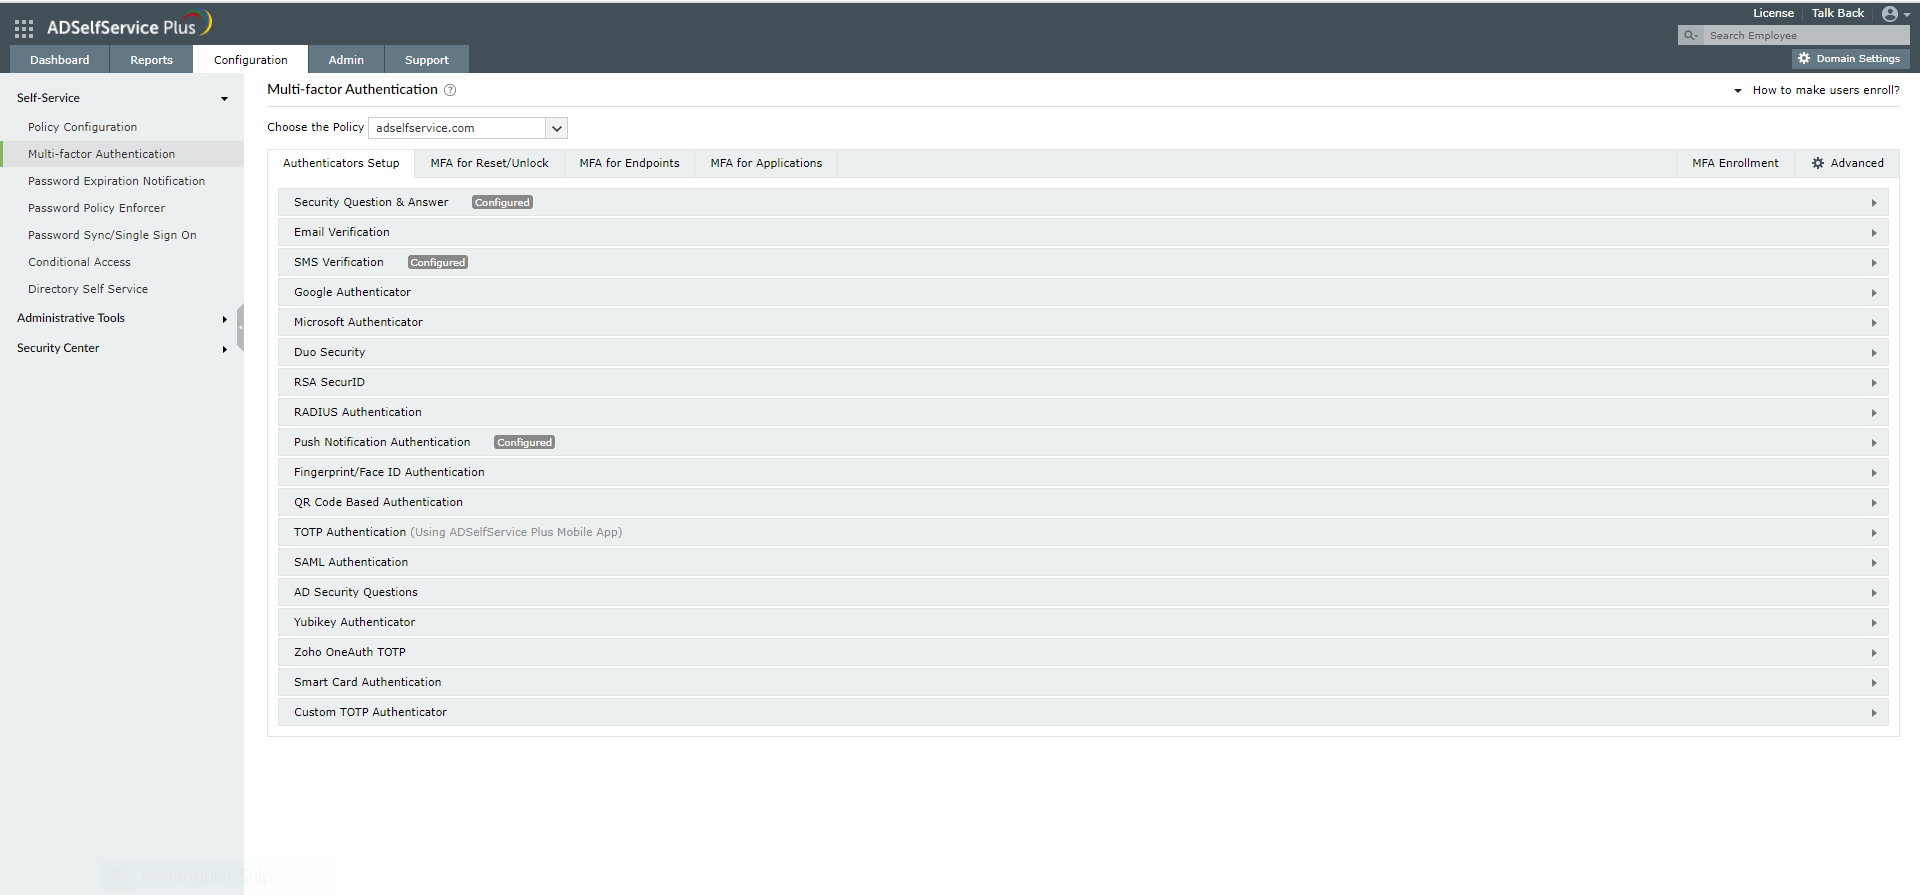
- Go to Configuration → Self-Service→ Multi-Factor Authentication → Authenticators Setup.
- Configure the authentication methods required.
- Go to MFA for Endpoints.
- Select a policy from the Choose the Policy drop-down. This policy will determine the users for whom MFA for ASA will be enabled. To learn more about creating an organizational unit or a group-based policy, click here.
- In the MFA for VPN Login section, select the checkbox next to Select the authenticators required. Choose the number of authentication factors to be enforced. Select the authentication methods to be used. The authentication methods listed can also be rearranged by dragging and dropping them at the necessary position.
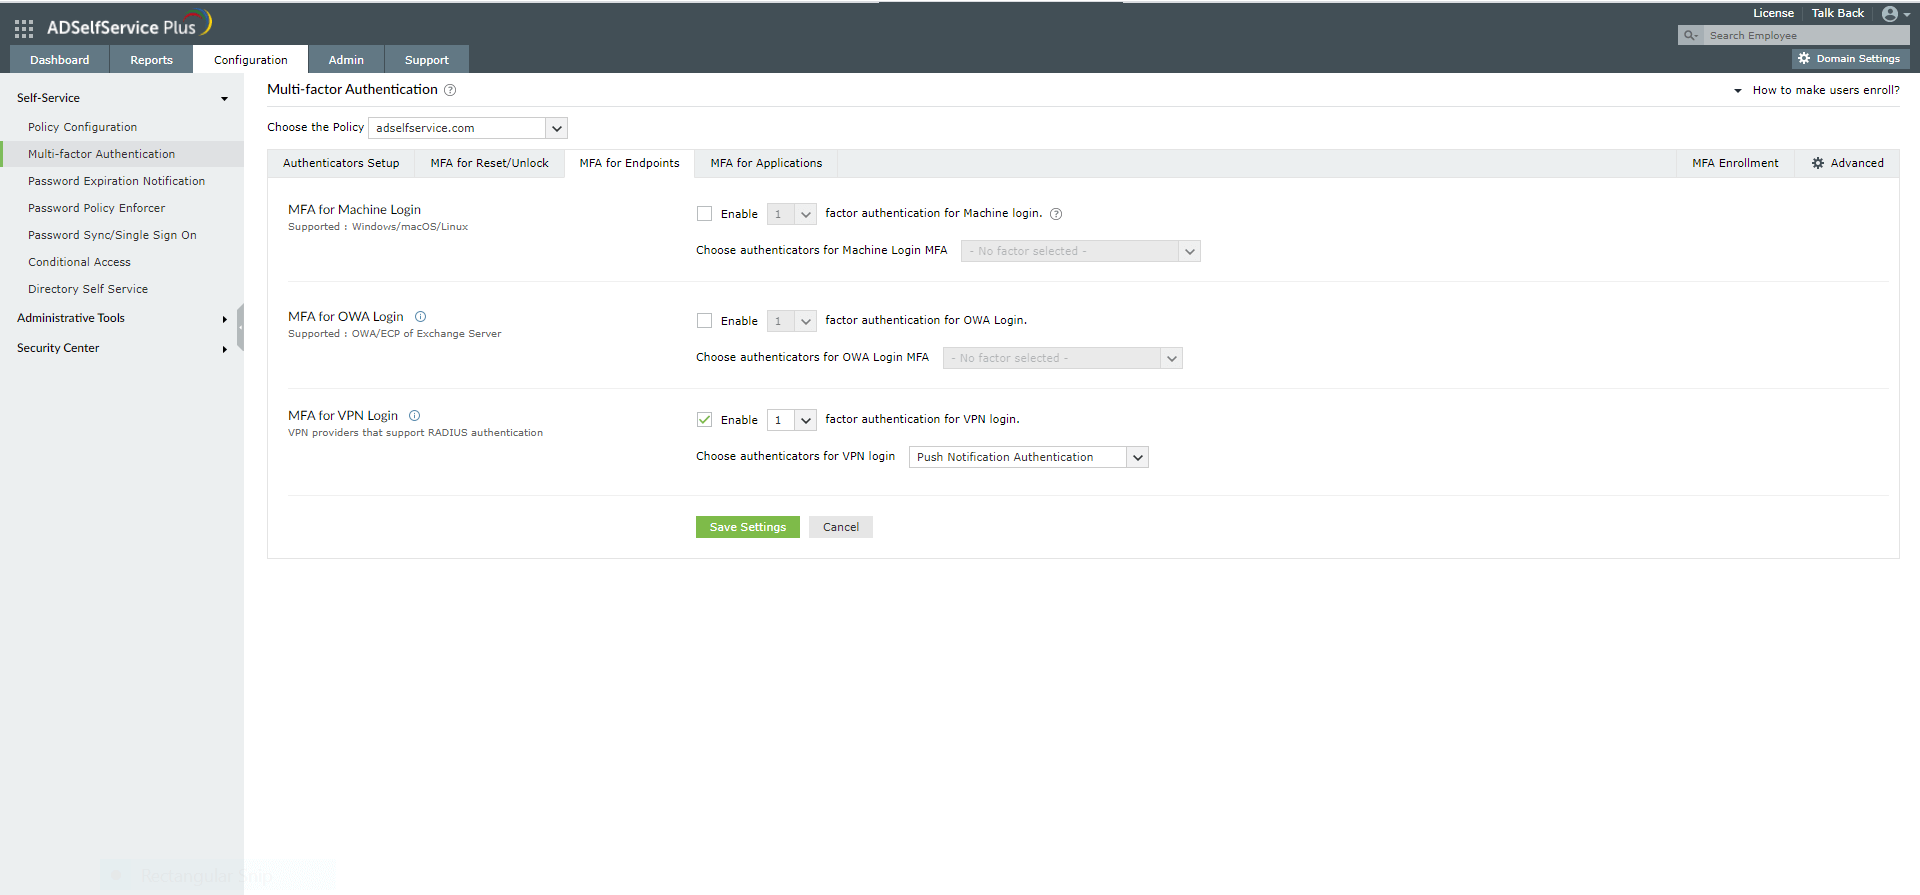
- Click Save Settings.
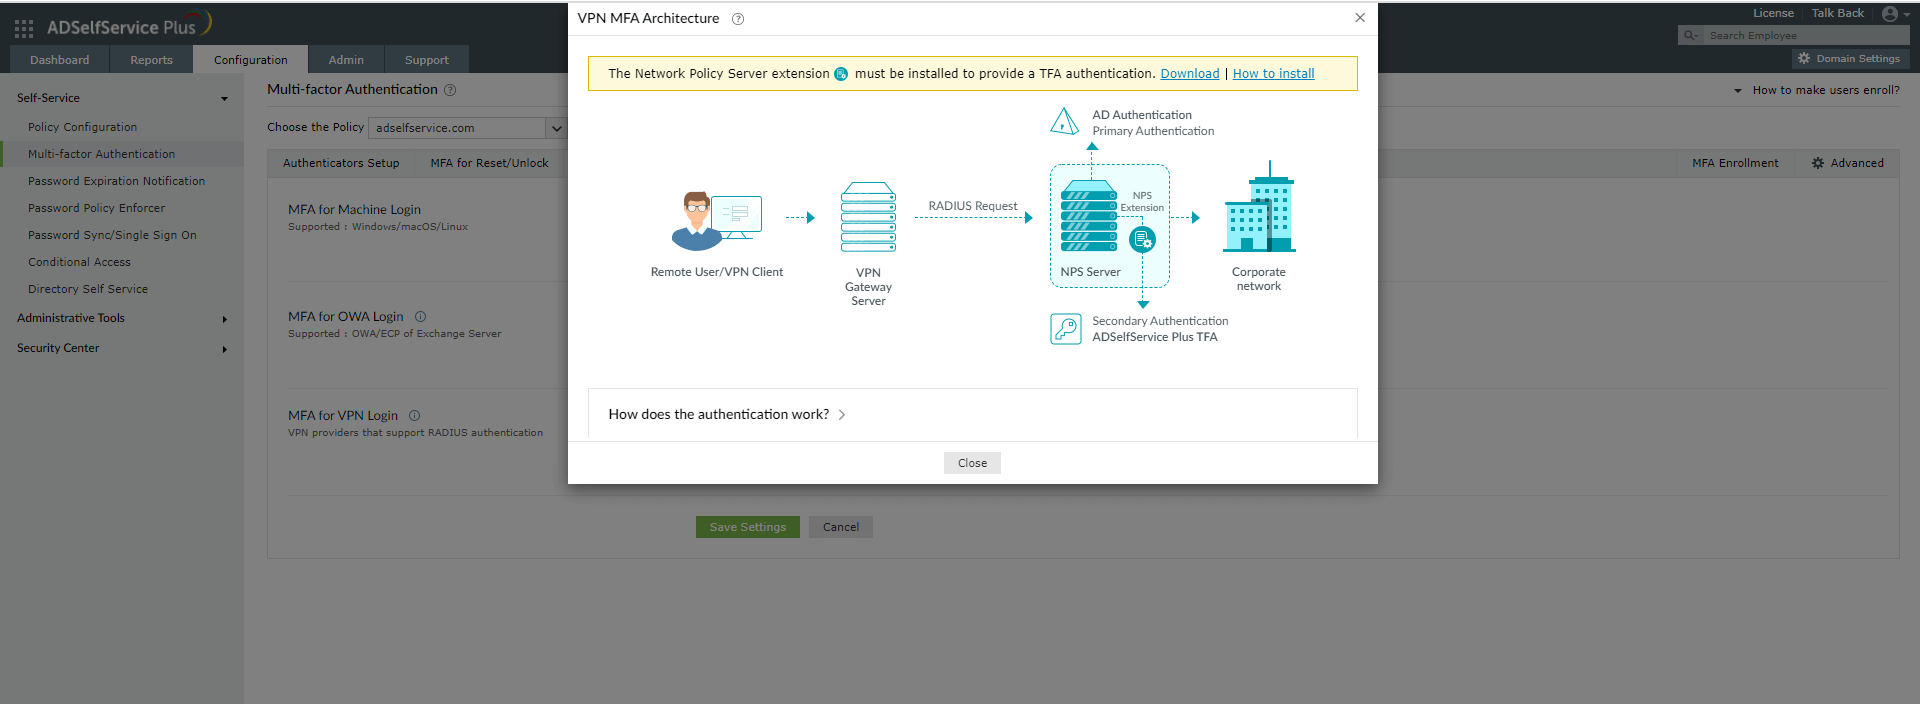
- Click the help icon next to MFA for VPN.
- Download the NPS extension using the Download link provided in the pop-up that appears.
Step 2. Install the NPS Extension
- Copy the extension file (ADSSPNPSExtension.zip) to the Windows server, which you have configured as the RADIUS server. Extract the ZIP file’s content and save it in a location.
- Open Windows PowerShell (x64) as administrator and navigate to the folder where the extension files content is located.
- Execute the following command:
PS C:\> .\setupNpsExtension.ps1 Install
Note: If the NPS extension plug-in has to be uninstalled or updated to newer versions and configuration data, enter Uninstall and Updated respectively instead of Install. - After installation, you will be prompted to restart the NPS Windows service. Proceed with the restart.
- Configure a RADIUS client in the NPS service for ADSelfService Plus. Set a shared secret during configuration for future use during configuration of the Cisco server.
Step 3. Configure your Cisco ASA
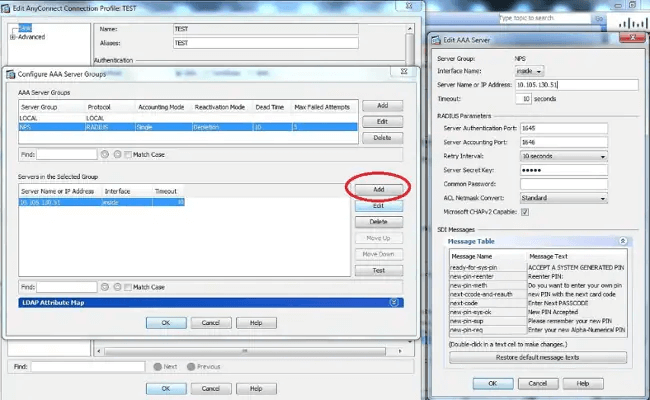
- Navigate to AAA/Local Users → AAA Server Groups, click Add.
- Provide a name for the AAA Server Group and select RADIUS as the Protocol.
- Click OK to create a new server group.

- Select the AAA Server Group just created.
- In the Add AAA Server pop-up that appears, enter the following information:
- Interface name: The ASA interface where the NPS extension can be reached.
- Server Name or IP Address: The hostname or IP address of the NPS server where the NPS extension is installed.
- Timeout: Set a minimum of 60 seconds.
- Server Authentication Port: 1812
- Server Accounting Port: Not required
- Retry Interval: Set for a minimum of 10 seconds.
- Server Secret Key: Enter the shared secret set during RADIUS client configuration under step 2 in the NPS server.
- Microsoft CHAPv2 Capable: Leave this checkbox unselected if using challenge-based authenticators like ADSelfService Plus TOTP Authentication, Google Authenticator, Microsoft Authenticator, and Yubico OTP (hardware key authentication).
- Click OK, and OK again to save the new server.
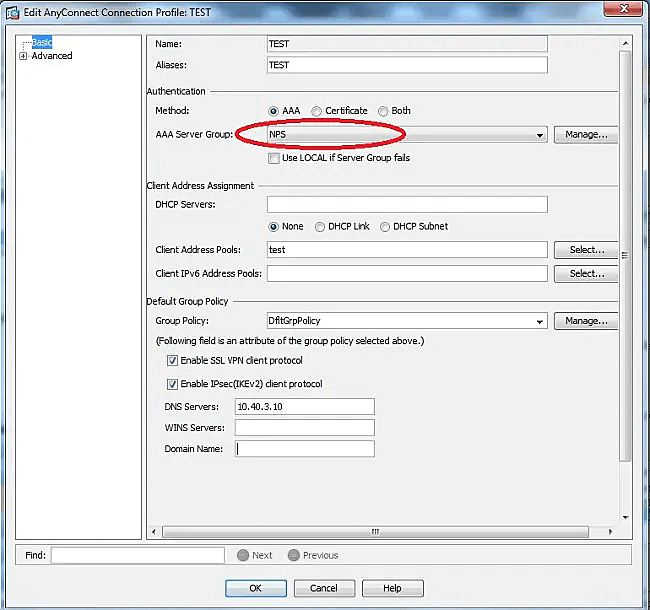
- Go to Network (Client) Access → AnyConnect Connection Profiles.
- Select the connection profile to which you want to add two-factor authentication and click Edit.
- In the Authentication section of the Basic profile settings page, select the AAA Server Group created previously.
- Go to AnyConnect Connection Profiles. Navigate to Advanced > Secondary Authentication, and set Server Group to None.
- Go to Network (Client) Access again, and navigate to AnyConnect Client Profile > Edit > At Preferences (Part 2) and set the Authentication Timeout (seconds) value to 60.
- Uncheck the Use LOCAL if Server Group fails option.
- Click OK, then click Apply.
- Click Save to save all the information in the ASA device memory.

New to ADSelfService Plus?
Related Articles
Configuring MFA for FTD VPN using RADIUS
This guide provides steps for enabling multi-factor authentication (MFA) using RADIUS for Cisco's Firepower Threat Defense (FTD) product using ManageEngine ADSelfService Plus' MFA for VPN feature. To enable RADIUS-based authentication for Cisco FTD, ...Configuring MFA for ISE with RADIUS
This guide provides steps for enabling multi-factor authentication (MFA) using RADIUS for Cisco's Identity Services Engine (ISE) product using ManageEngine ADSelfService Plus' MFA for VPN feature. To enable RADIUS-based authentication for Cisco ISE, ...Common VPN and RADIUS-based endpoints and the ADSelfService Plus authenticators they support
ADSelfService Plus supports the following types of authenticators for VPN MFA: One-way authenticators Push Notification Authentication Fingerprint/Face ID Authentication These authenticators are automatically applicable for all the endpoints ...Multi-factor authentication techniques in ADSelfService Plus
Let's take a look into the various authentication methods supported by ADSelfService Plus for enterprise multi-factor authentication (MFA). Why should you use MFA? Authentication based solely on usernames and passwords is no longer considered secure. ...Updating cached credentials in ADSelfService Plus through a custom VPN
ADSelfService Plus can automatically update the locally cached credentials on remote user machines as and when users reset their passwords. To update cached credentials, ADSelfService Plus requires the Windows login agent bundled with the product and ...