Configuring SAML with Azure (New)
Step 1:
Open the Azure Portal--->Enterprise Applications.
Step 2:
Select the created Enterprise Application and get started with Set up Single Sign-On.
Step 3:
Edit the basic SAML Configuration.
Step 4:
Copy the Entity ID from SDPMSP and place the entity ID in Azure Identifier.
Copy the Assertion Consumer URL from SDPMSP and place the url in Azure Reply URL
Copy the Single Log Out Service URL from SDPMSP and place the url in Azure Log Out URL.
Copy the Assertion Consumer URL from SDPMSP and place the url in Azure Reply URL
Copy the Single Log Out Service URL from SDPMSP and place the url in Azure Log Out URL.
Step 5:
Edit the Attribute Claim Section
Step 6:
Select the required claim name
Step 7:
Enter the name id format and the same format should be used in SDPMSP
For the Transient and Persistent source attribute will be user.display name.
For the E-mail Address source attribute will be user.mail.
Step 8:
Edit SAML Certificates
Download the Raw Certificate File and this file should be uploaded in SDPMSP.
Step 9:
Under Set up SAML
Copy the login and log out URL and paste it in SDPMSP
Under Set up SAML
Copy the login and log out URL and paste it in SDPMSP
Step 10:
Save the configuration in SDPMSP.
Now the user will be able to log in via.SAML with Azure.
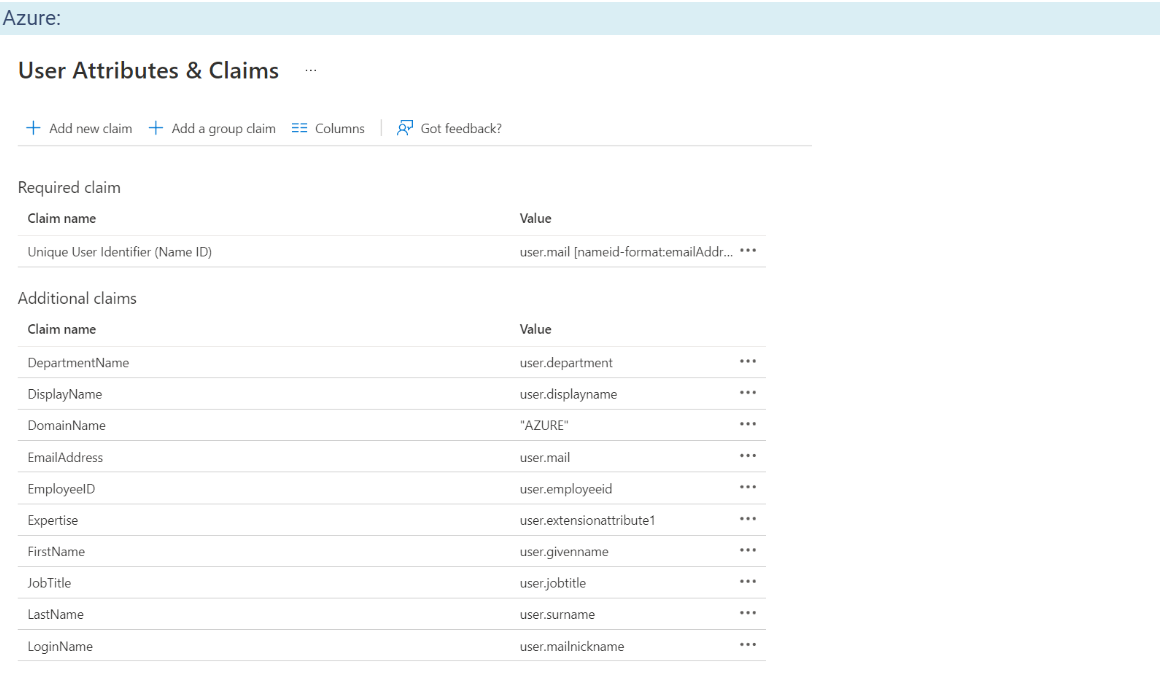
Additional Attributes in Azure:
In SDP we just need to fill the "SDP field" vs the "Claim name" mapping. From the IDP side, we also need to map the "Claim name" vs "Claim Attribute". In simpler terms, we need to provide the claim name ("EmailAddress") on the left and choose the attribute/value that we want to send ("user.mail") on the right. Let's look at the configuration from a few popular IDPs.
New to M365 Manager Plus?
New to M365 Manager Plus?
New to RecoveryManager Plus?
New to RecoveryManager Plus?
New to Exchange Reporter Plus?
New to Exchange Reporter Plus?
New to SharePoint Manager Plus?
New to SharePoint Manager Plus?
New to ADManager Plus?
New to ADSelfService Plus?
Related Articles
How to configure SAML with Azure AD
This guide will help us configure SAML for users who want to use Azure AD as their IdP and also give you insights on a few issues that you might run into while configuring SAML in an Azure Environment. In an ideal environment, customers will have an ...How to configure SAML with Azure AD
This guide will help us configure SAML for users who want to use Azure AD as their IdP and also give you insights on a few issues that you might run into while configuring SAML in an Azure Environment. In an ideal environment, customers will have an ...How to configure SAML with Azure AD
This guide will help us configure SAML for users who want to use Azure AD as their IdP and also give you insights on a few issues that you might run into while configuring SAML in an Azure Environment. In an ideal environment, customers will have an ...How to Configure SAML for Hybrid Azure AD in SDP
This article provides a workaround for older SDP builds (below 11200) alone that did not support EmailAddress as the NameID format. Moreover, this workaround is applicable only for environments that sync their On-Premise AD users to their Azure using ...Configuring SAML with ADFS
Step 1: Open the ADFS management application Step 2: Right-click Relying Party trust and choose Add Relying Party Trust. The Add Relying Party Trust Wizard opens. Step 3: Choose Claims Aware and click Start Step 4: Choose Enter data about the relying ...