Azure DevOps Integration
PFA for the files referred in below document
ServiceDeskPlus --> Azure DevOps
Create a new work-item in Azure DevOps when a request is created in SDP (using Custom Trigger + Python script)
Create a Custom Trigger to execute a python script on request creation, to create a work item in Azure DevOps .
Move create_work_item.py file to [Application Home]/integration/custom_scripts folder
Place the text file in [Application Home]/integration/custom_scripts/executor_files directory
Executor file content py create_work_item.py $COMPLETE_V3_JSON_FILE, save it as create_work_item.txt
Now for the script to run, we need to configure and set the access_token
To fetch an access_token, first we need to register an App in AD, follow either of the links below.
https://www.ecanarys.com/Blogs/ArticleID/354/Authorize-access-to-VSTS-REST-APIs-with-OAuth-2-0
After the registration, we get App ID, Client Secret and required scope as selected which will be used to fetch an authorization code
Now we need to authorize the registered app with the following URL
1. https://pitstop.manageengine.com/support/manageengine/undefined &state={state} &scope={scope}&redirect_uri={callback URL}
Replace the below specified parameters with respective values,
{appID} --> client id
{state} --> Username
{scope} --> vso.work_full
{callback URL} - based on your configuration
Please find the example link below,
Example:
https://app.vssps.visualstudio.com/oauth2/authorize?client_id=C0FF5274-091D-4C59-96F0-CC65837CB1A9&response_type=Assertion &state=user1&scope=vso.work_full&redirect_uri=https://9c20f2fffcea.ngrok.io/
Access the above constructed endpoint URL in a browser and you would see a similar page as shown in the below image,
Click on accept and we'll be redirected to the call back url with the auth_code in the url
https://{callbackurl}/?code={authorization_code}&state=user1
Get the auth code and replace it with key in the azureDevopsSecurityConfig.json file "auth_code" as well as Client secret Key from the registered app with the key "client_assertion"
2. Now the configuration is done, as the request is created the trigger runs the script and fetches the access_token and refresh_token using the auth_code and invokes the api to AD to create a work item.
3. For this to be done move the devopsProjectConfig.json, priority.json, azureDevopsSecurityConfig.json files to sdp_home/integration/custom_scripts folder and update the file as follows
devopsProjectConfig.json defines the project settings such as project name, username, work item type and redirect url
eg:
{"project_name":"FinTech", "user_name":"user10371", "workitem_type":"issue", "redirect_url":"https://9c20f2fffcea.ngrok.io%22%7D/
project name & username can be found in the project page of AD like below:
priority.json defines the priority mapping with SDP and AD
eg:
{"High":1,"Medium":2,"Normal":3,"Low":4}
azureDevopsSecurityConfig.json defines the auth_code and client_assertion
4. On the other part we need to create a trigger in Azure DevOps to hit the SDP REST API on status change of the work item
and for that we'll be storing a custom field in work item called 'sdp_request_id' and to add this custom field follow
5. Move AzureDevOps.jar to sdp_home/integration/lib folder
6. Move AppIntegrations_Handler_Custom.xml to sdp_home/integration/conf folder
7. Once work-item is created we are capturing the success/failure message under Request History
Once the requested is created as Work Item in AD here is how it looks
Note: Restart the SDP server.
Azure DevOps --> ServiceDeskPlus
Steps:

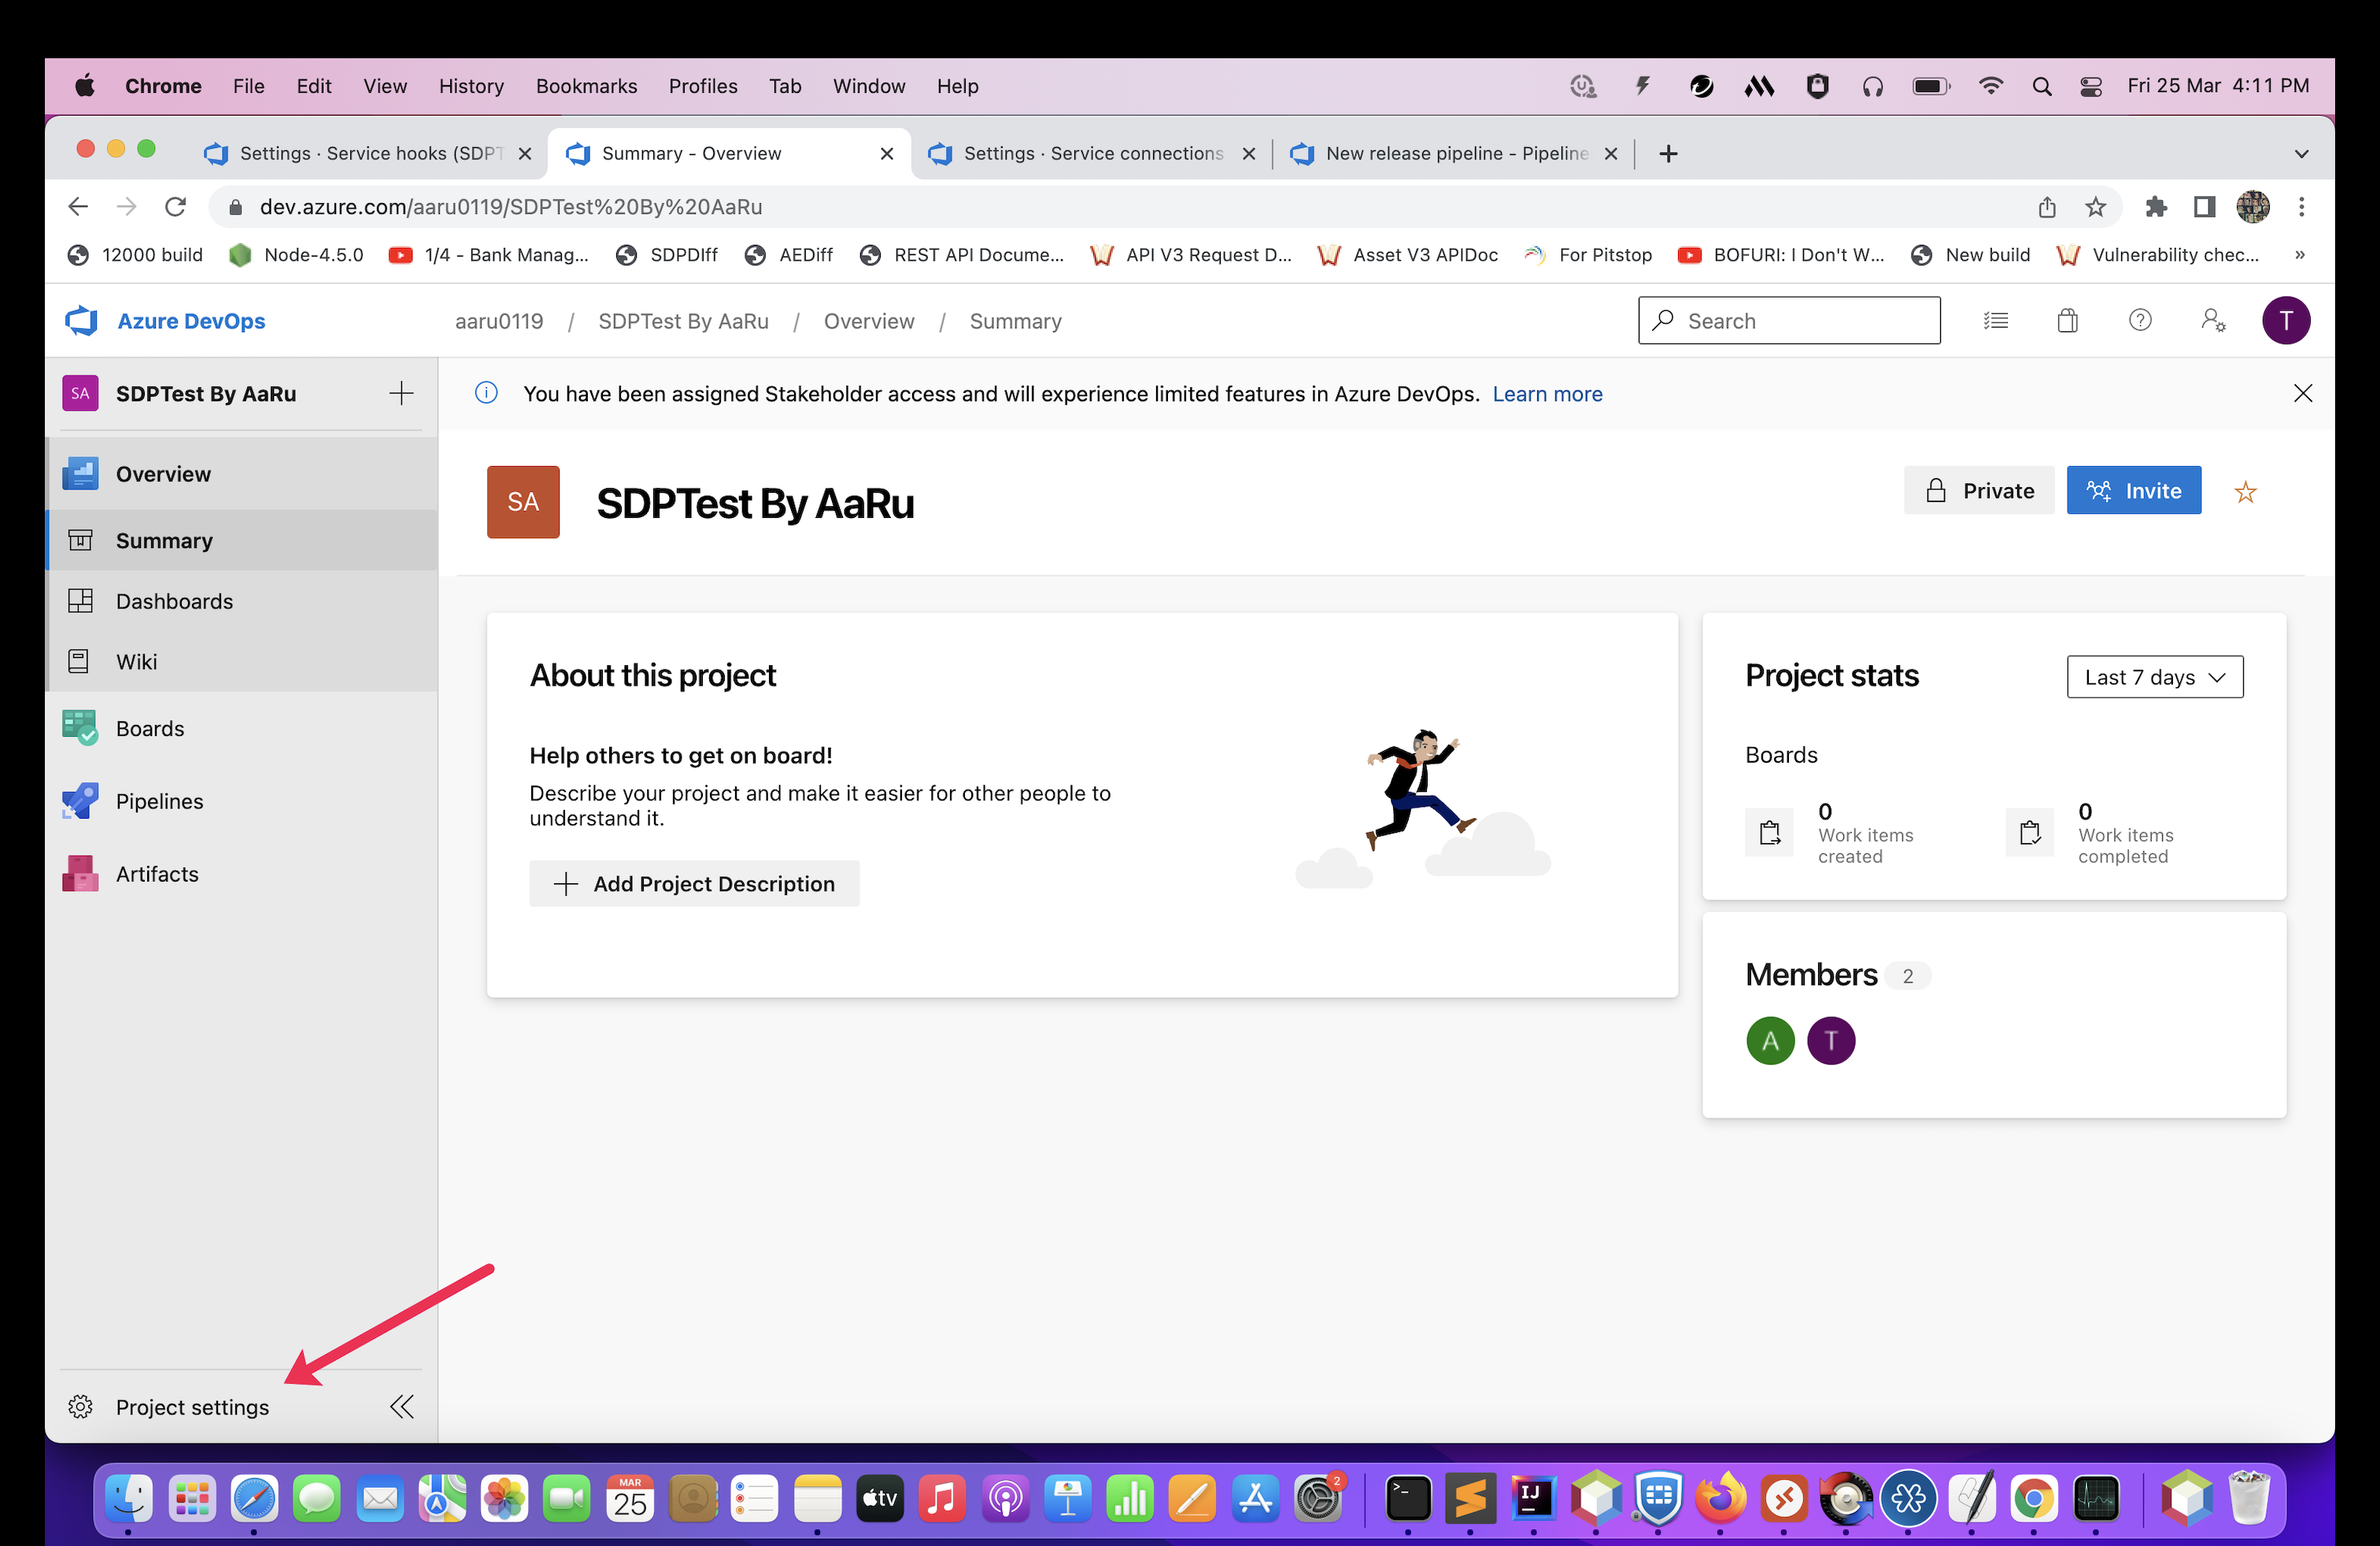
6. Now Go to your project in Azure DevOps account.
7. Go to Project settings>Service hooks


Updating Comments and closing the ticket from Azure DevOps to SDP after adding worklogs and resolution:
Execution steps:
1. Download the attached zip
2. Create a new Callback function from admin settings.
3. Check on publish checkbox and add the API name.
4. Add the parameters as resource and detailedMessage with type as Map for both.
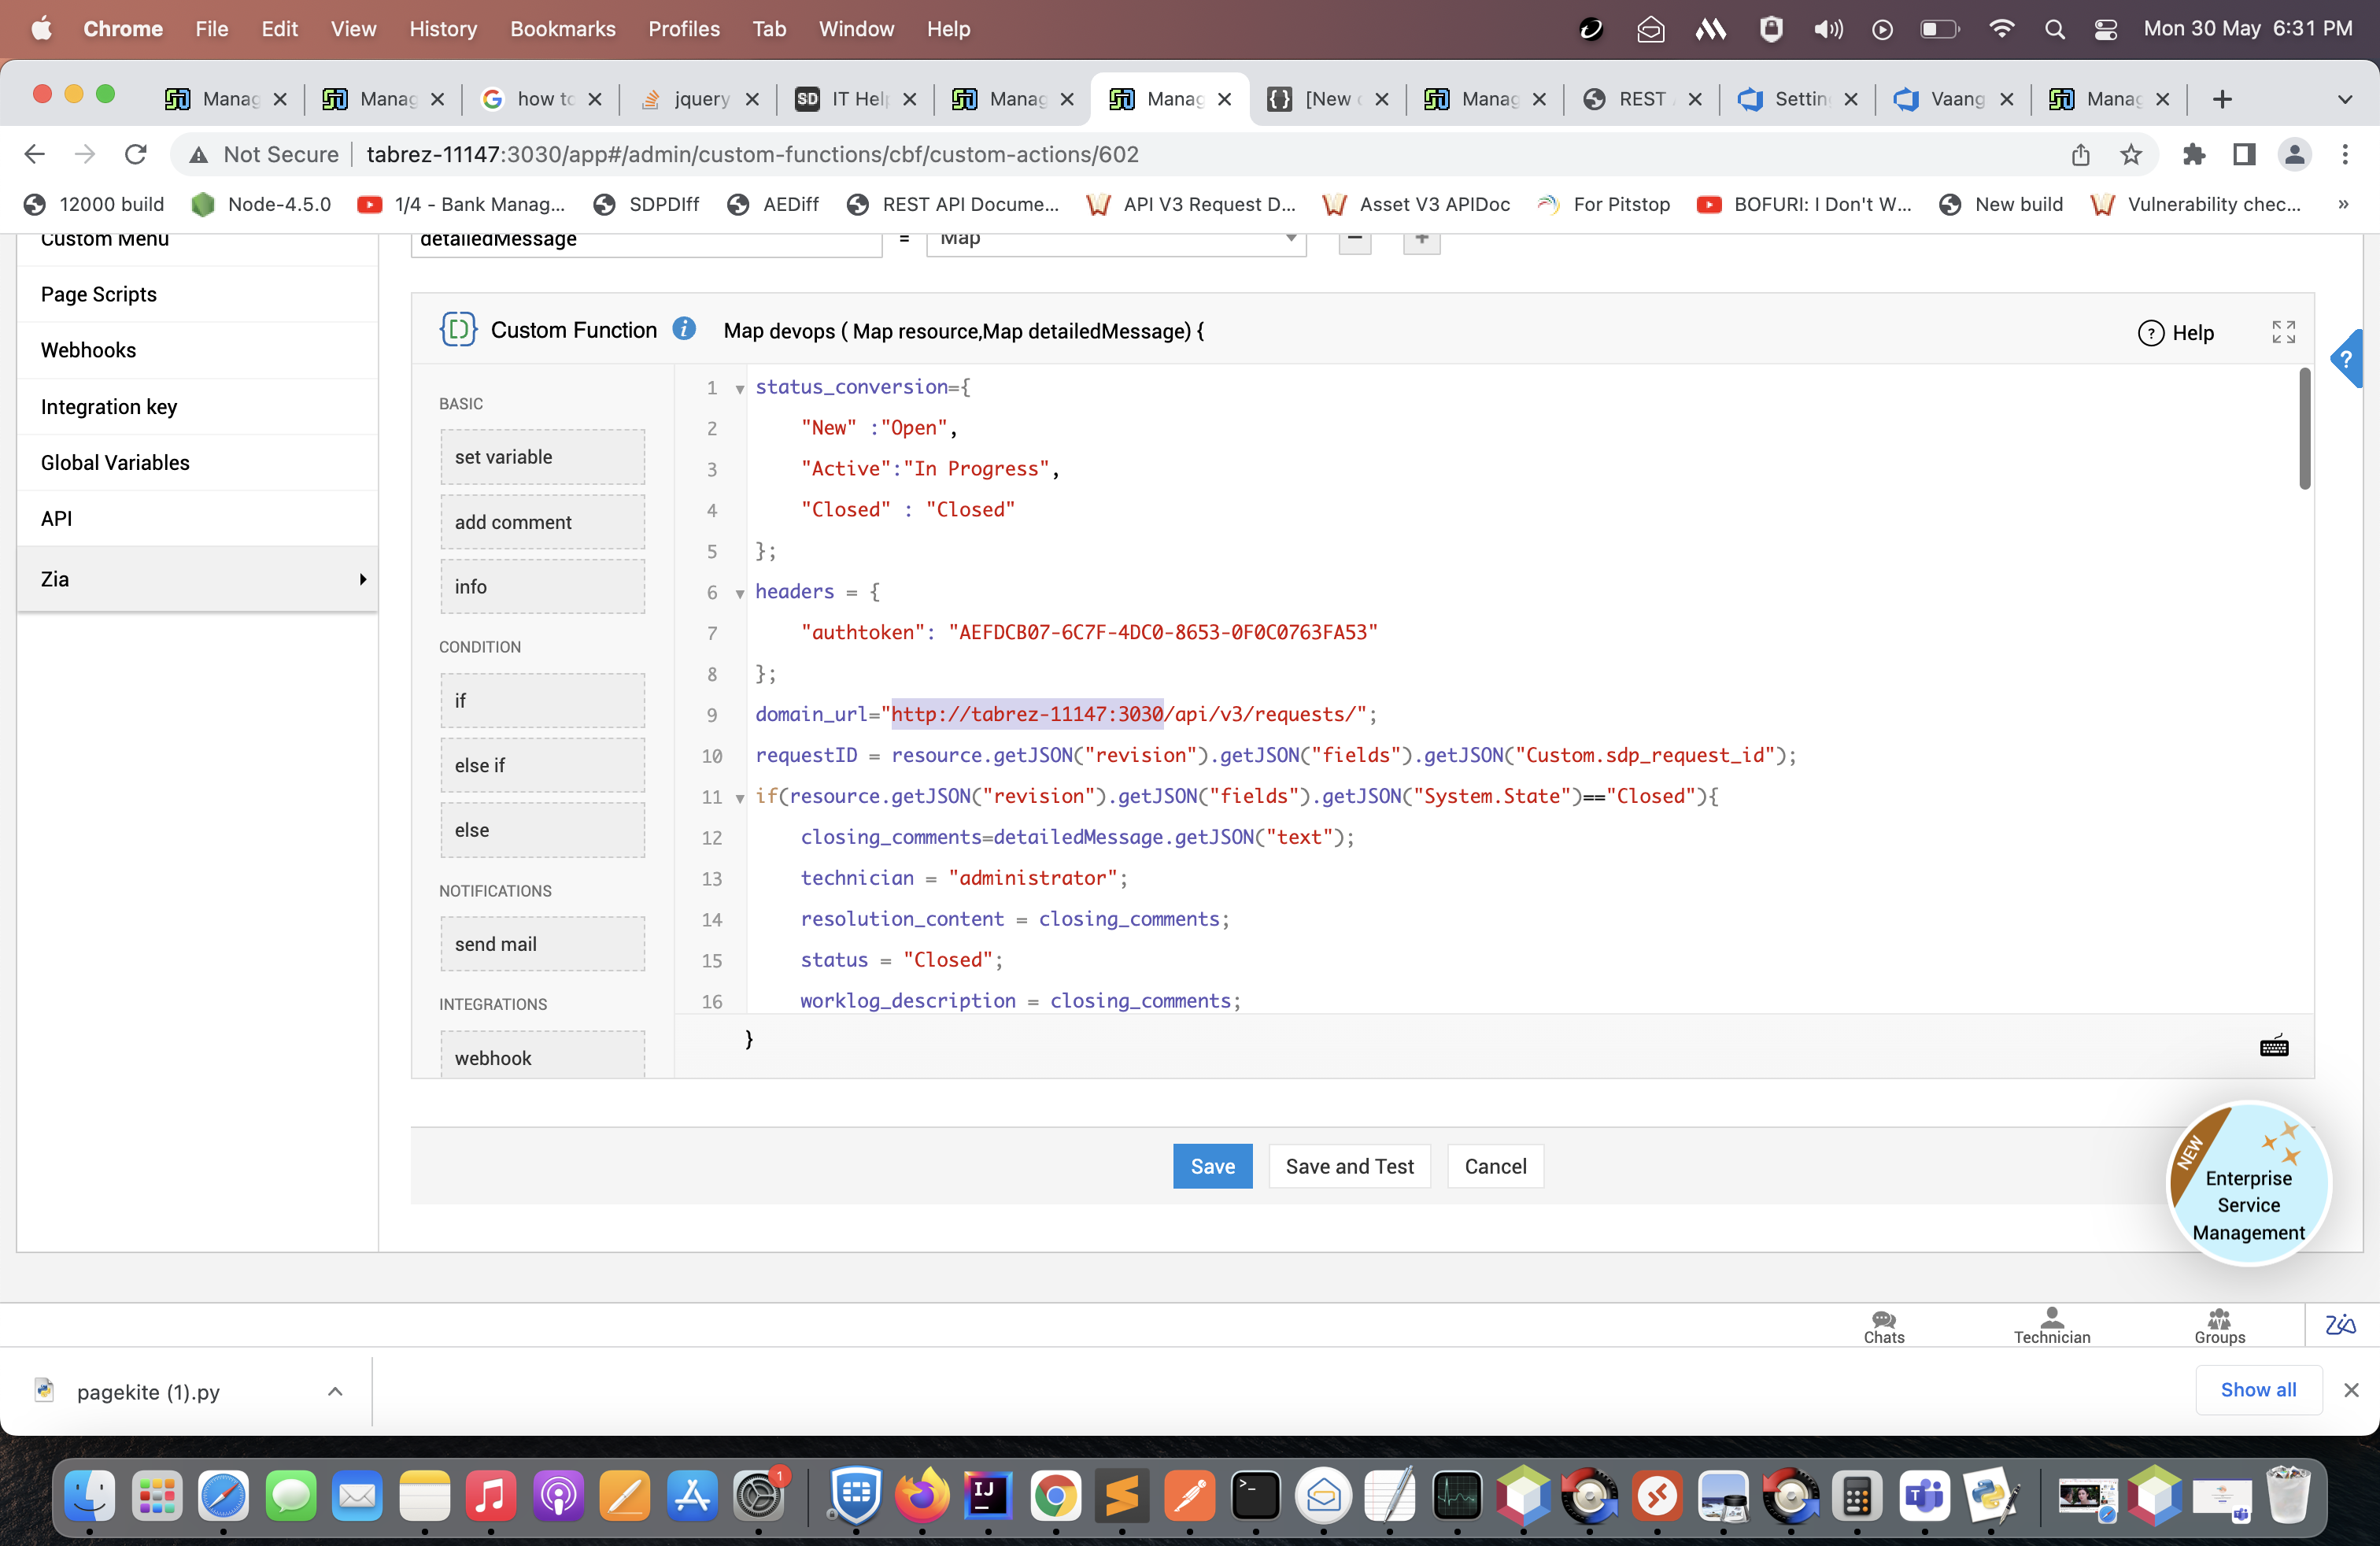
5. Copy the code from the ticket_closure text file and paste it in coding section of Callback function. Replace the domain name (highlighted part in the screenshot) with user's SDP domain name at all the positions in the code and integration key (authtoken) with user's integration key (User can generate this key at admin settings>Integration key).
6. Make sure to check the id in worklog_input_data (highlighted in the screenshot) is the id of the user who wants to create the work lo
7. Once it's saved, reopen the saved callback function, copy the "Url to execute this custom function", this will be used in DevOps.
8. Now Go to your project in Azure DevOps account.
9. Go to Project settings>Service hooks
10. Click on new subscriptions button and select Web hooks and click on next.
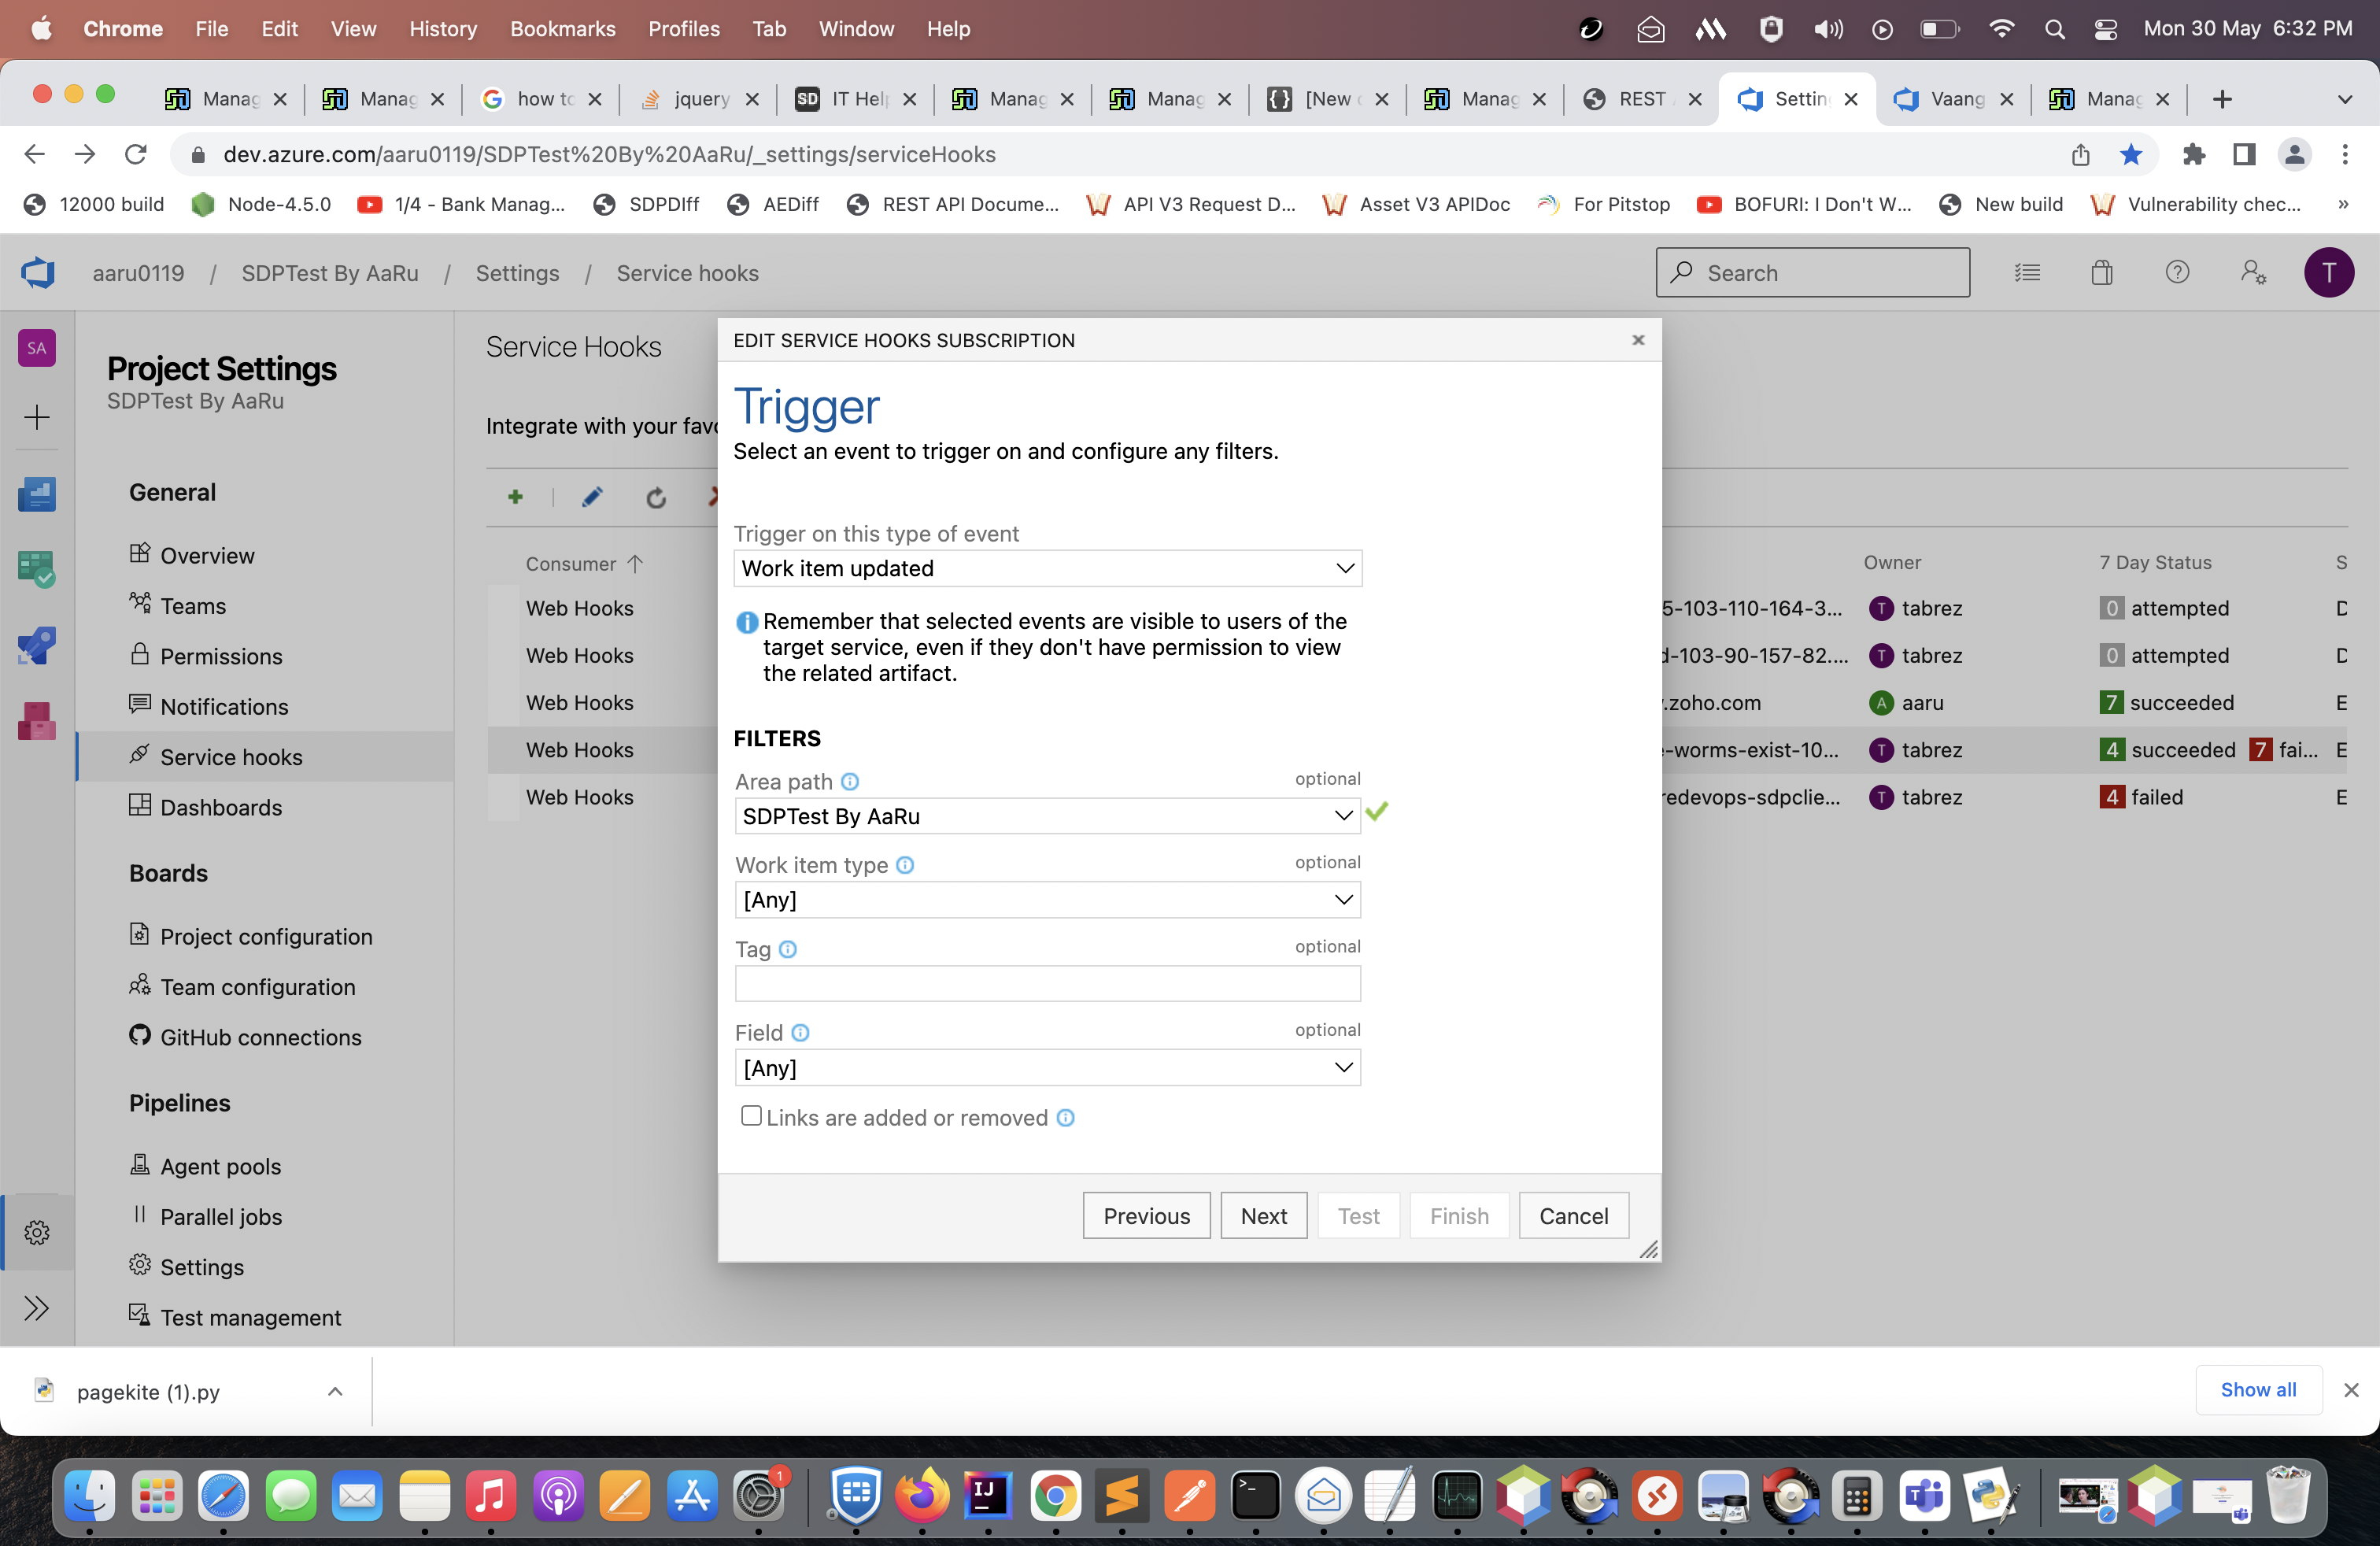
11. Select trigger as "Work item updated" and Area path as working project. Click on next.
12. Paste the callback function Url, and check the checkbox related to SSL. And click on finish.
Note:
1. Custom Mandatory fields won't be handled by this code.
2. The ticket will be closed by the user who generated the integration key. It doesn't take who closes the ticket in Azure, but it will be mentioned as a closure comment and resolution as shown
New to ADSelfService Plus?
Related Articles
How to configure SAML with Azure AD
This guide will help us configure SAML for users who want to use Azure AD as their IdP and also give you insights on a few issues that you might run into while configuring SAML in an Azure Environment. In an ideal environment, customers will have an ...How to configure SAML with Azure AD
This guide will help us configure SAML for users who want to use Azure AD as their IdP and also give you insights on a few issues that you might run into while configuring SAML in an Azure Environment. In an ideal environment, customers will have an ...How to configure SAML with Azure AD
This guide will help us configure SAML for users who want to use Azure AD as their IdP and also give you insights on a few issues that you might run into while configuring SAML in an Azure Environment. In an ideal environment, customers will have an ...MS Intune Integration using Script - v1
This article guides you through the process of integrating Intune data into SDP using a Python script. Prerequisites: - Python 3.6 or above Ensure Python is installed and added to your PATH. Use python --version or python3 --version to verify. ...How to Configure SAML for Hybrid Azure AD in SDP
This article provides a workaround for older SDP builds (below 11200) alone that did not support EmailAddress as the NameID format. Moreover, this workaround is applicable only for environments that sync their On-Premise AD users to their Azure using ...