[Tips & Tricks] Quick actions in ServiceDesk
As the name suggests you can do all the basic ServiceDesk Plus actions quickly in a single click using the Quick Actions option.
Being a ServiceDesk Plus admin or technician, you should be doing a lot of multi-tasking on a day to day basis.
While working on an Incident you might be getting the task of scanning a new asset or send a quick message regarding an outage or add a new software license or add a new solution in the application.
In such scenarios, switching to other modules and going to the corresponding option should be a few clicks away. But, all the above actions can be done in a single click from the Quick Actions menu be it anywhere in the application from any of the modules.
In such scenarios, switching to other modules and going to the corresponding option should be a few clicks away. But, all the above actions can be done in a single click from the Quick Actions menu be it anywhere in the application from any of the modules.
As an admin, you can do all of the below actions in a single click.
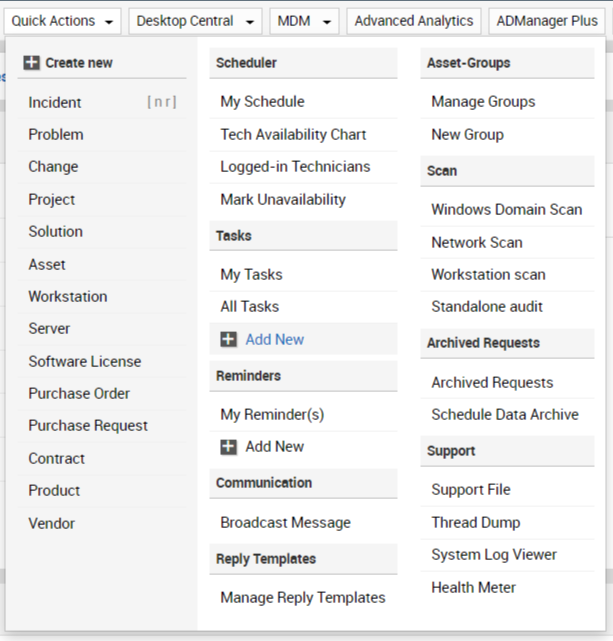
There are two sections in the menu as shown below:
1. Where you can create new:
>> Incident
>> Problem
>> Change
>> project
>> Solution
>> Asset
>> Workstation
>> Server
>> Software Lincense
>> Purchase Order
>> Purchanse Request
>> Contract
>> Product
>> Vendor
>> Problem
>> Change
>> project
>> Solution
>> Asset
>> Workstation
>> Server
>> Software Lincense
>> Purchase Order
>> Purchanse Request
>> Contract
>> Product
>> Vendor
2. Where you can perform other essential activities:
Scheduler:
>> View your scheduler
>> Tech availability chart
>> Logged-in technicians list
>> Mark unavailability of technicians
>> View your scheduler
>> Tech availability chart
>> Logged-in technicians list
>> Mark unavailability of technicians
Tasks:
>> Access to all Tasks
>> Access your tasks
>> Create a new task
Reminders:
>> View your Reminders
>> Add a new Reminder
>> Access to all Tasks
>> Access your tasks
>> Create a new task
Reminders:
>> View your Reminders
>> Add a new Reminder
Communication:
>> You can quickly broadcast a message among the technicians regarding server maintenance, power outage, etc.
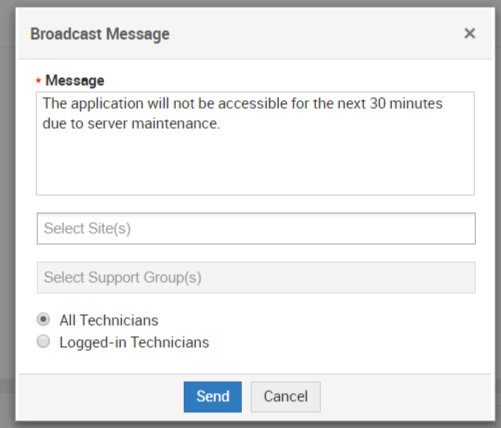
This can be shown to site-based/group based/logged-in technicians/all technicians.
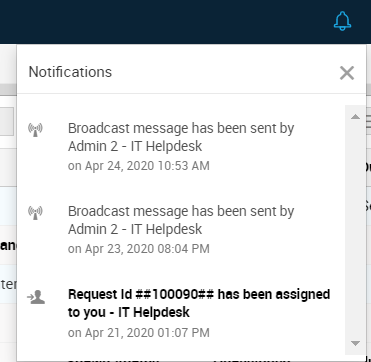
>> The message which you broadcast will be shown to all the logged-in technicians as
a pop-up message.

>> For non-logged in technicians, the pop-will not be shown but they can view it under the notifications after they log in.
This option is available only in the Quick Actions section of the application.
Reply Templates:
>> View all/public/private reply templates and manage them in a click.
An SDAdmin can view and edit all the reply templates. (From build 11100)
A technician with the Helpdeskconfig role also can view and edit all reply templates. (From build 11110)
The rest of all the technicians can view all the Public templates and their Private templates.
Asset Groups:
>> Create a new Asset Group
>> Manage existing asset groups.
Scan:
>> Create a new Asset Group
>> Manage existing asset groups.
Scan:
>> Perform Windows Domain Scan, Network Scan, Workstation Scan, and Standalone Audit.
Also, note that the Standalone Audit option is available only from the Quick Actions menu in the application; the rest of all scan options available under the Admin tab.
Archived Requests:
>> View the Archived Requests list
>> Schedule Data archive/ access Data Archiving settings
Support:
Also, note that the Standalone Audit option is available only from the Quick Actions menu in the application; the rest of all scan options available under the Admin tab.
Archived Requests:
>> View the Archived Requests list
>> Schedule Data archive/ access Data Archiving settings
Support:
All the basic details required by ServiceDesk Plus support team are available under the Support section which you can get it in a click and provide it to the Support team for analysis.
>> You can create a Support file (helps to analyze the logs for all type of issues)
>> Create a Thread Dump (helps to analyze performance-related issue)
>> System Log viewer (helps to see all the actions performed in the application along with the time and the name of the user who performed it)
>> Health Meter (Gives an overview of the health of the application as well as important application details like Build info, DB details, Server details, etc)

An SDAdmin can view all the above-said options from the Quick Actions section, however, the view gets changed for every technician based on the access permission (based on the roles that are assigned to them) they have over the application.
Start using the Quick Actions and you will see a change in the way the application works for you!
Let us know how well this helped you in your day to day application access!!
Start using the Quick Actions and you will see a change in the way the application works for you!
Let us know how well this helped you in your day to day application access!!
previous topic - [Tips & Tricks]Achieving maximum success with Employee Onboarding
