[Tips & Tricks] How to enable smart card authentication in ADSelfService Plus?
How about a hassle-free, passwordless, yet secure login to ADSelfService Plus?
If your organisation already utilises smart cards/PKI/certificates as an authentication system, the sensible choice would be for you to use the smart card authentication option in ADSelfService Plus to verify users' identities. This option enables ADSelfService Plus to authenticate users by comparing the certificate file in their machine with that in Active Directory. The authenticated users will then be automatically logged into the ADSelfService Plus web console with a click on the Smart Card link.

Smart card authentication
This article gives you the step-by-step instructions to enable smart card authentication in ADSelfService Plus.
Prerequisites:
- SSL must be enabled for configuring smart card authentication. To enable SSL, navigate to Admin > Product Settings > Connection. Select the Enable SSL Port [HTTPS] checkbox, and specify the port number. Click Save.
- Obtain the CA Root Certificate from the Certificate Authority. You will need this file while configuring the smart card authenticator. So, save this file and keep it safe.aTo download the certificate file from the Certificate Authority’s website, visit http://<CertificateAuthorityServerName>/certsrv/.Note: Replace ‘CertificateAuthorityServerName’ in the URL with the name of your certificate server.
Configuration steps:
- Log into the ADSelfService Plus web console with admin credentials.
- Navigate to Admin > Customize > Logon Settings.
- Click the Smart Card Authentication tab.
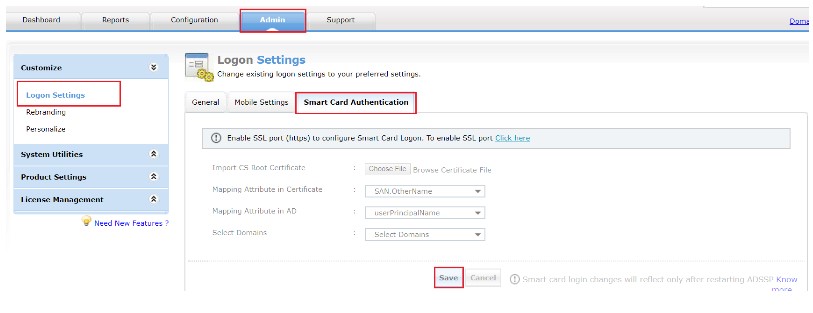
Connection Configurations
- In the Import CA Root Certification field, click Browse to import the required Certification Authority root certification file (X.509 certificate). Refer step 2 of prerequisites.
- In the Mapping Attribute in Certificate field, select a unique attribute in the certificate for mapping.
- Ensure that a unique attribute from the certificate is mapped to a unique attribute in Active Directory. Both attributes must have the same values.
- ADSelfService Plus provides the ability to select any attribute of the smart card certificate that uniquely identifies a user. You can choose any attribute among SAN.OtherName, SAN.RFC822Name, SAN.DirName, SAN.DNSName, SAN.URI, email, distinguishedName and CommonName. In case other attributes are used to uniquely identify the user in your environment, enter the attribute name in the text box provided and click the '+' icon.
- In the Mapping Attribute in AD field, specify the LDAP attribute that should be matched with the specified certificate attribute.
- Here you need to specify the particular LDAP attribute that uniquely identifies the user in Active Directory.E.g., sAMAccountName.
- During authentication, ADSelfService Plus reads the value corresponding to the certificate attribute that you specified in the certificate's mapping attribute and compares it with the specified mapping attribute in AD.
- In the Select Domains field, select the domains for which you wish to enable smart card authentication from the drop down menu.
- Click Save.
- Restart ADSelfService Plus for the changes to take effect.
That's it! Users can now use their smart cards to log into ADSelfService Plus!
Like this tip? Get the most out of ADSelfService Plus by checking out more tips and tricks here.
