[Tips and Tricks] How to integrate ServiceDesk Plus with ADSelfService Plus?
By integrating ServiceDesk Plus and ADSelfService Plus, you get to:
1. Automate ticket creation in ServiceDesk Plus for every self-service operation performed by end users using ADSelfService Plus. This empowers help desk technicians to keep track of users' self-service actions, and follow-up on them, if needed.
2. Provide single sign on to ServiceDesk Plus through ADSelfService Plus. This one-click access offers enhanced user experience, as the users do not have to login multiple times to access different applications.
Steps involved:
Step 1: Link ServiceDesk Plus with ADSelfService Plus
- Download and install ServiceDesk Plus.
- Log into ADSelfService Plus web-console with admin credentials.
- Navigate to Admin tab > Product Settings > Integration Settings.
- Click the ServiceDesk Plus tile.
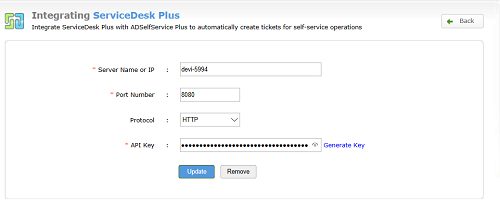
- In the Server Name or IP field, enter the name of the server in which ServiceDesk Plus is installed.
- Enter the Port Number used by ServiceDesk Plus.
- Select a Protocol (HTTP/HTTPS) from the drop-down list.
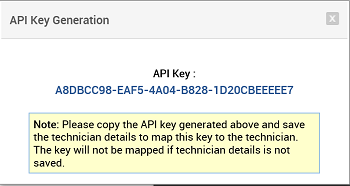
- Enter the API Key generated in ServiceDesk Plus for a technician with login permissions.
- Click Update.
Upon integration, carry out the below steps to configure automatic ticket creation.
Step 2: Configure automatic ticket generation
- Click the Configurations tab in the ADSelfService Plus web-console.
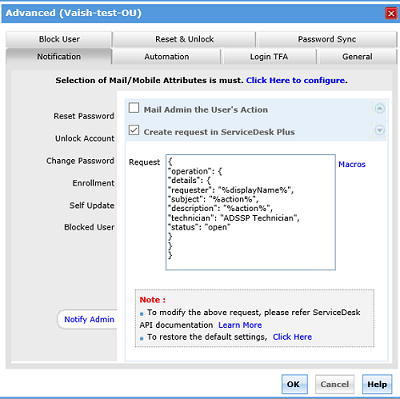
- Under Available Policies, click the Advanced Settings icon corresponding to the Policy that you wish to edit.
- Navigate to Notification tab > Notify Admin.
- Select the Create request in ServiceDesk Plus check box. Define the attributes of the request and enter them in JSON format.
To learn more about the different attributes that can be used in the request, follow the below steps.
- Log into ServiceDesk Plus.
- Navigate to Admin > General Settings > API.
- Click the Documentation link.
- Click the Request tab. A comprehensive list of all the attributes that can be used in a request are catalogued here.
- Click OK.
Your help desk technicians can now track the user’s self-service operations through ServiceDesk Plus with the automatically created tickets in the Requests tab.
 Automatically created tickets
Furthermore, users can now instantly access ServiceDesk Plus portal from the ADSelfService Plus, by clicking the Helpdesk tab.
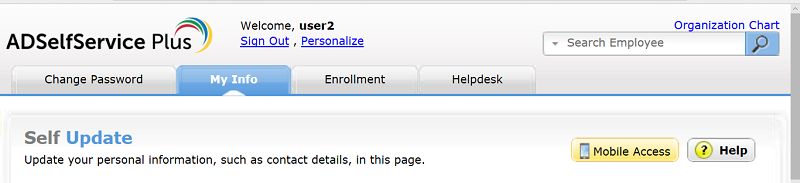 ADSelfService Plus’s self-service portal after integrating it with ServiceDesk Plus
Like this tip? Get the most of ADSelfService Plus by checking out more tips and tricks here.
